Before we go on to tell how, let us describe what are returns, refunds and credit notes in MGR. Usually, in an accounting software, a refund is the second stage of a credit note on a paid invoice. Whereas a due invoice can be revised with a credit note and after revising, the invoice can be paid while no refund is needed later.
In MGR, we have classified both scenarios as returns and credit notes.
- Returns are processed on paid invoices which include refund of any associated payment in the same process.
- Credit notes are created on due invoices to revise which do not need refund as they have not been paid.
Keeping that in mind, POS orders in MGR can not have credit notes as they are completely paid. You can only process returns and refunds on a POS order. While you can do both process returns/refunds and create credit notes against ticket invoices depending on if they are paid or due.
So how would you do that? Let’s go one by one.
How to process Returns and Refunds in MGR?
Depending on your return policy, you might need to create returns for customers to return purchased items and refund a customer’s payment or give them credit so they can use that towards another purchase. If you refund orders quickly and effectively, then you show your commitment to customer service and might encourage customers to order again.
In MGR you can refund money back to the customer via cash, credit card, cheque or customer credit/account etc.
Steps:
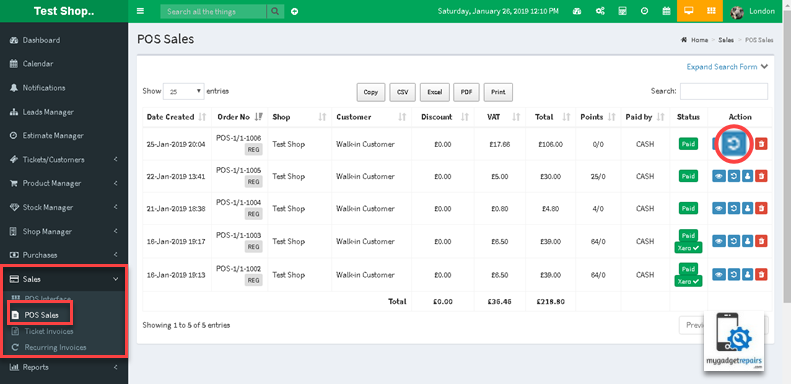
Start the process by going to “Sales“, select “POS Sales” and find the invoice you want to refund. Now click on the refund icon in ticket action.
Or you can also start the return process from “Ticket Invoices” as the return icon is the same.
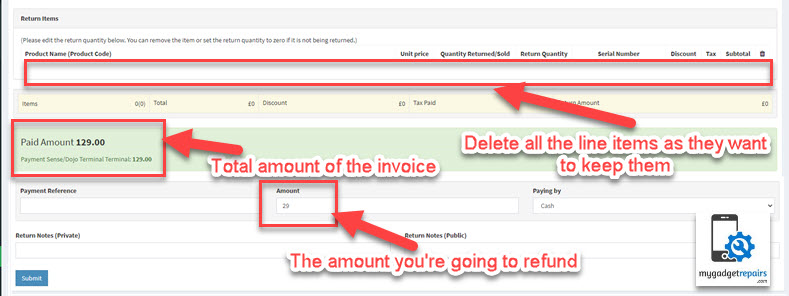
It’ll take you to the “Return Sale” page. On that page in “Return Items” you can edit the return quantity. You can remove the item or you can set the return quantity to zero if it’s not being returned.
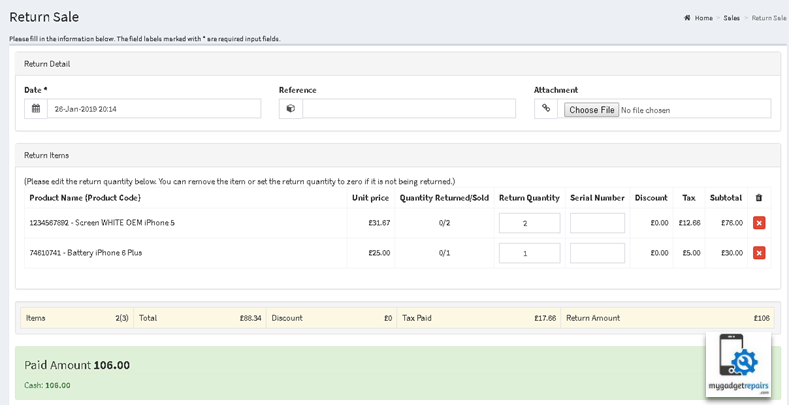
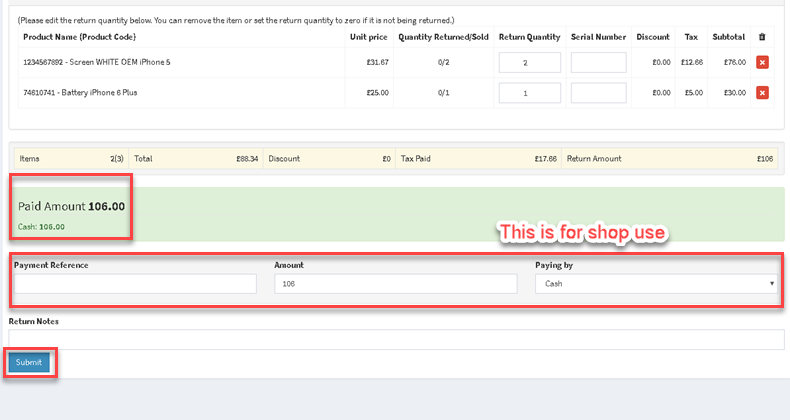
It’ll show you the “Paid Amount” on that invoice and how it was paid.
The “Payment Reference“, “Amount” and “Paying By” below “Returned Amount” is for the shop’s use. Add “Return Notes” and then click on “Submit“.
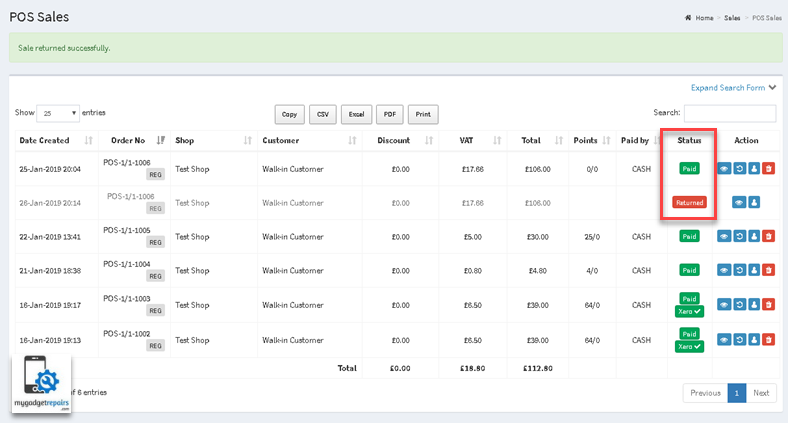
After submitting it’ll take you back to the “POS Sales” page and it’ll show the invoice with the “Status” “Returned” and all the details about the invoice.
You may have a scenario where the ticket invoice is partially paid and the customer no longer wants the items or has changed their mind, in such a case the system will show you a warning saying that the order is partially paid and will only allow you to return what has been paid so far.
As you can see from the below screenshot that the order total is £184 and the customer has only paid £62 so the system is only allowing you to return £62. Once returned all the line items will be added back to the inventory hence why the system is not letting you delete any. So just remember if it’s partially paid the whole order has to be returned.

Please note that if you’re using “Logistics” then the shipping charges will appear as line items.
You may have a scenario where the customer has paid the full amount however you want them to refund part of the paid amount but they want to keep the items. Let’s say the invoice total was £129 and you want to give them £29 as a return, the process is exactly the same however as they are keeping the items you delete the line items from the return as shown in the below screenshot and add £29 in the return amount.
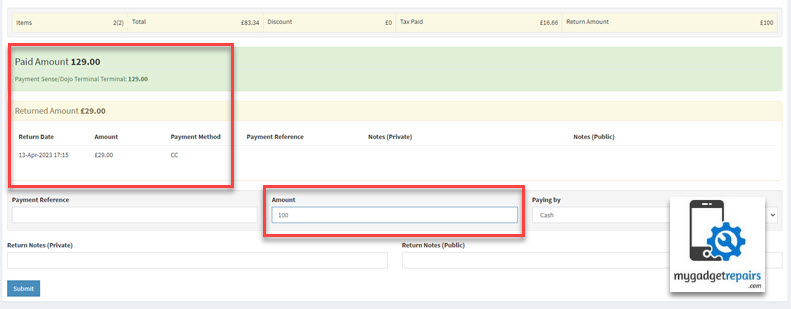
Once submitted it will be shown like the below screenshot.
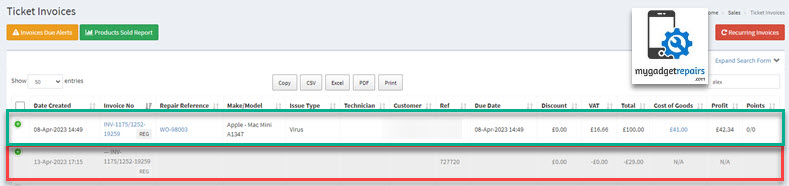
The ticket invoices manager will show you 2 records. The green record is the sale and the red one represents the refund.
After the above your ticket will look like the below screenshot where you can see that the original payment is still stated as £129 and £29 is shown as the returned amount and the balance due is £0.
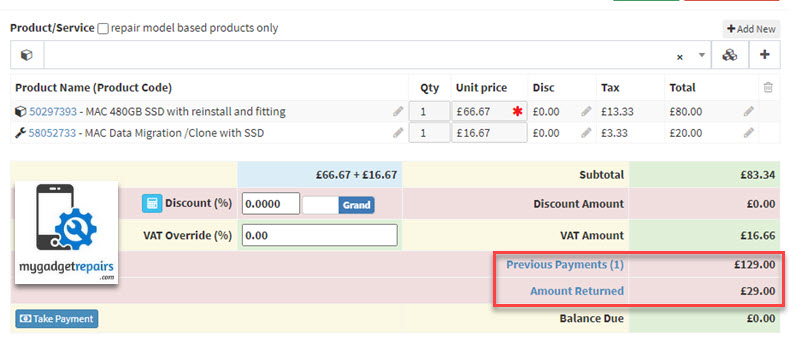
The daily sales report and register will show the correct figures as shown in the following screenshot.

In the above scenario, you must change the line item sell price to reflect the refund otherwise your sales data will be incorrect and the invoice due balance will not be 0, If your line items are locked after making the payment then please go to the settings > invoice and set the “Lock Line Items on Payment” to “No” temporarily.
Below are some common scenarios when it comes to returns/refunds.
- Fully Paid: This could have 3 scenarios
- Partial Return (Based on Quantity or whole Line Items): When some items are returned this could be in quantity or line items. For example, I could have 1 line item where I ordered 5 quantities and I am returning 2 quantities. Or it could be I ordered 3 line items with 1 quantity and I am returning 2 line items. The system allows you to either pay the difference via cash or customer credit/account so they can use it toward another purchase. The stock adjustment will be made accordingly. This is allowed in ticket invoices and POS sales.
- Partial Return (Based on Paid Amount): When someone’s order total is £129 and you want to give them £29 as a return but they are keeping the items. This is allowed in the ticket invoices.
- Full Return: When it’s fully returned. The system allows you to either pay the difference via cash or customer credit/account so they can use it toward another purchase. The stock adjustment will be made accordingly. This is allowed in ticket invoices and POS sales.
- Partial Paid: When the invoice total was £100 and they paid £50 and decided not to go through with it. The system allows you to either pay the difference via cash or customer credit/account so they can use it toward another purchase. The stock adjustment will be made as a full return. This is allowed in the ticket invoices as POS sales can’t be partially paid.
- Not Paid: This is where no payment is made and that’s when the stock must be added back to inventory. This is only possible in ticket invoices as POS orders are always fully paid. To reverse the stock from a repair ticket with due invoice there are two possible things you can do.
- You can simply delete the line items or decrease the quantity of the line items from the repair ticket. The stock will be reversed to previous state.
- Or if you want to keep invoices in record and maintain the stock as well, you can create a credit note on an invoice which is not paid.
How to create Credit Notes in MGR?
To create a credit note the process is pretty much similar to returns in MGR. Go to “Ticket Invoices” and choose the orange return icon against a due invoice.
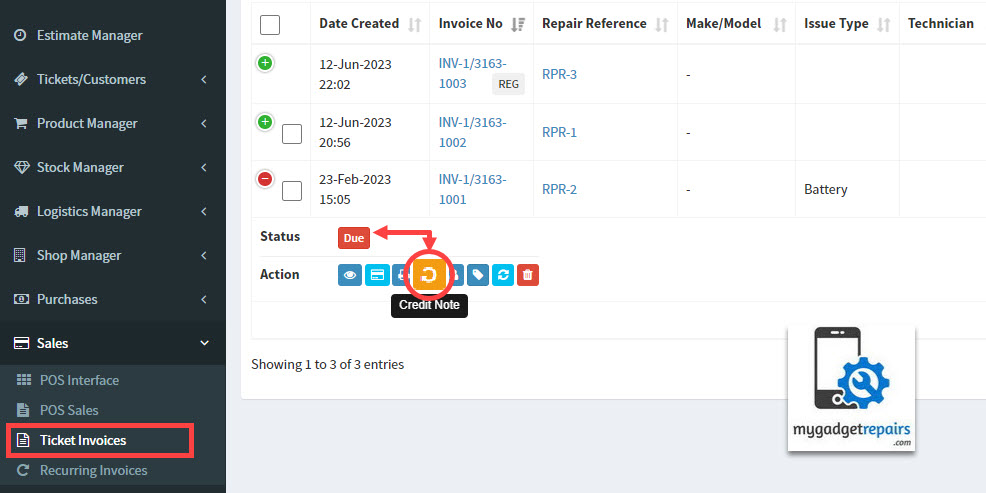
User interface of the credit note will show a light blue background to make it different from the return interface so that you know where you are and what you are about to do.
Like returns, process is simple, credit note will be created with the listed line items and their quantities. Remove the line item or set its quantity to 0 if you don’t want to include it in the credit note. The final amount to be applied in the credit note will be reflected as highlighted in the following screenshot.
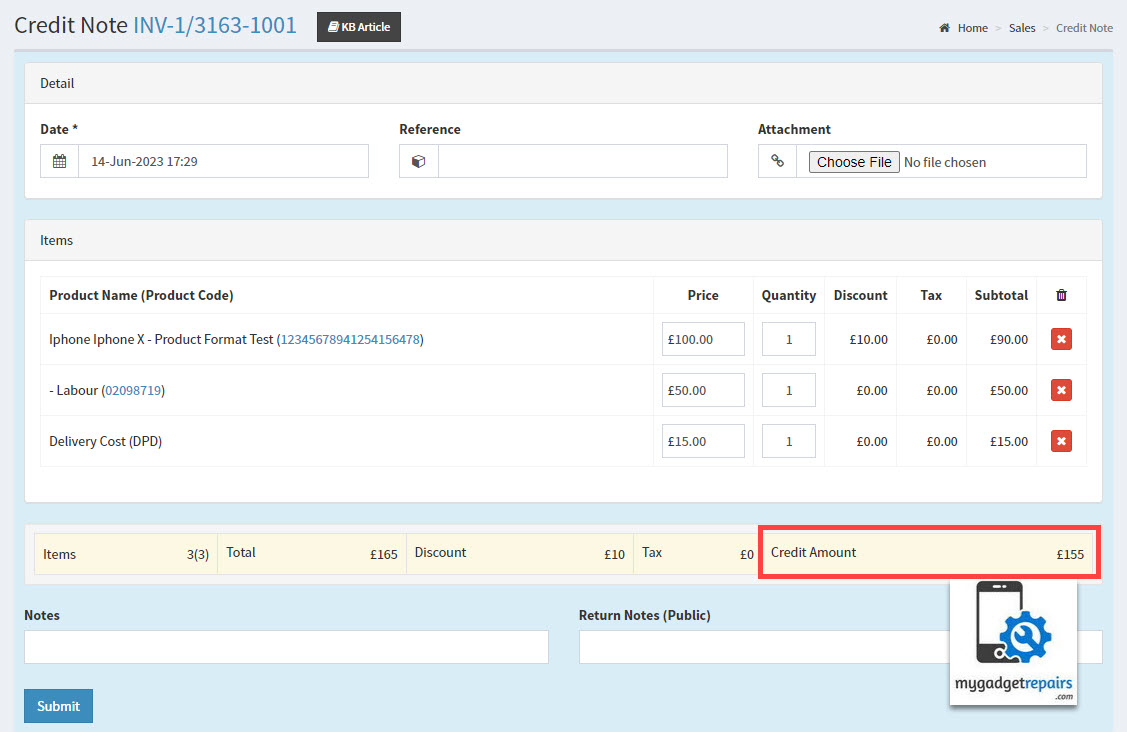
Click submit to create the credit note.
Once the credit note is created, you will be redirected back to ticket invoice manager where the credit note entry will be listed under the actual invoice. This entry is grayed out just like the return entry but with a tag labeled “Credit Note” clearly showing that it’s a credit note. Additionally like returns, the amounts listed in credit notes are deducted from the total whether or not shown as negative.
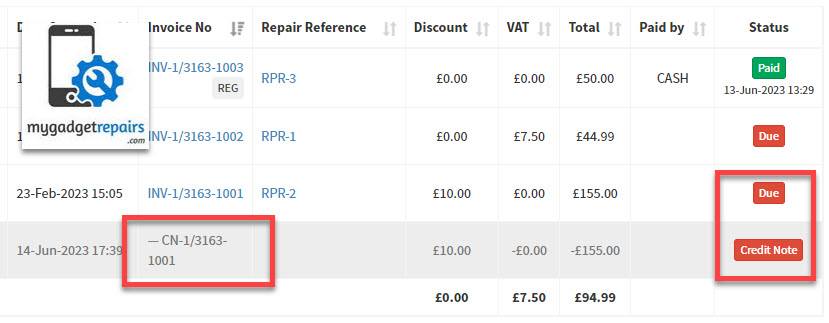
Another thing to notice is like an invoice number, the credit notes have their dedicated sequential credit note numbers. How credit note numbers work is briefed after the break. Right now let’s focus on how credit note effects the invoice it’s created against.
After a credit note has been allocated to an invoice, the credit note amount will be listed in the actual invoice. This is shown in the screenshot below.
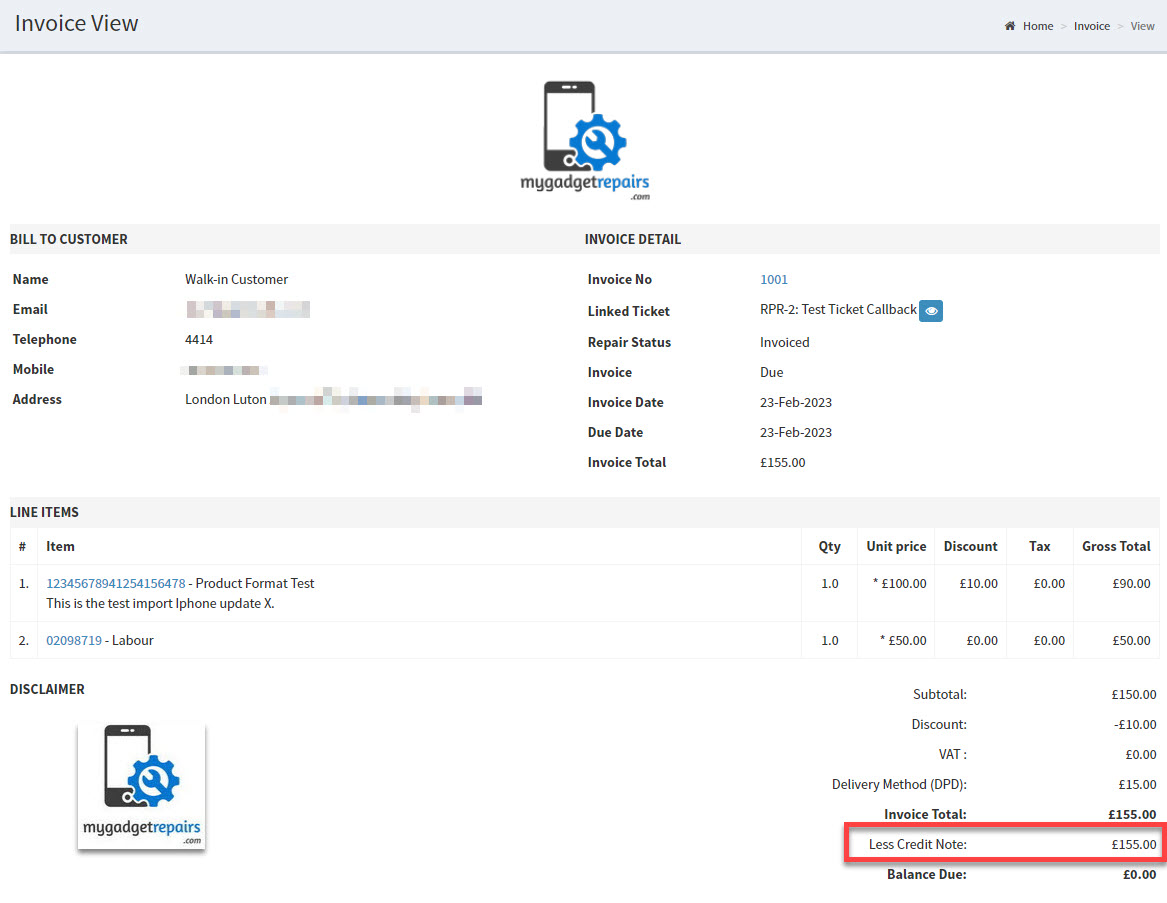
Also note that the credit note amount entry in Invoice is shown once whether there is one ore more credit notes against that invoice. In case of multiple credit notes, the sum of all the credit note amounts will be shown.
After a credit note created against an invoice, only the remaining amount will be payable.
Credit Note Numbers
Like invoices, credit notes have their own credit note numbers e.g. CN-1001 or CN-1/1-1001 as configured in Settings > invoice. MGR offers you to keep multi sequential numbers for each sales resource including order, invoice and credit note that allows you to keep different sequence numbers for each of them. Each resource number progresses separately unless “Single Number Sequence” is turned on as shown in the following screenshot.
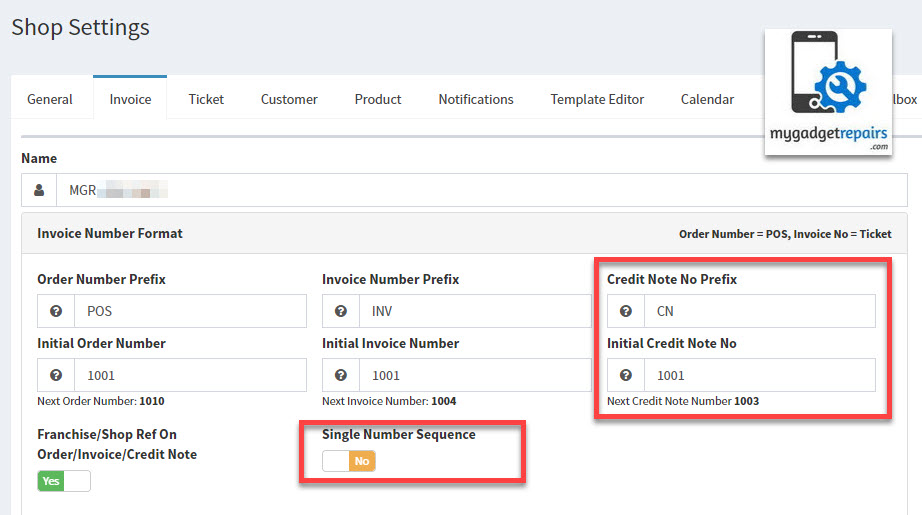
According to above state, the next order number will be 1010, the next invoice number will be 1004, while the next credit note number will be 1003.
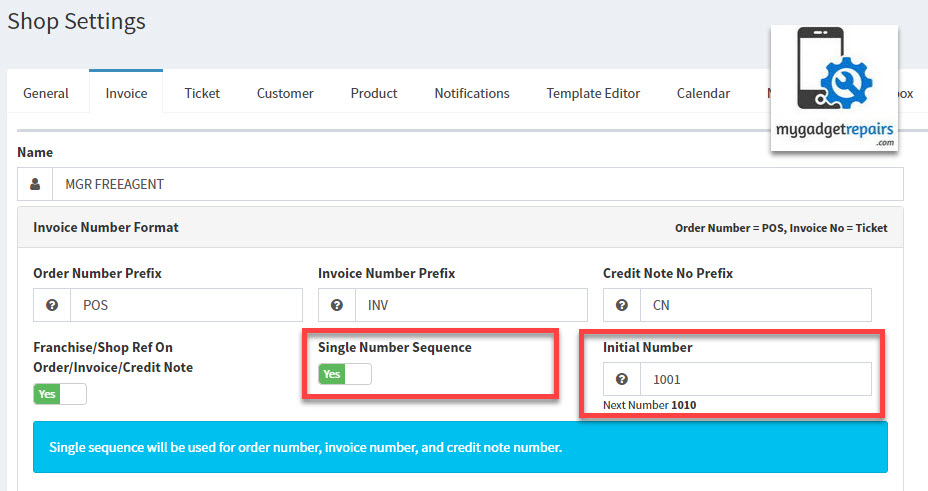
If you enable “Single Number Sequence” this would look like the following screenshot and all resources will progress in a single sequence. In that case, the next number will be 1010 no matter which resource is created next. For example, in the following state, if you create a credit note, it will be allotted the number CN-1010 or if instead if you create an invoice next, it will take the number INV-1010.
What about Returns and their sequential numbers?
Short answer, No! The returns will not have their dedicated sequential numbers unless you have activated any of the accounting integration such as Xero. When listing in Ticket Invoices or POS Orders, the return entry will simply show the actual invoice or order number preceded by a long dash (—) as shown in the following screenshot.

If you have integrated your MGR shop with one of the supported accounting software, your returns will automatically be allocated with credit note numbers. This is to facilitate syncing data with accounting software. Keep in mind that that Returns in MGR are synced as Credit Notes in your integrated accounting software.
This also applies to both Ticket Invoices and POS Orders as the following screenshot shows how a return entry is labeled with a credit note number.


