We are thrilled to announce the exciting addition of the Project Management Module in our latest update! This new feature is designed to enhance your experience and bring remarkable benefits to your project management workflow. It will allow you to manage your projects, organize work via tasks, enhance collaboration, and accelerate execution, and billing.
The project management module helps organizations effectively plan, organise, and control their projects from start to finish. It provides a structured approach to managing projects, ensuring that they are completed on time, within budget, and with the desired quality. Here are some of the key benefits you can expect:
- Planning: The module helps in defining project objectives, identifying tasks and activities, estimating resources and timelines, and creating a project schedule. It enables project managers to set realistic goals, allocate resources efficiently, and establish a clear roadmap for project execution.
- Organisation: A project management module allows project managers to assign responsibilities, create project teams, and define roles and communication channels. It helps in coordinating various stakeholders, aligning efforts, and ensuring that everyone understands their roles and responsibilities.
- Monitoring and Control: The module facilitates the tracking of project progress, identifying potential risks and issues, and implementing corrective actions. Project managers can monitor key performance indicators (KPIs), analyze project data, and make informed decisions to keep the project on track. It provides visibility into project status, allowing timely interventions and adjustments.
- Collaboration and Communication: A project management module provides a centralised platform for collaboration and communication among team members. It allows real-time sharing of project documents, updates, and discussions. This fosters effective teamwork, reduces miscommunication, and ensures that everyone is aligned towards the project goals.
- Resource Management: The module helps in the efficient utilisation of resources, including human resources, materials, and equipment. It allows project managers to allocate resources based on availability, skills, and project requirements. This optimisation ensures that resources are used effectively, minimising waste and maximising productivity.
- Risk Management: Project management modules enable the identification, assessment, and mitigation of project risks. They provide tools for creating risk registers, evaluating potential impacts, and developing contingency plans. By proactively managing risks, project managers can minimise the chances of project delays, cost overruns, and other negative consequences.
- Documentation and Reporting: The module assists in creating project documentation, including project charters, progress reports, and final project reports. It automates the generation of reports, making it easier to communicate project status, achievements, and outcomes to stakeholders. This documentation also serves as a valuable reference for future projects.
The project management module is to streamline project processes, enhance collaboration, and ensure project success. It brings structure, efficiency, and control to project execution, helping organizations deliver projects on time, within budget, and with the desired outcomes.
MGR provides a centralized hub to streamline your team’s work management. Utilising projects, you can effectively oversee all components related to your team’s ongoing initiatives.
By leveraging an array of powerful features like subtasks, tasks, task timers, task messages, task reminders, task files, task tickets, task estimates, task lists and milestones, you can efficiently organize and monitor progress. The systematic approach involves systematically working through and completing each component, starting from the lowest level of subtasks if they are created.
Our projects are built upon a well-defined hierarchy of information, forming a strong foundation for their success so you must understand the hierarchy.
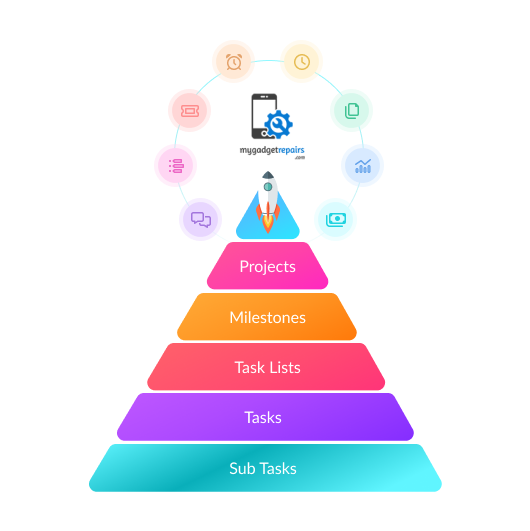
- Subtasks: These are the smallest actionable units within a project, breaking down complex tasks into manageable steps.
- Tasks: Tasks are the fundamental building blocks of a project, representing the specific pieces of work that require completion by members of the team. For enhanced organization and efficiency, these tasks can be further broken down into subtasks, allowing for a more detailed and manageable approach to project execution.
- Task Lists: To ensure effective project management, it is essential to associate tasks with specific task lists. Task lists serve as a means to group and organize tasks efficiently. Within a project, you have the flexibility to create multiple task lists, each with its distinct purpose. Additionally, you can associate these task lists with relevant milestones, facilitating better tracking and progress monitoring. By leveraging task lists and milestone associations, you can enhance the overall organization and management of your project, leading to a more streamlined and successful workflow.
- Milestones: A milestone is a significant point of progress in a project, symbolising the completion of a major phase or the achievement of a critical objective. To effectively track progress towards a milestone, task lists are attached to it. These task lists represent the specific sets of tasks that must be completed in order to reach that milestone successfully. By breaking down the project into manageable tasks and associating them with milestones, teams can better monitor their progress and ensure the project stays on track for successful completion.
- Projects: Each project is a hierarchical structure consisting of several components that contribute to its successful completion. The overarching goal is to complete the project methodically by effectively managing and completing each component in the hierarchy, starting from the granular subtasks (if created) and steadily progressing towards the milestones. This systematic approach ensures a well-organized and successful project execution.
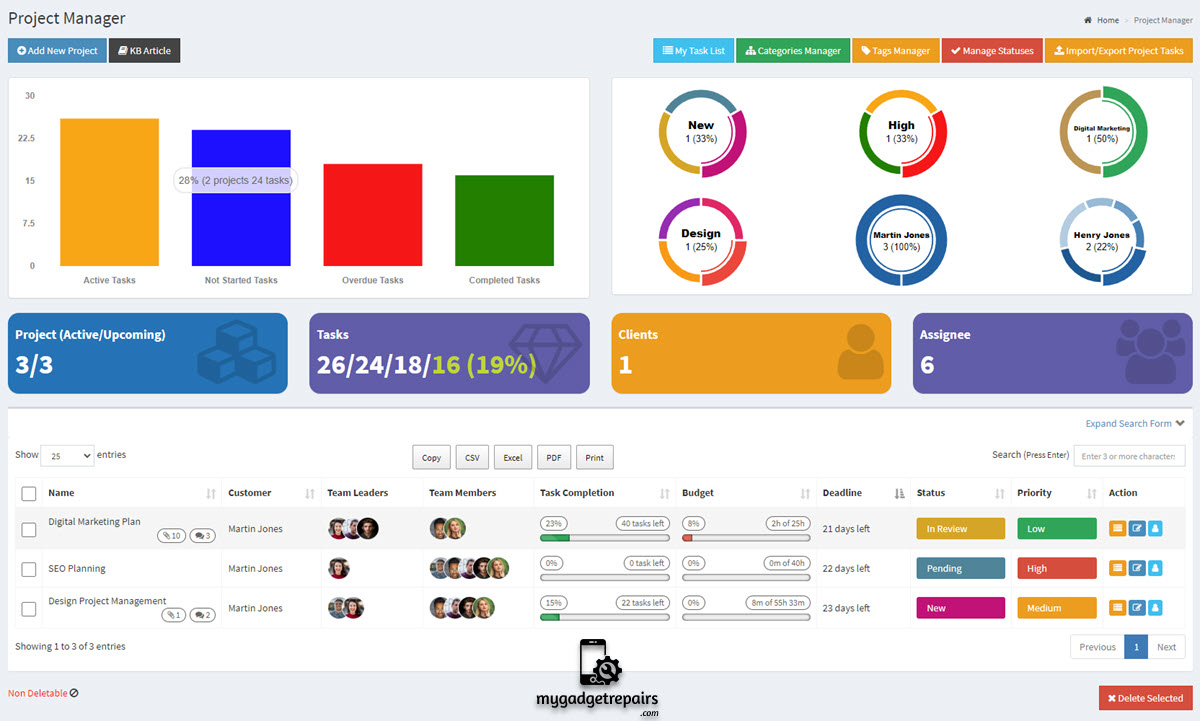
Project Manager View, is designed to provide you with invaluable insights into your ongoing projects. Discover valuable insights about your ongoing projects through the new Project Manager. Gain a comprehensive understanding of project dynamics with the following key metrics:
- Comprehensive Task Breakdown: Stay on top of your project’s task status with a clear breakdown. Easily track the number of active tasks, overdue tasks, completed tasks, and those not yet started.
- Client Engagement Overview: Understand the scope of your projects by knowing how many clients are actively involved. Get a holistic view of your project’s stakeholder network.
- Resource Allocation at a Glance: Efficiently manage resources by accessing information on resource allocation. Know exactly how much resources are engaged in your projects, aiding in effective allocation and utilization.
- Project Status/Lifecycle Overview: Keep tabs on project progression with insights into the number of active projects versus upcoming ones. Stay prepared for future workloads by planning ahead.
- Project Completion Progress: Monitor each project’s completion percentage, allowing you to gauge their progress at a glance. This feature enables timely intervention to ensure projects stay on track.
- Budget Insights: Maintain financial control by accessing a comprehensive overview of project budgets. Make informed decisions to ensure projects are financially sound.
Dashboard Explained
Let’s delve into the dashboard, we’ve taken your dashboard to the next level by breaking it down into four distinct sections. Each section is designed to provide you with a clear and organized view of your data, making it easier than ever to navigate and access the information you need.
- The top left-hand graph represents active, not started, overdue and completed tasks. Let’s break down the information presented in the top-left graph for you:
- Active Tasks: These are the tasks that are currently in progress or ongoing (where the progress is more than 0). They require your attention and are actively being worked on.
- Not Started Tasks: These are tasks that have not been initiated yet (where the progress is 0). They are on your to-do list but haven’t been kicked off or worked on.
- Overdue Tasks: These tasks are past their due dates. They were expected to be completed earlier but haven’t been finished within the specified timeframe.
- Completed Tasks: These tasks have been successfully finished. They are marked as 100% done and are no longer active or pending.”
- The right-hand graph represents various graphs let’s break down the information presented in the top-left graph for you:
- Current Status: In this first graph, we’ve categorized projects based on their current status. This means you can easily identify which projects are ‘New,’ which ones are ‘On Hold,’ which are ‘Pending,’ which are ‘In Review,’ and which are ‘In Progress,’ among other statuses. This helps you get a quick overview of where each project stands in its lifecycle.
- Priority Levels: Moving on to the second graph, it’s all about project priority. We’ve classified projects into different priority levels, including ‘High,’ ‘Low,’ ‘Medium,’ and ‘None.’ This allows you to instantly recognize which projects demand immediate attention and which can be handled with a lower priority.
- Project Categories: The next graph is organized by project categories. This helps you see how your projects are distributed across different categories or themes, making it easier to spot trends or allocate resources accordingly.
- Project Tags: Following that, we’ve broken down projects by the tags associated with them. Tags are like labels that provide additional context or characteristics to each project. This graph allows you to quickly locate projects that share common tags or attributes.
- Customer Engagement: The next graph focuses on the customers associated with each project. By visualizing projects based on their customers, you can gain insights into your client relationships and ensure you’re meeting the needs of each customer effectively.
- Assigned Team Members: Lastly, the last graph pertains to project assignees. It highlights who on your team is responsible for each project. This is invaluable for tracking workloads, ensuring accountability, and optimizing team resources. These detailed breakdown graphs provide you with a comprehensive view of your projects from various angles, helping you make more informed decisions and manage your projects more effectively.
- In the upcoming section, you’ll find our dynamic ‘Activity Boxes‘ four in total, each serving a unique purpose:
- Project (Active/Upcoming): Here, you can quickly identify your ongoing and upcoming projects. It’s your at-a-glance project overview.
- Number of Tasks: We’ve broken down your tasks into categories for easy tracking:
- Active: Tasks currently in progress.
- Not Started: Tasks are yet to begin.
- Overdue: Tasks past their due dates.
- Completed: Tasks successfully wrapped up.
- % of Completed: A percentage to measure your progress.
- Number of Clients: Stay informed about the number of clients you’re currently serving. Keep an eye on your client base.
- Number of Assignees: This box lets you know how many team members are involved in your projects. It’s all about managing your resources effectively.
These Activity Boxes give you a comprehensive view of your project and task landscape, ensuring you’re in control and well-informed.”
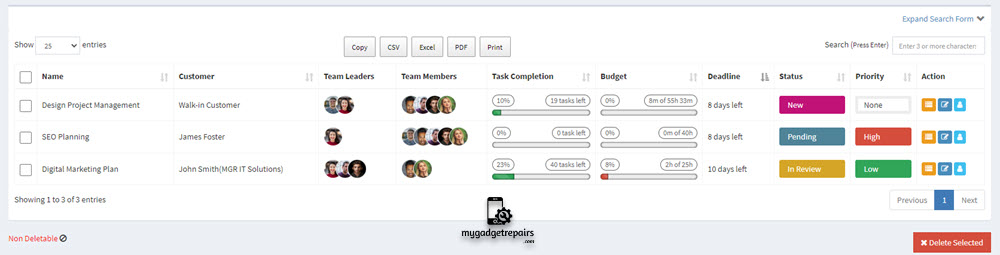
- The final section of the page provides a comprehensive list of all the projects currently under your management. Here, you’ll find a detailed overview of your ongoing projects, giving you quick access to vital project information.
Stay organized, proactive, and informed every step of the way.
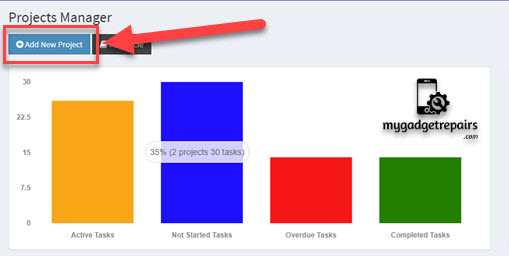
Create New Project
Let’s create your first project in MGR, simply click on “Projects” from the left-hand menu of your screen. From there, you can create new projects, easily track and advance towards project completion, ensuring a smooth and productive workflow for your team.
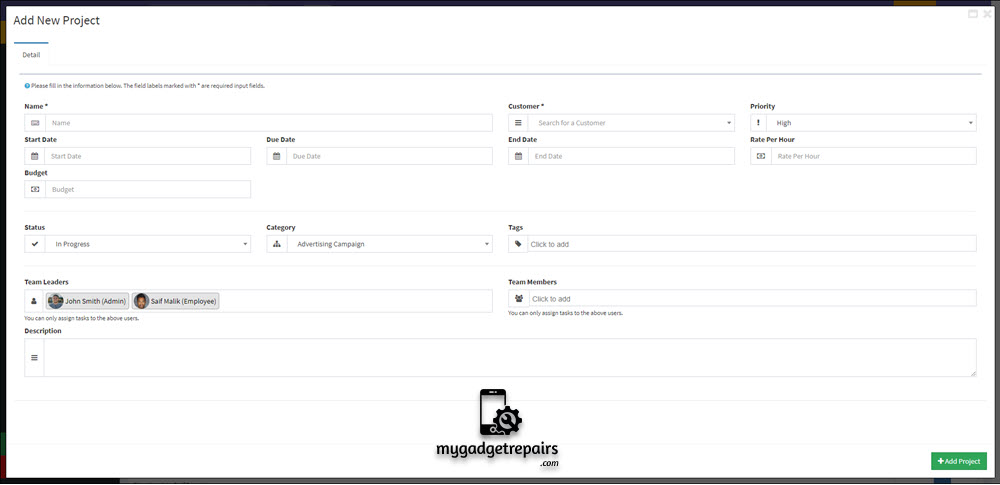
Please click on the “New Project” button which is located on the top left-hand. It will open a new window with the below information.
- Name: This field is used to give a title or name to the project, providing a clear and concise identifier for the project. This is a required field.
- Customer: This field is used to specify the name or details of the customer or client for whom the project is being undertaken. This is a required field.
- Start Date: This field captures the intended or actual start date of the project, indicating when the project is scheduled to begin or when it actually started.
- End Date: This field captures the intended or expected end date of the project, indicating when the project is scheduled to conclude.
- Due Date: This field indicates the deadline or due date for the completion of the project. It may be the same as the end date, but in some cases, it might be an internal deadline set earlier than the end date.
- Priority: This field is used to assign a priority level to the project, indicating its importance or urgency relative to other projects or tasks.
- Rate: This field may refer to the billing rate or hourly rate associated with the project, especially relevant for projects billed on an hourly basis. Please note that you can also set different rates for each team member.
- Budget: This field specifies the allocated budget for the project, representing the total amount of resources or funds available for its execution.
- Status: This field tracks the current progress or status of the project, providing an overview of whether it is in progress, completed, on hold, or any other relevant status. You can create as many new statuses as want, the same way as you do with the tickets, below are the default project statuses.
- Pending
- In Review
- Declined
- Approved
- In Progress
- On Hold
- Completed
- Category: This field categorizes the project into a specific group or type, which can help with organization and filtering in systems. Project categories also provide a systematic approach for organizing and categorizing your projects, enabling you to manage and navigate them more efficiently. By implementing project categories, you can enhance project management and streamline your workflow. By implementing project categories, you can enhance your project management practices, improve team collaboration, and achieve better overall project outcomes.
- Tags: Tags are keywords or labels that can be assigned to the project for better organization and easy retrieval when searching or filtering projects based on specific criteria. With Project Tags, you can now label, categorize, and track your projects effortlessly. By assigning relevant tags to each project, you gain valuable insights and maintain a clear overview of your work. Whether you are an individual professional, a small team, or an entire organization, this feature is designed to boost productivity and improve collaboration.
- Team Leaders: This field lists the names or details of the individuals who are leading the project and responsible for its successful execution.
- Team Members: This field lists the names or details of other team members involved in the project.
- Description: This field provides a detailed description of the project, outlining its objectives, scope, deliverables, and any other relevant information necessary for understanding and managing the project.
These fields collectively provide crucial information about the project, helping stakeholders to manage and track its progress effectively.
To ensure accurate project tracking, each individual task within the project must be fully completed before you can mark the entire project as ‘”Completed” In other words, we’re making sure that all the pieces of the puzzle are in place before celebrating the project’s success.
Once the project is created it will be listed on the “Project Manager” as you can see from the below screenshot.
Let’s modify the project which will incorporate additional settings, providing you with a broader range of options to explore and customize. This will enable you to access a wider array of features and functionalities, enhancing your overall experience and making the project more versatile. You will get the below additional tabs.
- Detail: The detail tab will contain all the fields when you create the project along with some KPI information related to the project.
- Target Completion Date: This is the planned or expected date when the project should be completed. It serves as a goalpost for the project team to work towards.
- Project Duration So Far: This represents the total amount of time that has elapsed since the project started.
- Assignees: Assignees are individuals or teams responsible for specific tasks or activities within the project. They are accountable for completing their assigned work.
- Total Tasks: This refers to the complete list of tasks or activities that need to be accomplished to complete the project.
- Total Estimated Time: This is the total amount of time that is estimated to be required to complete all the tasks in the project. It’s an estimation made during the project planning phase.
- Total Time Spent: This is the cumulative amount of time that has been actually spent on the project up to the current point. It’s a measure of the effort and resources invested.
- Messages: Messages typically refer to communications or discussions related to the project.
- Attachments: Attachments are documents, files, or other materials that are relevant to the project. These can include project plans, reports, design files, or any other documents that provide information or support the project.
- Financials: The Financials tab contains the data so you can track and manage the financial aspects of the project. It includes information related to the project default rate, budget, user based rates for the project to ensure that the project stays within the allocated budget.
- Analytics: The Analytics tab refers to the collection and analysis of data related to the project’s performance and progress. It may include various metrics and key performance indicators (KPIs) that measure the project’s success and efficiency. Analytics provide valuable insights into the project’s strengths, weaknesses, trends, and areas for improvement, enabling data-driven decision-making and better project management.
- Documents: The Documents tab contains all project-related files and documentation. This includes project plans, reports, meeting minutes, design documents, contracts, and any other relevant files. Having a centralized repository for documents ensures that team members can access the necessary information easily and promotes collaboration by allowing multiple stakeholders to share and work on documents.
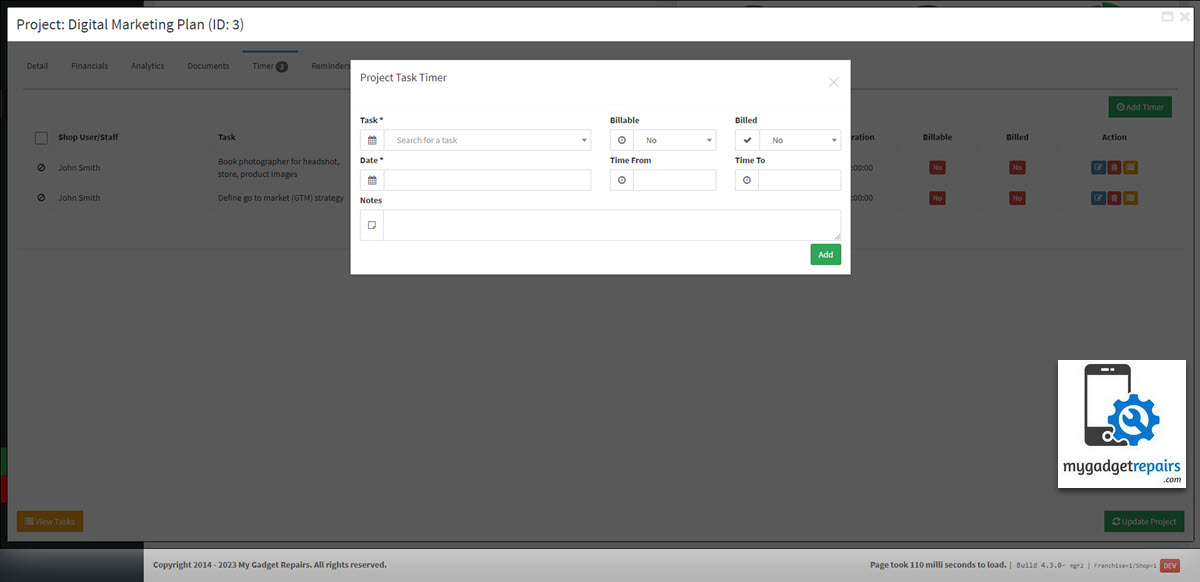
- Timer: The Timer tab is used to track the time spent on specific tasks or activities within the project. It is particularly helpful for projects that require hourly or time-based billing, such as consulting or freelance work. Team members can start and stop timers to record the duration of their work on individual tasks, providing accurate time tracking for billing, performance evaluation, and resource allocation purposes.
- Reminders: The reminders tab enables users to set and receive notifications or alerts for important project-related events, milestones, deadlines, or other crucial activities. Reminders help ensure that team members stay on top of their tasks and responsibilities, reducing the risk of missing critical deadlines.
- Tickets: These are the normal tickets as you may need to create them in your project workflow.
- Estimates: These are the normal estimates as you may need to create them in your project workflow.
- Settings: The “Settings” tab serves as a central hub for configuring various aspects of the project. Within this tab, you will find a range of settings, including both general settings and those specifically tailored to customer portal access. These settings empower you to fine-tune your project environment to meet your unique requirements and streamline customer interactions through the portal. Whether you need to set project-wide parameters or customize the customer experience, this tab is your go-to destination for all things related to project management and customer engagement.
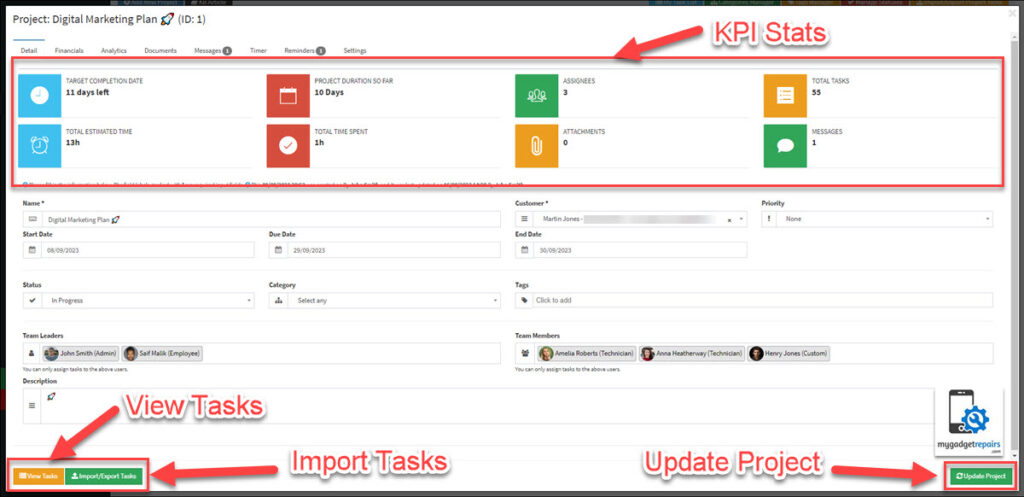
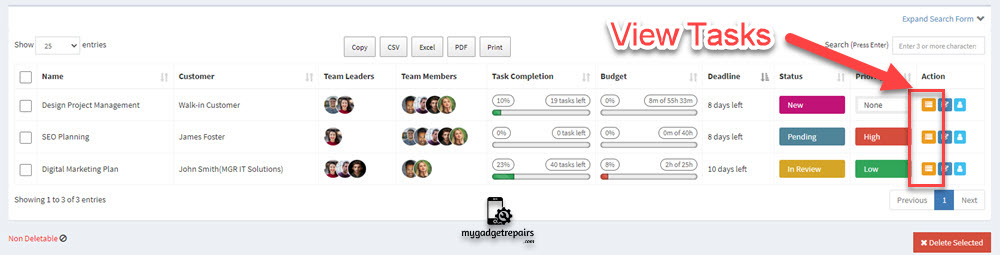
Now that we have the project setup it’s time to create the “Task lists” and “Tasks“. To access the tasks associated with the project, simply click on the “Manage Task” icon within the actions section. This will give you an overview of all the tasks pertinent to this project.
As mentioned earlier task lists serve as a means to group and organize tasks efficiently. You can create as many task lists to group your tasks. Please click on the “Manage Tasks” icon from the action column. It will open up a new window, please note that the very first time it will not have any tasks lists or tasks, please click on the “+” icon as shown in the below screenshot, or you can also create a task list when you create the task which might be quicker. Also, you can import tasks as well and during the import the system will create task lists for you if they don’t exist.
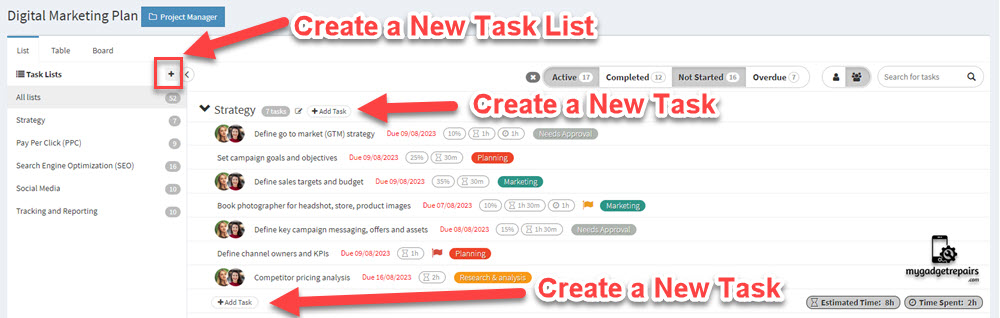
Let’s create a first task list, please click on the “+” icon in the task list section as shown in the below screenshot. It will open a new popup, please enter the task list name.
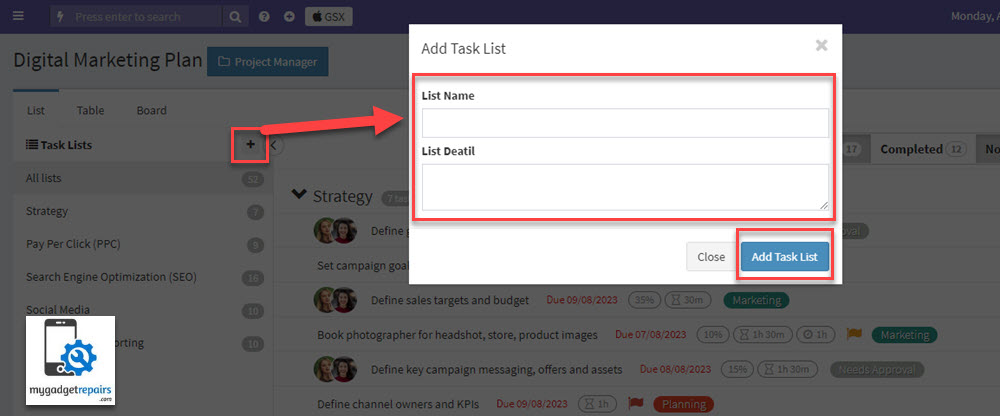
You can also create a new task list from the task screen.
Create New Task
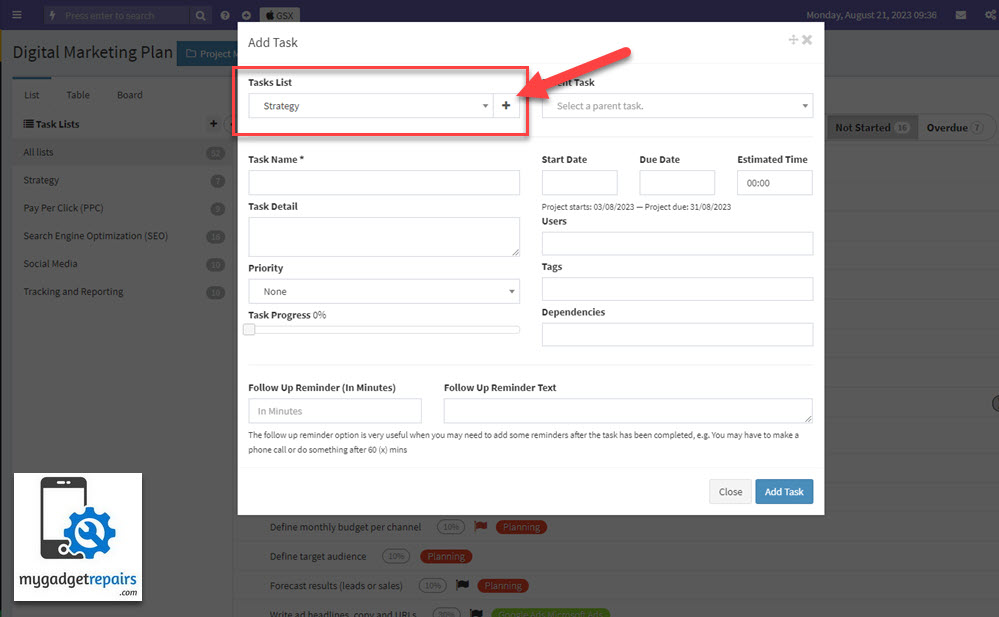
Now let’s create our tasks and sub-tasks.
- Tasks List: This field is used to select which task list this task resides in. If the task list is not there then the system will allow you to add a new task list from the same page.
- Parent Task: This field is used to indicate if the task is a subtask of a larger, parent task. It helps in organizing and hierarchically structuring tasks within a project.
- Task Name: This field represents the name or title of the task. It should be a concise and clear description of what the task is about. This is a required field.
- Start Date: This field denotes the planned or actual start date of the task, indicating when work on the task is scheduled to begin or has started. Please note that the task’s start date can’t be before the project’s start date.
- Due Date: This field represents the deadline or target completion date for the task. It’s the date by which the task is expected to be finished. Please note that the task’s due date can’t be after the project’s due date.
- Estimated Time: This field provides an approximate duration of time required to complete the task. It helps in scheduling and resource allocation.
- Task Detail: This field provides a more in-depth description of the task, including any necessary information, context, or instructions for completing the task.
- Priority: This field indicates the relative importance or urgency of the task. Common priority levels are High, Medium, and Low.
- Private: The ‘Private‘ field serves to designate the task as private. Please be aware that when marked as private, tasks will be kept confidential and will not appear on the customer portal, ensuring complete privacy and security.
- Task Progress: This field tracks the completed percentage of the task that’s why it’s presented as a slider so you can choose.
- Users: This field lists the team members or individuals assigned to work on the task. It clarifies who is responsible for completing the task.
- Tags: Tags are labels or keywords assigned to the task to categorize or group related tasks together. They help in searching and filtering tasks based on specific criteria. If the required tag is not there then the system will allow you to add a new tag from the same field.
- Dependencies: This field indicates any tasks or activities that must be completed before the current task can start or progress. It outlines the interrelationships between tasks.
- Follow-Up Reminder (In Minutes): This field allows setting a reminder for follow-up action. It specifies the duration (in minutes) after which a reminder notification should be triggered.
- Follow-Up Reminder Text: This field contains the text or message that will be displayed in the reminder notification when the follow-up time is reached.
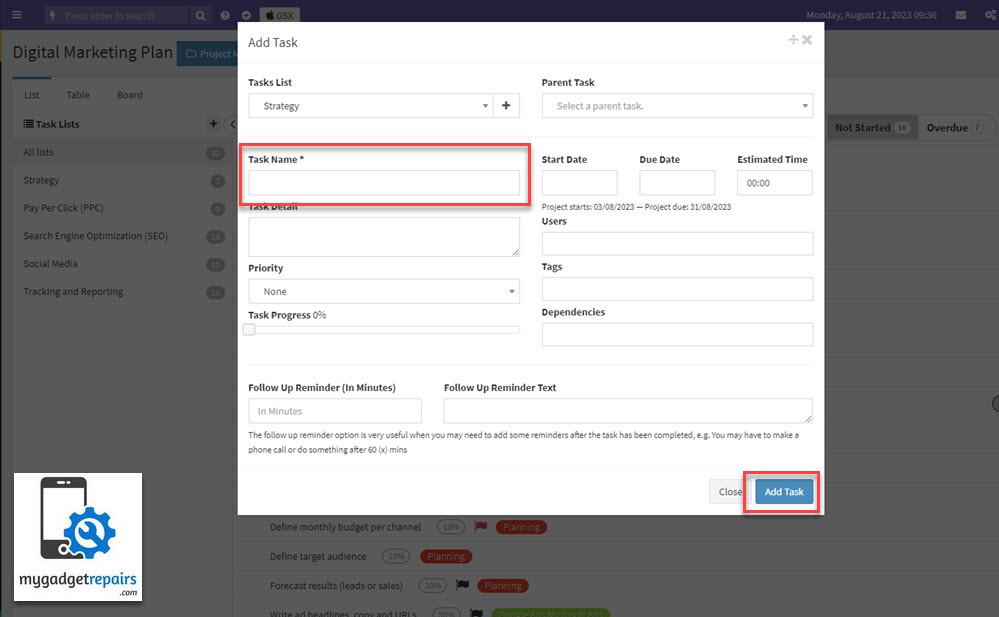
Once ready please click on the “Add Task” button and the task will appear in the task manager.
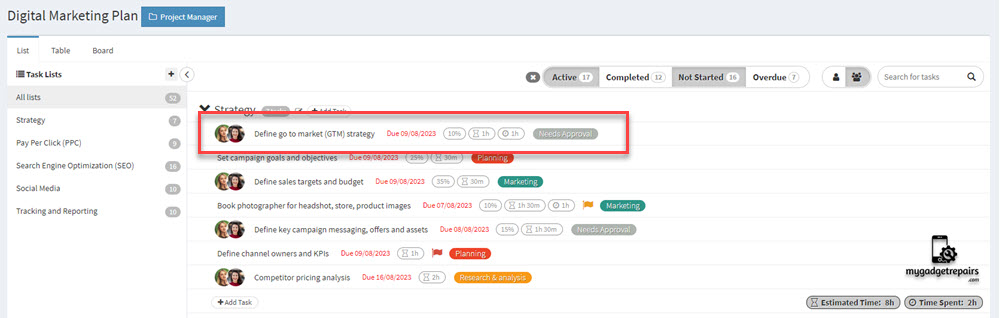
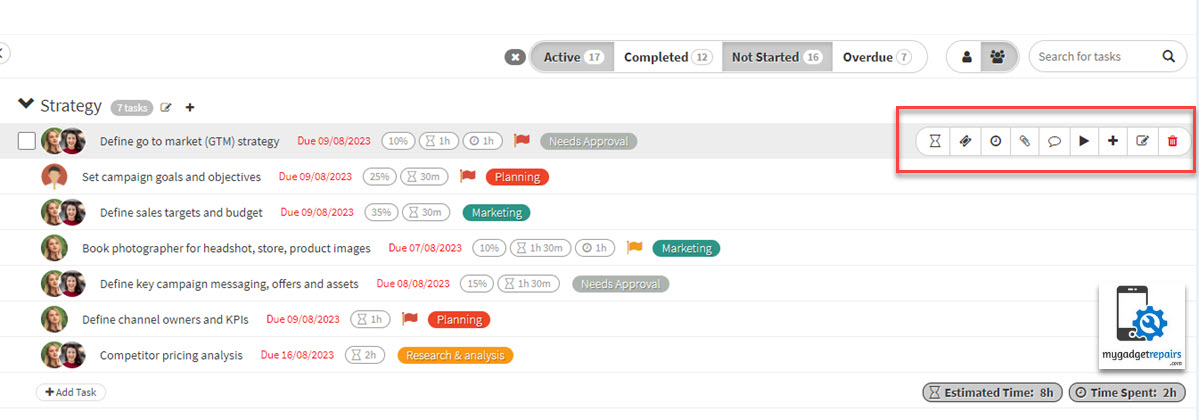
Task Actions
Each task has the following actions. These actions collectively form the core functionalities of a project management module, empowering users to plan, execute, and track their work effectively. Let’s delve into each of these actions in more detail:
Create Estimate: This action involves the process of generating a detailed estimate for a task, which typically includes cost projections, resource allocation, and a timeline for completion. Creating an estimate is a crucial initial step in project management, helping to set expectations and allocate resources effectively.
Create Ticket: You can create tickets and assign them to a task if needed.
Timer Manager: The Timer Manager is a dedicated tool or feature within a project management system that allows users to monitor and control active timers. It enables users to view, pause, resume, or stop timers associated with various tasks, ensuring accurate time tracking across projects.
Add Attachment: Adding attachments to a task or project involves including supplementary files, documents, images, or other relevant materials. Attachments can provide additional context, share critical information, or facilitate collaboration among team members.
Messages: Messaging within a task or project management system serves as a means of communication between team members working on the same project or task. It allows for real-time discussions, sharing updates, and addressing questions or concerns, fostering effective collaboration.
Reminders: To stay on top of deadlines and important milestones, users can set reminders, ensuring that critical tasks are not overlooked.
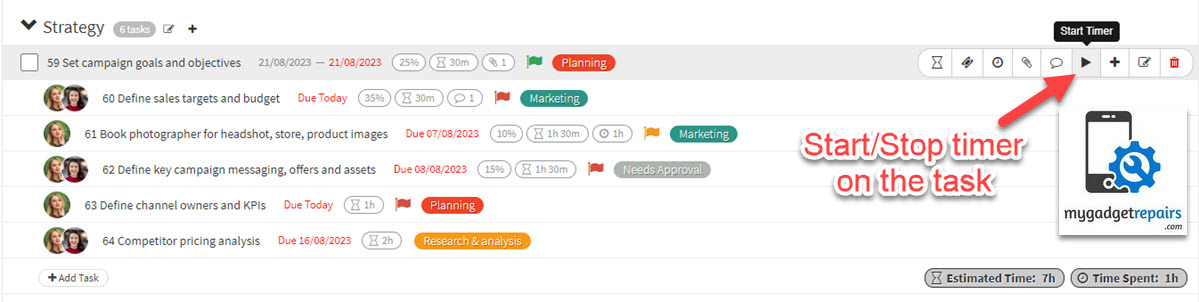
Start/Stop Timer: This action allows users to commence or conclude time tracking for a specific task or project. Starting a timer records the beginning of work, while stopping it signifies the end, providing accurate insights into time spent on various activities. Starting a timer is a fundamental action in time tracking and project management. It involves initiating a digital or physical timer to record the amount of time spent on a specific task or project. This data is valuable for tracking productivity, billing clients, or improving project estimates.
Add Subtasks: Subtasks are smaller, manageable components of a larger task or project. Adding subtasks involves breaking down complex tasks into more digestible pieces, enhancing project organization, and enabling better tracking of progress.
Copy Task: The ‘Copy Task‘ option enables you to swiftly duplicate an existing task, providing you with a quick and efficient way to create task clones.
Edit Task: Editing a task entails modifying its details, such as its title, description, due date, or assigned team members. This action allows for flexibility in adapting tasks to changing project requirements or evolving priorities.
Delete Task: Deleting a task removes it from the project or task list. It’s an action typically performed when a task is no longer relevant or necessary, streamlining project management by decluttering task lists.
Task Manager Views
Task Manager offers different views to help users manage their tasks more efficiently.
- List View
- In the List View, tasks are displayed in a linear format, typically in a vertical list. Each task is represented by its name or title, and additional information such as due dates, priorities, and assigned individuals may be included in columns or as part of the task details. List View provides a simple and easy-to-read layout, allowing users to quickly scan and manage tasks one after the other.
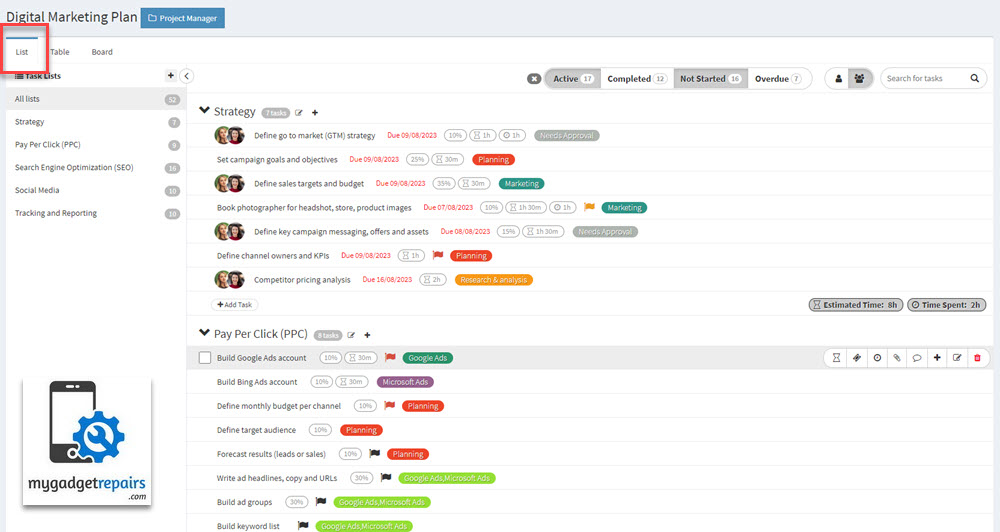
- Please note that in the “List View” you can also filter tasks from the top section by clicking on the below buttons. The filter bar is divided into 3 sections.
- Task Status
- Active: This filter displays tasks that are currently in progress or not yet completed. It helps users focus on the tasks that need immediate attention or are currently being worked on.
- Completed: This filter shows tasks that have been marked as completed. It allows users to review their accomplishments and see what has been finished.
- Not Started: Tasks that have not been initiated or worked on yet are displayed when this filter is selected. It helps users identify tasks that are waiting to be started.
- Overdue: This filter shows tasks with due dates that have passed, and the tasks have not been marked as completed. It helps users identify tasks that are overdue and may require immediate attention.
- By default, the system initially displays tasks with the “Active,” “Not Started,” and “Overdue” filters applied.
- Task Association
- All User’s Tasks: When this filter is selected, it shows all user’s tasks. It provides a comprehensive view of all tasks in the list. This is the default selection.
- My Tasks: This filter is used in a collaborative environment where tasks are assigned to different team members. It displays only the tasks that are assigned to the user who is currently logged in. It helps individuals focus on their assigned responsibilities.
- Search Box
- The search box is a versatile tool that allows users to quickly locate specific tasks by typing in relevant keywords or phrases. It enhances the efficiency of task management by enabling users to find tasks that match their search criteria, even if they are not currently visible based on the selected filters.
- In summary, the “List View” and its filter bar provide users with a flexible and powerful toolset for managing tasks effectively. Users can filter tasks by status, task association, and perform targeted searches to streamline their task management process. This feature promotes organization, collaboration, and productivity in various work environments.
- Task Status
- In the List View, tasks are displayed in a linear format, typically in a vertical list. Each task is represented by its name or title, and additional information such as due dates, priorities, and assigned individuals may be included in columns or as part of the task details. List View provides a simple and easy-to-read layout, allowing users to quickly scan and manage tasks one after the other.
- Table View
- Table View organizes tasks in a tabular format, presenting them in rows and columns. Users can customize the columns to display specific task attributes like status, progress, start dates, end dates, etc. This view is particularly useful for users who prefer to have a structured overview of their tasks and need the ability to sort and filter tasks based on different criteria. Please note that you can manage the order of the columns or add/remove columns via the settings.
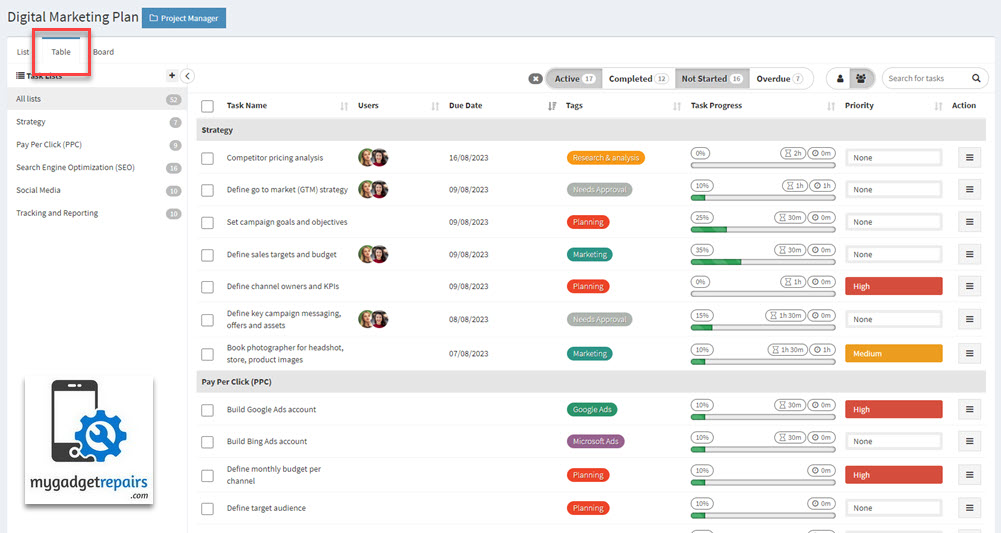
- Please note that in the “Table View” you can also filter tasks from the top section by clicking on the below buttons. The filter bar is divided into 3 sections.
- Task Status
- Active: This filter displays tasks that are currently in progress or not yet completed. It helps users focus on the tasks that need immediate attention or are currently being worked on.
- Completed: This filter shows tasks that have been marked as completed. It allows users to review their accomplishments and see what has been finished.
- Not Started: Tasks that have not been initiated or worked on yet are displayed when this filter is selected. It helps users identify tasks that are waiting to be started.
- Overdue: This filter shows tasks with due dates that have passed, and the tasks have not been marked as completed. It helps users identify tasks that are overdue and may require immediate attention.
- By default, the system initially displays tasks with the “Active,” “Not Started,” and “Overdue” filters applied.
- Task Association
- All User’s Tasks: When this filter is selected, it shows all user’s tasks. It provides a comprehensive view of all tasks in the list. This is the default selection.
- My Tasks: This filter is used in a collaborative environment where tasks are assigned to different team members. It displays only the tasks that are assigned to the user who is currently logged in. It helps individuals focus on their assigned responsibilities.
- Search Box
- The search box is a versatile tool that allows users to quickly locate specific tasks by typing in relevant keywords or phrases. It enhances the efficiency of task management by enabling users to find tasks that match their search criteria, even if they are not currently visible based on the selected filters.
- In summary, the “Table View” and its filter bar provide users with a flexible and powerful toolset for managing tasks effectively. Users can filter tasks by status, task association, and perform targeted searches to streamline their task management process. This feature promotes organization, collaboration, and productivity in various work environments.
- Task Status
- Table View organizes tasks in a tabular format, presenting them in rows and columns. Users can customize the columns to display specific task attributes like status, progress, start dates, end dates, etc. This view is particularly useful for users who prefer to have a structured overview of their tasks and need the ability to sort and filter tasks based on different criteria. Please note that you can manage the order of the columns or add/remove columns via the settings.
- Board Views
- Board View presents tasks using a visual board, typically similar to Kanban boards. Tasks are represented as cards that can be moved across different columns, each representing a specific stage of the task (e.g., “To Do“, “In Progress“, “Completed“). This view is particularly popular for project management and workflow visualization, allowing users to easily track the progress of tasks and identify potential bottlenecks.
- We have the below board views which can be changed by clicking on the “Filter” dropdown.
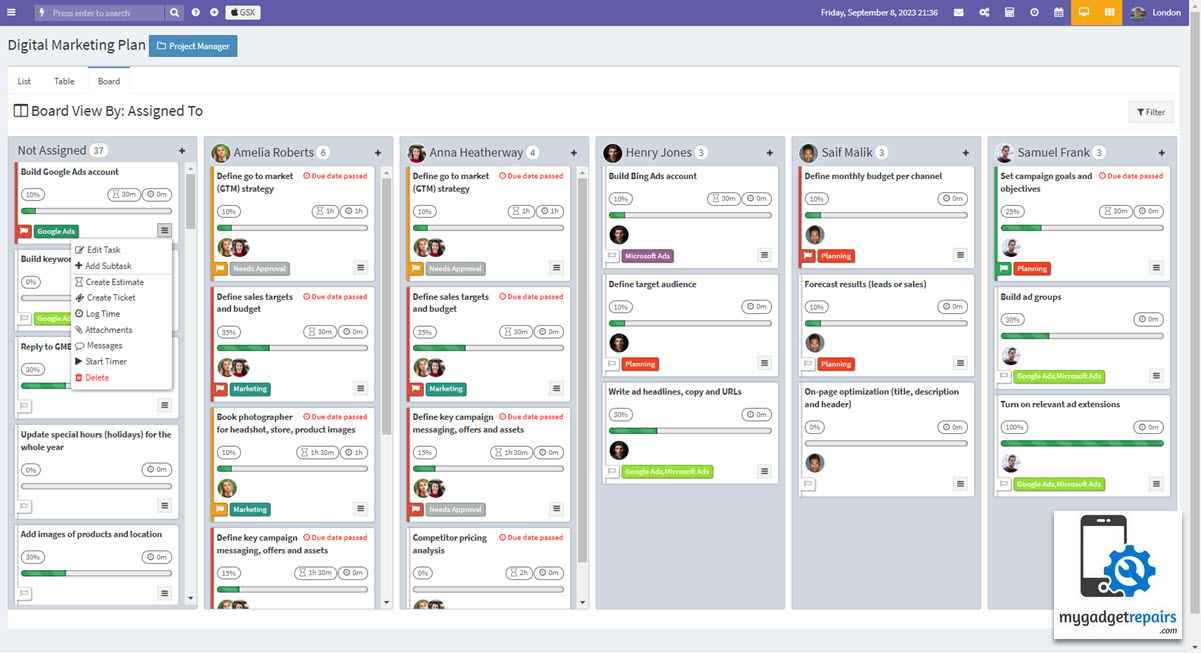
- By Assigned To: The “By Assigned To” view organizes tasks based on the individuals or team members responsible for completing them. Each user’s assigned tasks are grouped together, making it easy to see who is working on what and identify workload distribution. This view is particularly helpful in team environments to ensure everyone knows their responsibilities and to manage workload allocation effectively.
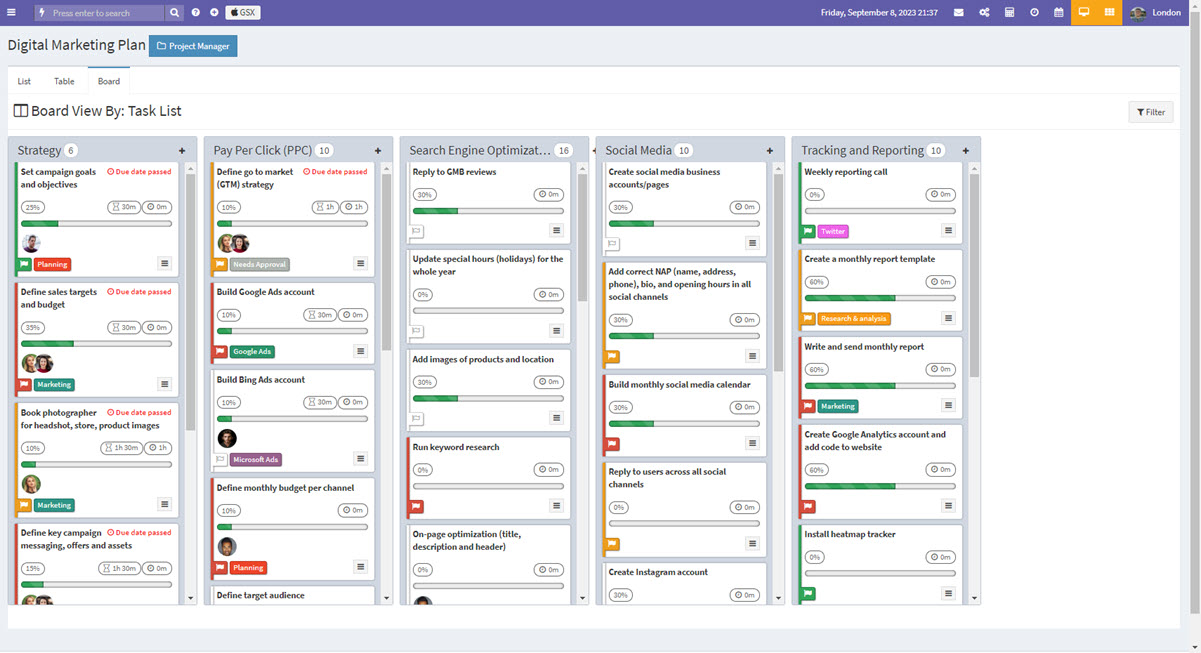
- By Task List: The “By Task List” view groups tasks according to different lists or categories. These lists could be based on specific project phases, functional areas, or any other logical grouping you choose. For example, you might have lists like “Marketing Tasks“, “Development Tasks” or “Bug Fixes“. This view enables you to manage and focus on specific areas of your project or work.
- By Priority: In the “By Priority” view, tasks are organized based on their level of importance or urgency. Tasks with higher priority are typically shown at the top, making it easy to identify critical items that need immediate attention. Prioritization helps individuals and teams stay focused on the most critical tasks and prevents important items from being overlooked.

- By Percent Completed: The “By Percent Completed” view group’s tasks or projects based on their progress. Tasks that are closer to completion or have higher completion percentages are often listed first. This view provides a quick overview of the overall progress of the project and helps you identify tasks that might be lagging behind.

- By Assigned To: The “By Assigned To” view organizes tasks based on the individuals or team members responsible for completing them. Each user’s assigned tasks are grouped together, making it easy to see who is working on what and identify workload distribution. This view is particularly helpful in team environments to ensure everyone knows their responsibilities and to manage workload allocation effectively.
- Each of these board views offers a different perspective on your tasks or projects, allowing you to manage and prioritize work effectively, track progress, and ensure that nothing falls through the cracks.
- Gantt Chart View – Coming Soon
- Gantt charts are essential tools in project management because they offer several benefits that help project managers plan, execute, and monitor projects effectively. Here are some of the key benefits of using Gantt charts in project management:
- Visualization of Project Timeline: Gantt charts provide a visual representation of the project timeline. They display tasks and their corresponding durations in chronological order, allowing project managers and team members to see when each task starts and ends. This visual timeline helps in understanding the project’s overall structure and progress.
- Task Sequencing: Gantt charts clearly depict task dependencies and sequences. This ensures that team members understand the order in which tasks need to be completed. Identifying task dependencies helps prevent bottlenecks and ensures that tasks are executed in the most logical and efficient order.
- Task Duration and Deadlines: Gantt charts allow you to specify the duration of each task and set deadlines. This helps in creating a realistic project schedule and ensures that tasks are completed within their allotted timeframes.
- Parallel Task Management: Gantt charts allow for the identification of tasks that can be performed in parallel. When multiple tasks can run concurrently, it can significantly shorten the project duration. This optimization of task sequencing can help in meeting project deadlines and improving efficiency.
- Critical Path Analysis: Gantt charts can highlight the critical path of a project—the sequence of tasks that must be completed on time to prevent delays in the overall project. Identifying the critical path allows project managers to focus their attention on the most crucial tasks.
- Time Estimations: Gantt charts help in estimating task durations more accurately. By breaking down a project into smaller, manageable tasks and assigning durations to each, project managers can create more realistic timelines. This aids in setting achievable project deadlines.
- Progress Tracking: Gantt charts are useful for monitoring project progress. Team members can mark completed tasks and update the chart as work is accomplished. This real-time tracking allows project managers to identify delays, bottlenecks, or deviations from the planned schedule and take corrective actions promptly.
- [picture-gantt-chart]
- Gantt charts are essential tools in project management because they offer several benefits that help project managers plan, execute, and monitor projects effectively. Here are some of the key benefits of using Gantt charts in project management:
Bulk Task Update
The Bulk Task Update interface offers a multitude of benefits that significantly enhance task management efficiency and streamline workflows. With this interface, users can swiftly update multiple tasks simultaneously, saving valuable time and effort. This feature empowers teams to maintain accurate and up-to-date information across various tasks effortlessly.
Additionally, the Bulk Task Update interface ensures consistency in data entry, minimizing errors and preventing discrepancies in the project. By simplifying the task update process, it encourages better collaboration and seamless communication among team members. Embracing this user-friendly interface leads to enhanced productivity, improved project tracking, and ultimately, greater project success.
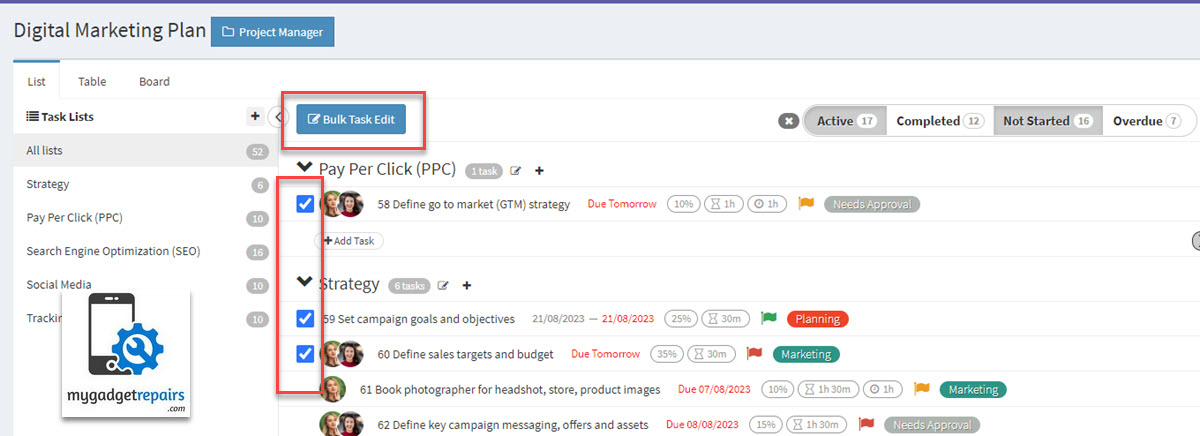
In both the list view and table view, you have the convenience of selecting multiple tasks simultaneously. Once you have made your selections, a powerful option becomes available – the “Bulk Task Update” button. By clicking on this button, you gain the ability to perform various actions on all the tasks you have chosen at once, streamlining your workflow and saving valuable time.
With this feature, you can efficiently manage and modify multiple tasks with ease. Some of the actions you can perform on the selected tasks include updating their status, assigning them to specific team members, setting due dates, adding tags or labels, changing priorities, and much more.
This bulk task update capability empowers you to handle large-scale task management effortlessly, enabling you to focus on what truly matters without the hassle of individually editing each task. Whether you need to prioritize a batch of tasks, reassign them to different team members, or give them specific labels for better organization, the “Bulk Task Update” functionality provides a powerful and efficient solution to manage your workload effectively.
Upon clicking the “Bulk Task Edit” button, a user-friendly and intuitive popup interface will seamlessly appear on your screen. This feature is meticulously designed to empower you with the ability to execute a wide array of bulk updates effortlessly, streamlining the process of managing and enhancing the selected tasks.
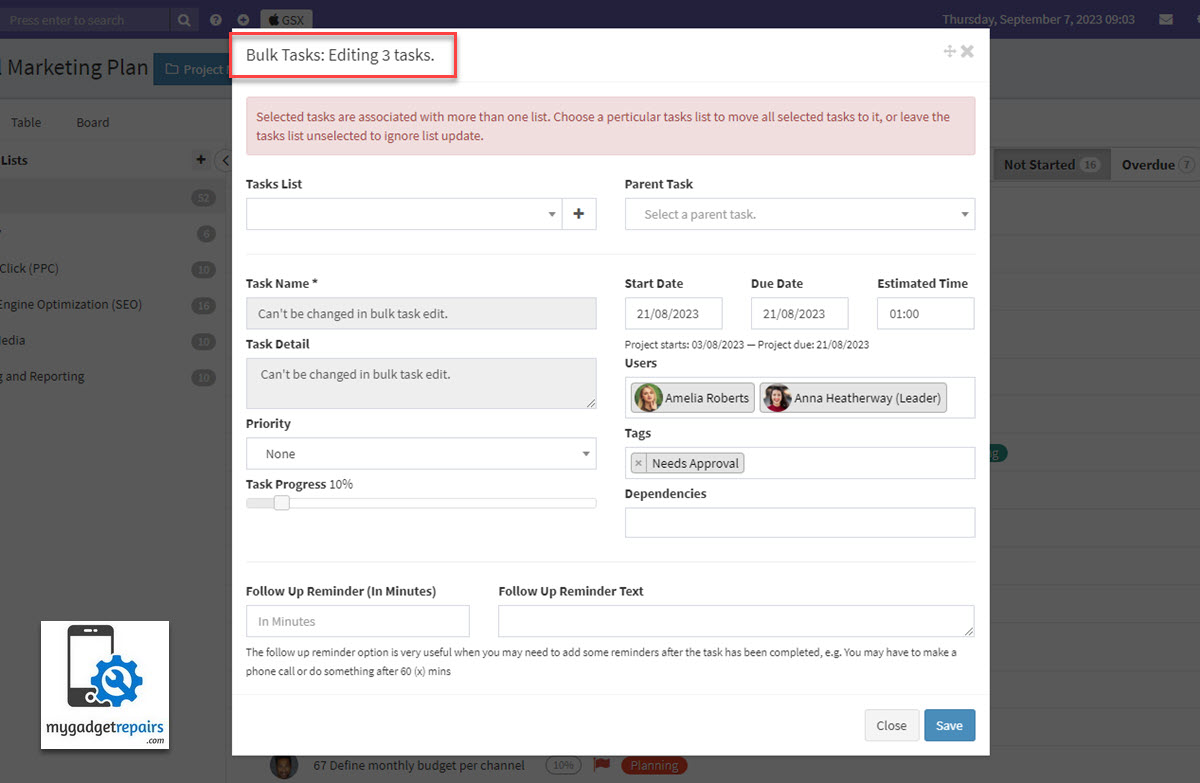
Once finished with the changes click on the “Save” button. Additionally, you have the option to utilize ‘Bulk Task Edit‘ for efficiently deleting tasks in bulk. This streamlined feature enables you to swiftly manage and remove multiple tasks with ease.
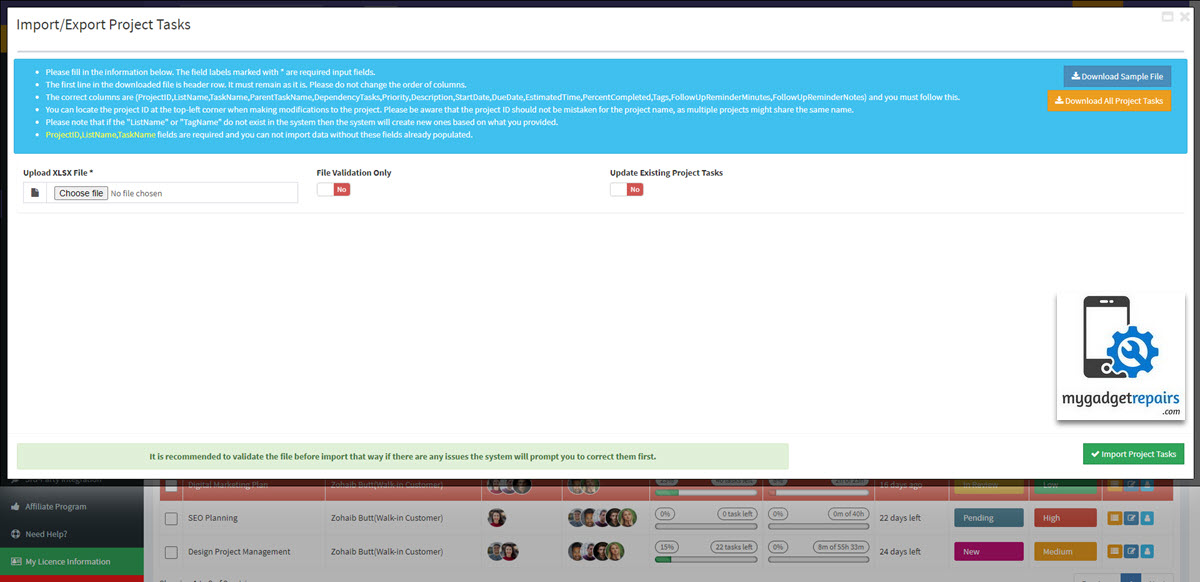
Import/Export Tasks
You can also import and export tasks via the xls file. The system will provide a sample file the same way as we do on all the other import interfaces. The sample file will contain the below columns.
- ProjectID: The project ID can be located on the “Modify Project” screen. Please note that if you’re importing tasks from the “Modify Project” screen then you don’t need the “ProejctID” field as the system knows which project you’re importing the data to.
- ListName: This column is used to enter which task list this task resides in. If the task list is not there then the system will create the new task list automatically.
- TaskName: This column represents the name or title of the task. It should be a concise and clear description of what the task is about. This is a required field.
- ParentTaskName: This column is used to indicate if the task is a subtask of a larger, parent task. It helps in organizing and hierarchically structuring tasks within a project.
- DependencyTasks: This column indicates any tasks or activities that must be completed before the current task can start or progress. It outlines the interrelationships between tasks. if more than one dependent task then add it like this “Task1~Task2~Task3”
- Priority: This column indicates the relative importance or urgency of the task. Common priority levels are High, Medium, and Low.
- Description: This column provides a more in-depth description of the task, including any necessary information, context, or instructions for completing the task.
- StartDate: This column denotes the planned or actual start date of the task, indicating when work on the task is scheduled to begin or has started. Please note that the task’s start date can’t be before the project’s start date.
- DueDate: This column represents the deadline or target completion date for the task. It’s the date by which the task is expected to be finished. Please note that the task’s due date can’t be after the project’s due date.
- EstimatedTime: This column provides an approximate duration of time required to complete the task. It helps in scheduling and resource allocation.
- PercentCompleted: This column tracks the completed percentage of the task that’s why it’s presented as a slider so you can choose.
- Tags: Tags are labels or keywords assigned to the task to categorize or group related tasks together. They help in searching and filtering tasks based on specific criteria. If the required tags are not in the system then the system will automatically create the tags.
- FollowUpReminderMinutes: This column allows setting a reminder for follow-up action. It specifies the duration (in minutes) after which a reminder notification should be triggered.
- FollowUpReminderNotes: This column contains the text or message that will be displayed in the reminder notification when the follow-up time is reached.
Please note that you can import tasks for multiple projects at the same time which makes it quicker when you’re working on multiple projects. You can also use the same file to do a bulk update as well. Please note that the “Task Name” is the unique key when we update the tasks via the import process.
Timer for project tasks
A timer for project tasks is an essential tool that aids in effective task management and productivity. It enables individuals and teams to allocate specific time intervals to various project tasks, helping them stay focused, organized, and accountable. By setting timers for tasks, individuals can better estimate the time required for each activity, preventing overcommitment and optimizing work schedules. Timers also serve as motivational tools, instilling a sense of urgency and promoting a disciplined work approach. Furthermore, tracking time spent on tasks through timers provides valuable data for future project planning and resource allocation. Overall, incorporating timers for project tasks enhances time management, productivity, and the successful execution of projects.
- Time Tracking: Timers help you track the time spent on each task or project. This information is crucial for understanding how much time is being allocated to different tasks, which can aid in project planning, resource allocation, and identifying areas where time is being spent inefficiently.
- Productivity Measurement: Timers allow you to measure your productivity. By tracking how much time it takes to complete tasks, you can assess your efficiency and set benchmarks for improvement.
- Task Estimation: Timers help you estimate how long similar tasks or projects might take in the future. This assists in setting realistic deadlines and managing client or stakeholder expectations.
- Focus and Concentration: Knowing that a timer is running can encourage you to stay focused and avoid distractions. The time pressure can help increase your concentration and reduce procrastination.
- Project Planning: Timers aid in breaking down larger projects into smaller, manageable tasks. You can allocate specific time slots to each task, ensuring that you make consistent progress and meet your milestones.
- Time Management: Timers act as a reminder to allocate a specific amount of time to a task. This prevents overcommitting to a single task and helps you distribute your time more effectively among different projects and responsibilities.
- Billing and Invoicing: For businesses that charge clients based on time spent, timers provide an accurate record of billable hours, which is essential for generating accurate invoices.
- Performance Analysis: Over time, timers generate data that can be used for performance analysis. You can identify patterns in your work habits, such as peak productivity times, and make adjustments to your schedule accordingly.
- Collaboration: Timers can be used to track individual and collective progress. It helps team members synchronize their efforts and ensures that everyone is on the same page.
- Motivation: Some people find timers motivating as they introduce an element of challenge and competition against the clock. This can lead to a sense of accomplishment when tasks are completed within the allocated time.
In essence, timers provide a structured approach to time management, improve accountability, enhance productivity, and contribute to better project planning and execution. However, it’s important to strike a balance, as excessive time tracking can lead to stress and burnout. It’s essential to use timers as a tool for productivity enhancement rather than allowing them to become a source of pressure.
You can also start and stop timers on each task as you do on the tickets.
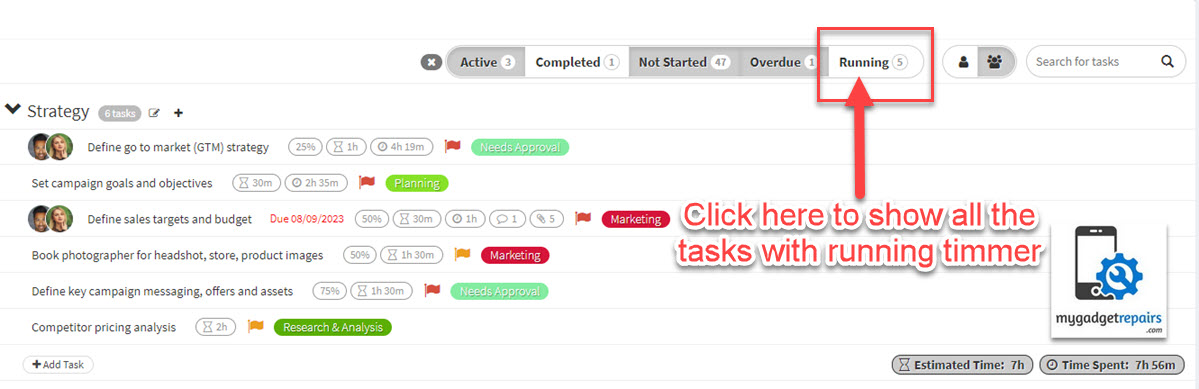
Once you initiate the timer, our system grants you the ability to conveniently filter and view tasks that are currently in progress. This means you can easily keep track of and manage tasks while the timer is actively running
Reminders for Project Tasks
Reminders for project tasks are essential to ensure effective project management and timely task completion. In the complex and fast-paced environment of projects, it’s easy for tasks to be overlooked or deadlines to be missed. Reminders act as proactive prompts that help team members and project stakeholders stay organized and focused. By receiving timely reminders, individuals can prioritize their work, allocate resources efficiently, and maintain a smooth workflow. These reminders not only enhance accountability and productivity but also contribute to the overall success of the project by reducing the risk of delays and ensuring that critical milestones are achieved as planned.

Messages for Project Tasks
Messages for project tasks are essential because they facilitate clear and effective communication within a project team. These messages serve as a means to convey task-related information, such as assignment details, deadlines, progress updates, and any potential roadblocks. By utilizing project task messages, team members can stay informed about their responsibilities and stay aligned with project goals. This communication ensures that everyone is on the same page, reducing misunderstandings, enhancing collaboration, and ultimately leading to the successful and timely completion of project milestones.
Using messages as a means of communication and collaboration among team members and clients can offer several benefits:
- Efficient Communication: Messages provide a quick and efficient way to communicate within a project. Team members can exchange information, ask questions, and share updates without the need for lengthy meetings or formal emails.
- Real-time Updates: Messages allow for real-time updates. Team members can receive instant notifications when someone posts a message, ensuring that they stay informed about project developments as they happen.
- Collaboration: Messages facilitate collaboration among team members who may be working remotely or in different locations. They can work together on tasks, share files, and provide feedback without being physically present.
- Reduced Email Overload: Using messages for project-related communication can reduce the volume of emails in team members’ inboxes. This can make it easier to manage and prioritize messages specifically related to the project.
- Accessibility: Messages are typically accessible through various devices and platforms, making it easy for team members to stay connected and engaged with the project, even when they are on the go.
- Feedback and Decision-Making: Messages provide a platform for team members to share feedback, make decisions, and reach a consensus. This collaborative aspect can be crucial for project success.
- Reduced Miscommunication: Written messages can reduce the likelihood of miscommunication compared to verbal communication. Messages provide a clear written record that can be referred to if there are any doubts or disputes.
- Privacy and Security: Depending on the platform used, messages can offer privacy and security features to protect sensitive project information and ensure that only authorized individuals have access.
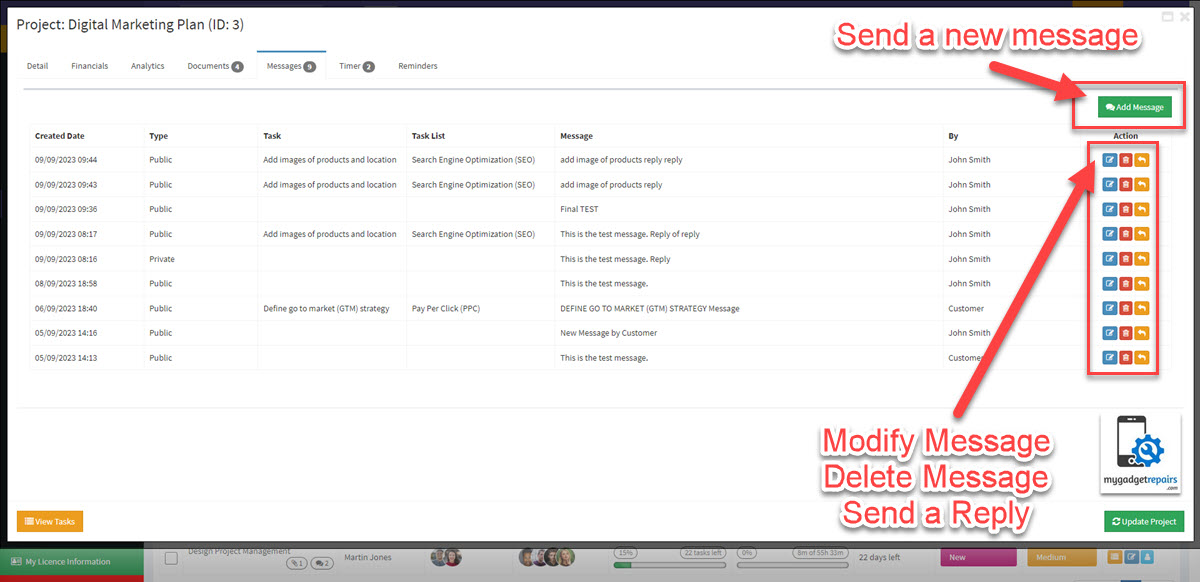
Kindly take note that messages have the flexibility to be assigned either to a project as a whole or to individual tasks within the project.
Attachments for Project Tasks
Attachments to project tasks offer several benefits that can enhance project management and collaboration. Here are some key advantages:
- Clarity and Context: Attachments provide visual or supplementary information that can clarify task details. For instance, you can attach documents, images, or diagrams to illustrate requirements or expectations. This helps team members better understand the task’s context.
- Documentation: Attachments serve as a central repository for project-related documents, reducing the risk of losing important files or data. This ensures that all relevant materials are readily accessible to team members when needed.
- Collaboration: They facilitate collaboration by allowing team members to share files and resources related to a task. This can include design files, reports, spreadsheets, or any other materials that team members need to work together effectively.
- Version Control: Attachments can help with version control by ensuring that everyone is working with the most up-to-date materials. This is particularly important in projects with frequent changes or iterative processes.
- Reference and History: Attachments create a historical record of a task’s development. Team members can refer back to previous attachments to understand how a task has evolved over time, which can be valuable for lessons learned and future improvements.
- Reduced Communication Overhead: Instead of sending files separately through email or other communication channels, attachments keep all relevant information within the task itself. This reduces the need for back-and-forth communication and minimizes the risk of information getting lost in transit.
- Compliance and Auditing: Attachments can be crucial for compliance purposes. They provide a clear record of all documents and resources associated with a task, which can be important in regulated industries or for audit purposes.
- Efficiency: Attachments can streamline processes by keeping all task-related materials in one place. This can help save time and reduce the effort required to find, share, or update documents.
- Transparency: They enhance transparency by allowing all team members to view the same materials. This transparency can lead to better decision-making and a shared understanding of project goals and requirements.
- Accountability: Attachments can help assign accountability. When specific documents or files are attached to a task, it’s clear who is responsible for managing or completing that aspect of the task.
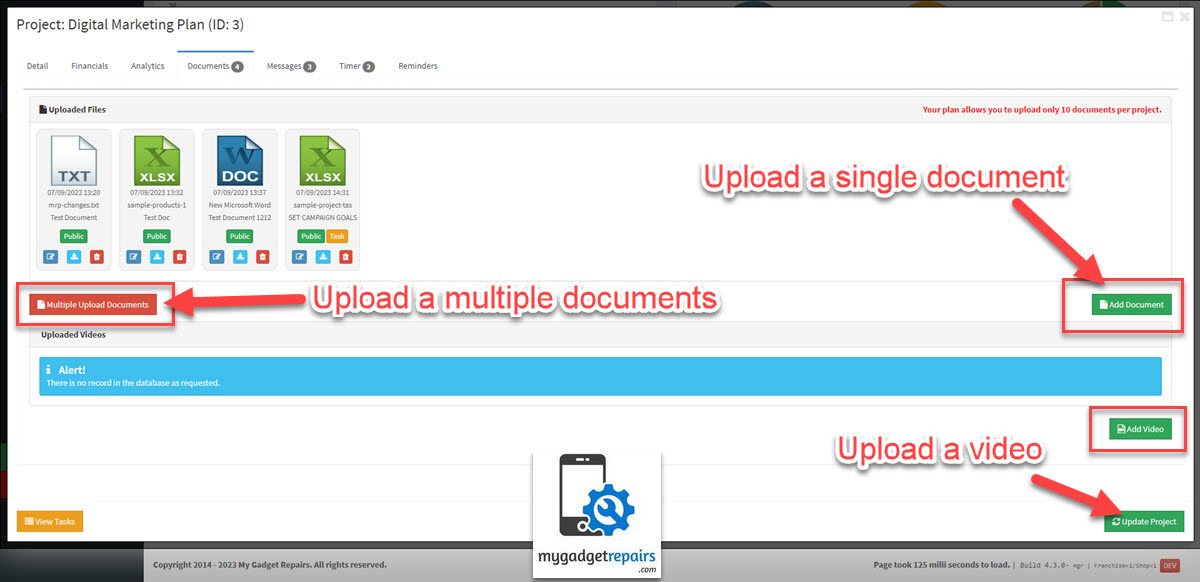
Kindly take note that an attachment has the flexibility to be assigned either to a project as a whole or to individual tasks within the project.
Project Milestones
Milestones are indispensable components within project documentation, including the project schedule, project charter, and project plan, as they serve a crucial role in enhancing the accuracy of project time estimation. These significant markers, denoting key dates and pivotal events, are instrumental in facilitating meticulous project planning and scheduling. A milestone represents a significant and clearly defined progress point within the course of a project. These milestones are instrumental in denoting important changes or crucial steps in the project’s development. Typically, they serve as essential markers that segment the project timeline into distinct stages and are frequently integrated into project management.
Milestones are initially established during the project’s planning phase and are continually revised as the project advances. Think of milestones as key signposts along the project’s journey – they offer visual reference points that break down the project into manageable, organized segments. They play a pivotal role in grounding the project, making it more manageable, and preventing it from feeling overwhelming.
For any project manager, keeping a close eye on significant events and pending decisions is vital. The strategic use of milestones serves this purpose effectively. Milestones serve as clear indicators to all stakeholders of the project’s overall “lifespan” and outline the critical achievements that must be reached throughout its duration.
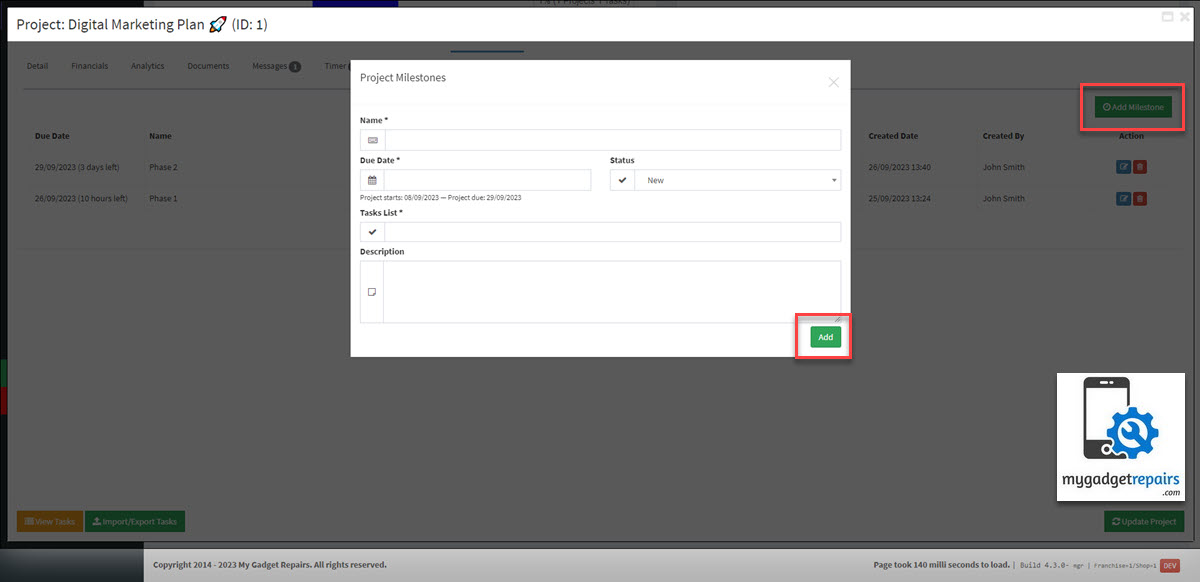
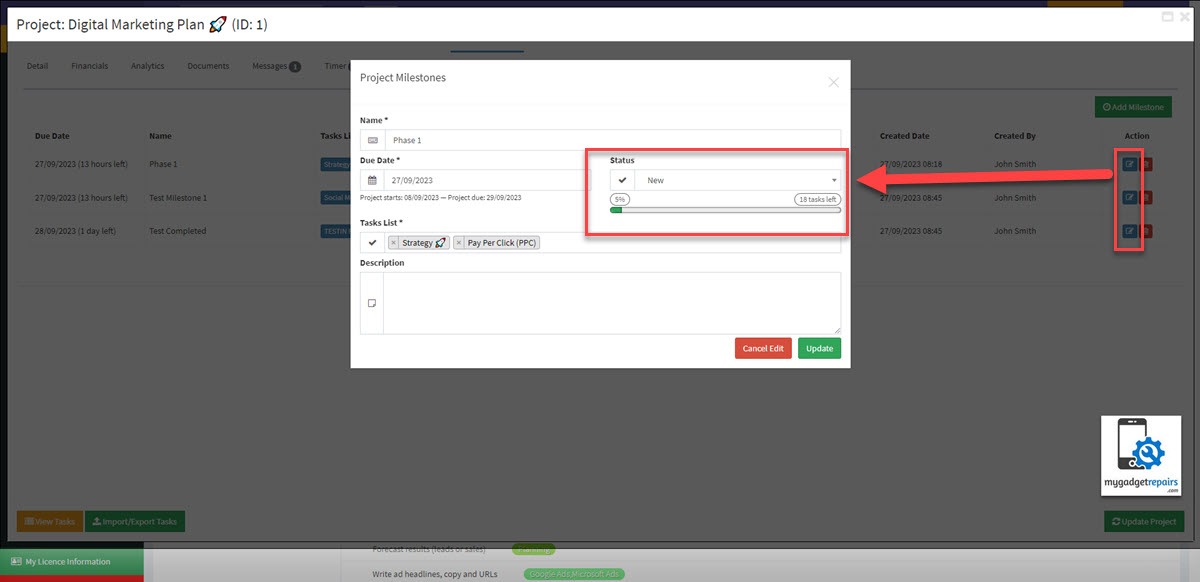
To create a new milestone, please click on the “Milestones” tab and follow the below instructions.
- Click on the “Add new Milestone” button.
- The default status will be set as “New“.
- Provide the milestone “Name“, and “Due Date” and choose at least one “Task List” from the task list dropdown.
- Please note that the due date can’t be greater than the project’s due date. The due date also can’t be before the project’s start date.
- Also, one task list can only be associated with one milestone.
- Finally, click on the “Add” button.
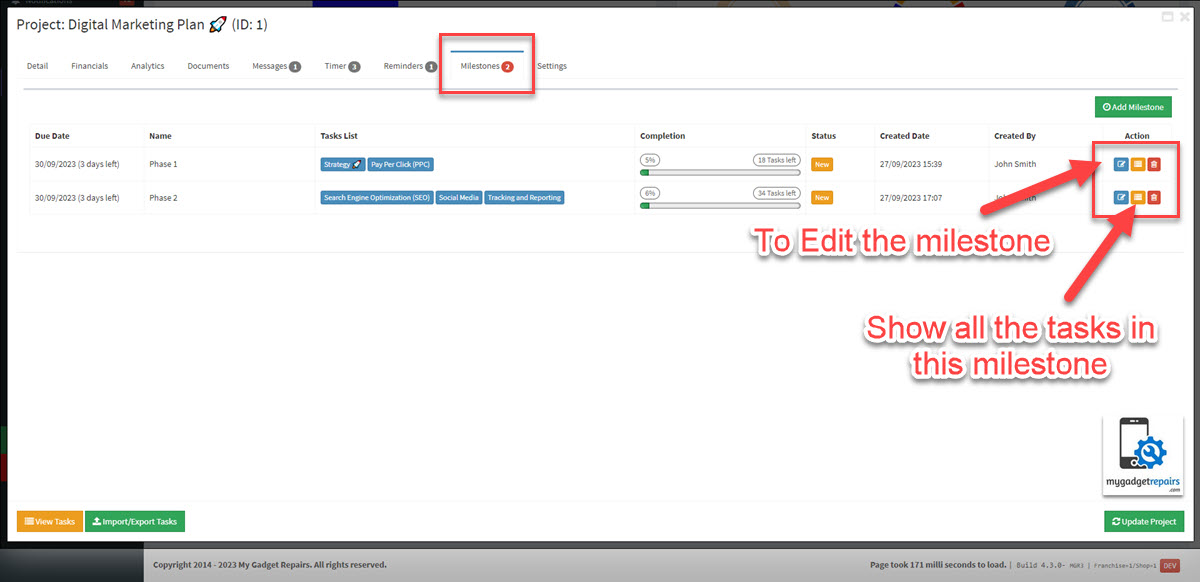
On the task list page, we show the “Milestone” information next to each task list if they are associated with a milestone.
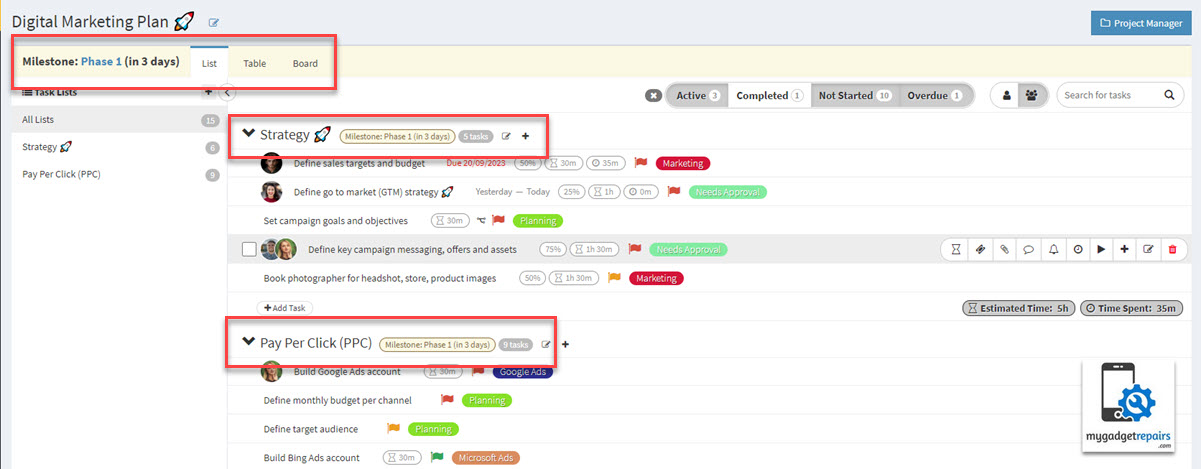
To edit a milestone please click on the edit icon within the actions column. There are a few things to consider when setting the milestone to complete.
- Each task list associated with a milestone shouldn’t have any pending tasks.
- One task list can only be associated with one milestone.
- The due date criteria are the same as when you create the milestone.
- Please note that the due date can’t be greater than the project’s due date. The due date also can’t be before the project’s start date.
Project-based Settings
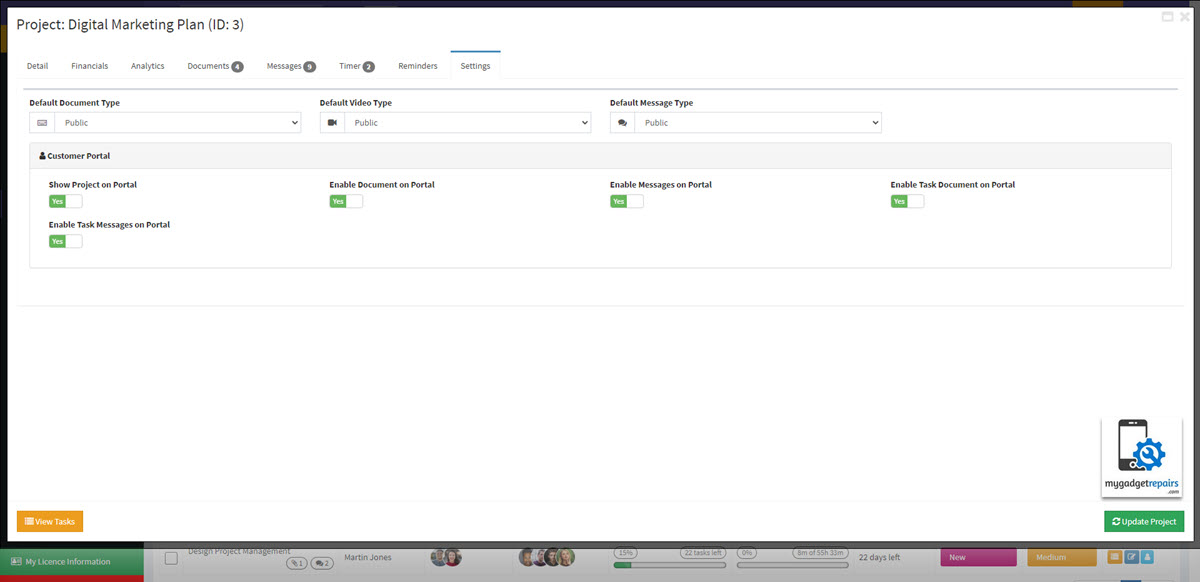
There are also lots of settings related to individual projects in the “Settings” tab, having settings at the project level means that you can customize and influence the behaviour of a specific project by adjusting parameters, rules, and preferences to align with the project’s objectives and requirements. This customization allows you to optimize processes, resources, and outcomes to successfully complete the project.
- Default Document Type: The predefined document type that is applied to documents within a project as a default. The values are “Public” and “Private“. The default value is “Public“.
- Default Video Type: The predefined video type that is applied to video within a project as a default. The values are “Public” and “Private“. The default value is “Public“.
- Default MessageType: The predefined message type that is applied to a message within a project as a default. The values are “Public” and “Private“. The default value is “Public“.
- Show Project on Portal: This setting determines whether a specific project is visible and accessible to customers on the customer portal. When enabled, the project will be displayed on the customer portal interface, allowing users to view and access information related to that project.
- Show Project Milestone on Portal: This setting controls the visibility of milestone information on the customer portal.
- Enable Document on Portal: Enabling this option allows customers to upload, view, and share documents related to the project within the customer portal.
- Enable Messages on Portal: Enabling this option typically allows customers to send and receive messages, notifications, or comments within the customer portal. It facilitates real-time or asynchronous communication among team members and project customers.
- Enable Task Document on Portal: Enabling it means that customers can attach or associate documents with individual tasks, making it easier to provide context, share relevant files, or track progress for each task.
- Enable Task Messages on Portal: Similar to the “Enable Task Document on Portal” setting, this setting might control whether users can communicate or leave messages/comments specifically related to individual tasks within the project on the customer portal. Enabling this feature allows for task-specific discussions or updates, enhancing collaboration and transparency.
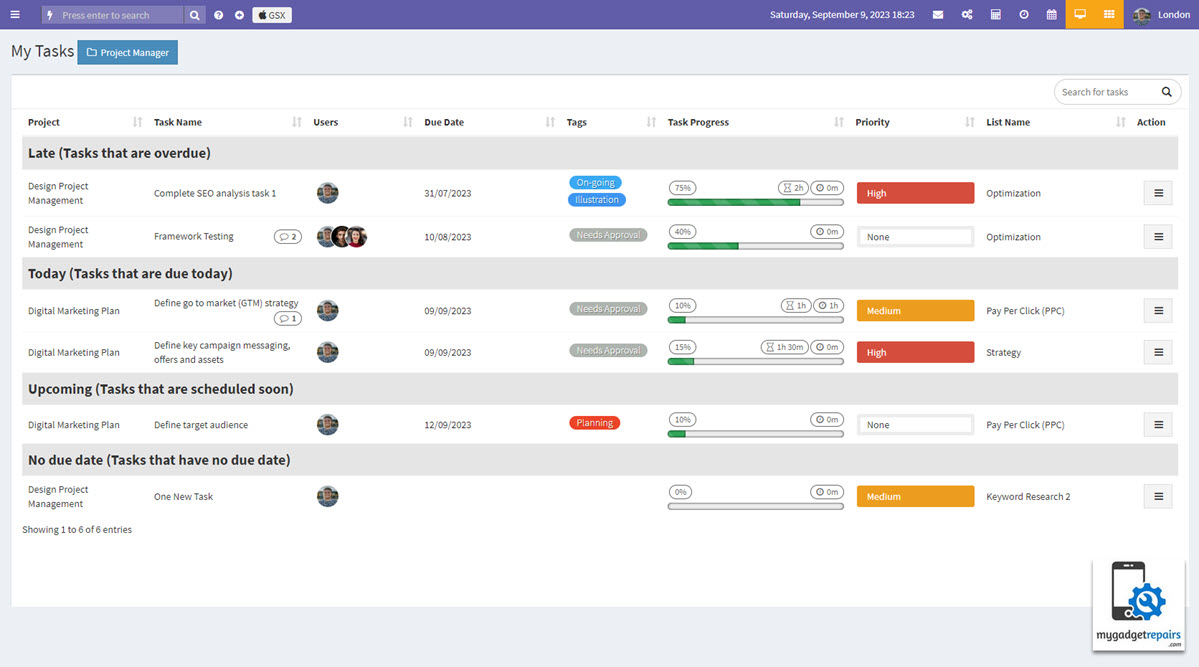
My Tasks List – Logged-in user
The “My Tasks List” button allows users to access and view tasks that are specifically assigned to them. When users click on this button, they are presented with a “Table View” that categorizes their assigned tasks into four distinct sections:
- Late: This section displays tasks that are overdue, meaning their due dates have passed, and they have not yet been marked as completed. Tasks in this section require immediate attention, as they are behind schedule and may have potential consequences for project timelines or commitments. Users can use this section to prioritize catching up on overdue tasks and avoiding further delays.
- Today: Tasks categorized under “Today” are those that are due for completion on the current day. This section provides a snapshot of the tasks that require immediate action to meet today’s deadlines. Users can focus on these tasks to ensure they are completed on time and avoid any last-minute rushes.
- Upcoming: In the “Upcoming” section, users can find tasks that have due dates in the near future but are not due today. These tasks are on the horizon, and users can plan their work accordingly to ensure that they are prepared to address these tasks as their due dates approach. It helps users stay organized and avoid last-minute stress.
- No due date: The “No Due Date” section contains tasks that do not have specific due dates assigned to them. These tasks are often open-ended or do not have strict time constraints. Users can work on these tasks at their own discretion and prioritize them based on their importance or other factors, as they are not bound by specific deadlines.
This organization of tasks into these four sections helps users efficiently manage their workload. It provides a clear picture of tasks that need immediate attention (Late and Today), tasks that require planning (Upcoming), and tasks that offer flexibility due to their lack of a specified due date (No Due Date). Users can prioritize their work accordingly, ensuring that they meet deadlines and effectively allocate their time and resources.
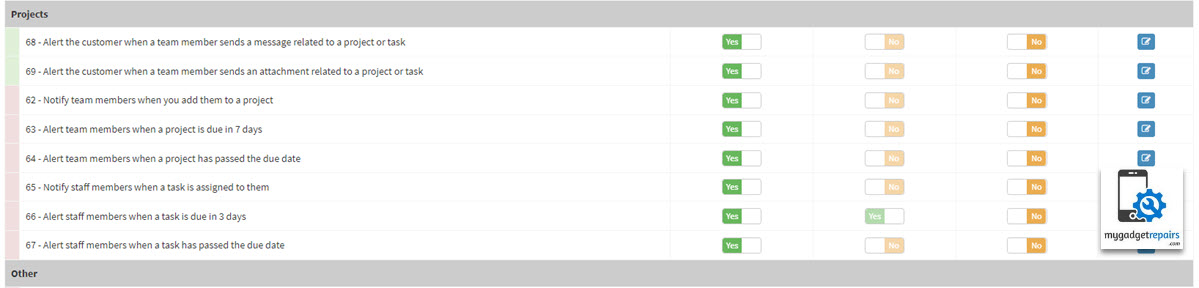
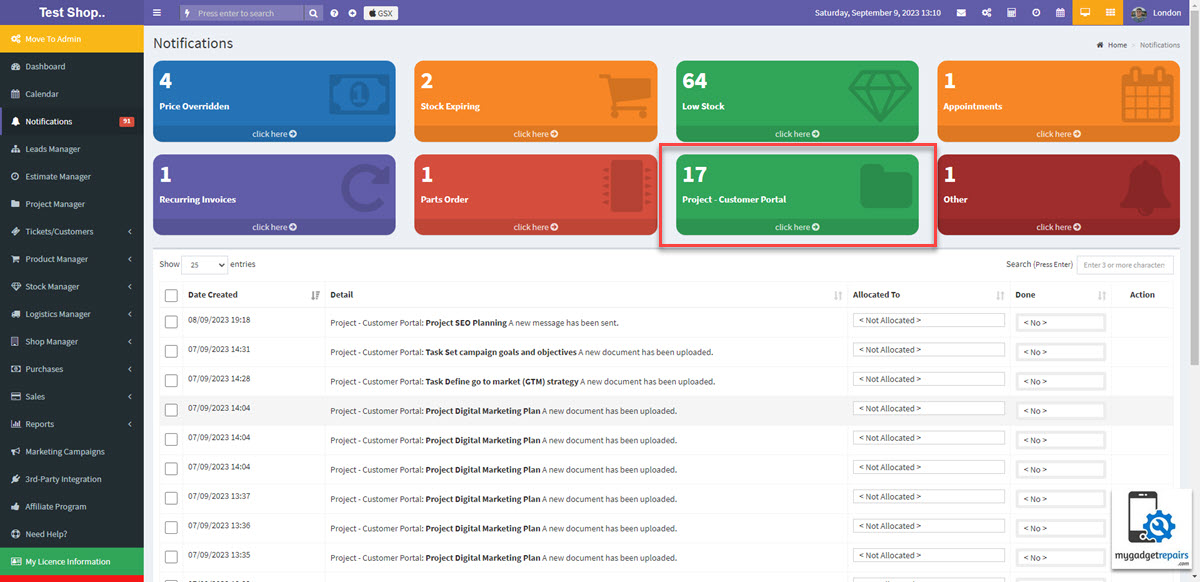
Notifications related to Projects
We have added a new section called “Project” which will hold notifications related to projects.
- 62 – Notify team members when you add them to a project
- 63 – Alert team members when a project is due soon
- 64 – Alert team members when a project has passed the due date
- 65 – Notify staff members when a task is assigned to them
- 66 – Alert staff member when a task is due soon
- 67 – Alert staff member when a task has passed the due date
- 68 – Alert the customer when a team member sends a message related to a project or task
- 69 – Alert the customer when a team member sends an attachment related to a project or task
- 70 – Alert staff members when a milestone is due in 3 days
- 71 – Alert staff members when a milestone has passed the due date
System Notifications
In project management, effective communication is paramount. Notifications play a crucial role in keeping team members and project stakeholders informed about significant events, updates, and changes related to a project. Categorizing project notifications into a separate section is a smart strategy to manage them better. It ensures that project-related updates are organized, prioritized, and easily accessible, ultimately contributing to smoother project execution and better decision-making.
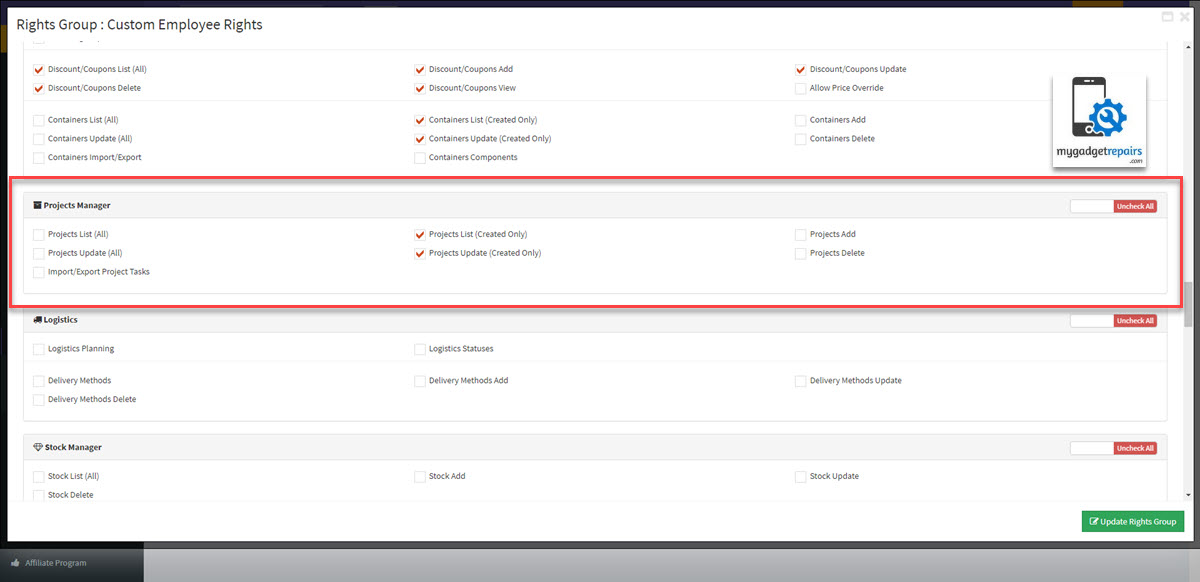
User Group Rights Related to Projects
We have also added rights related to the project management under the user rights groups.
System Settings related to the Project
There are also lots of settings related to the project in the settings> project tab.
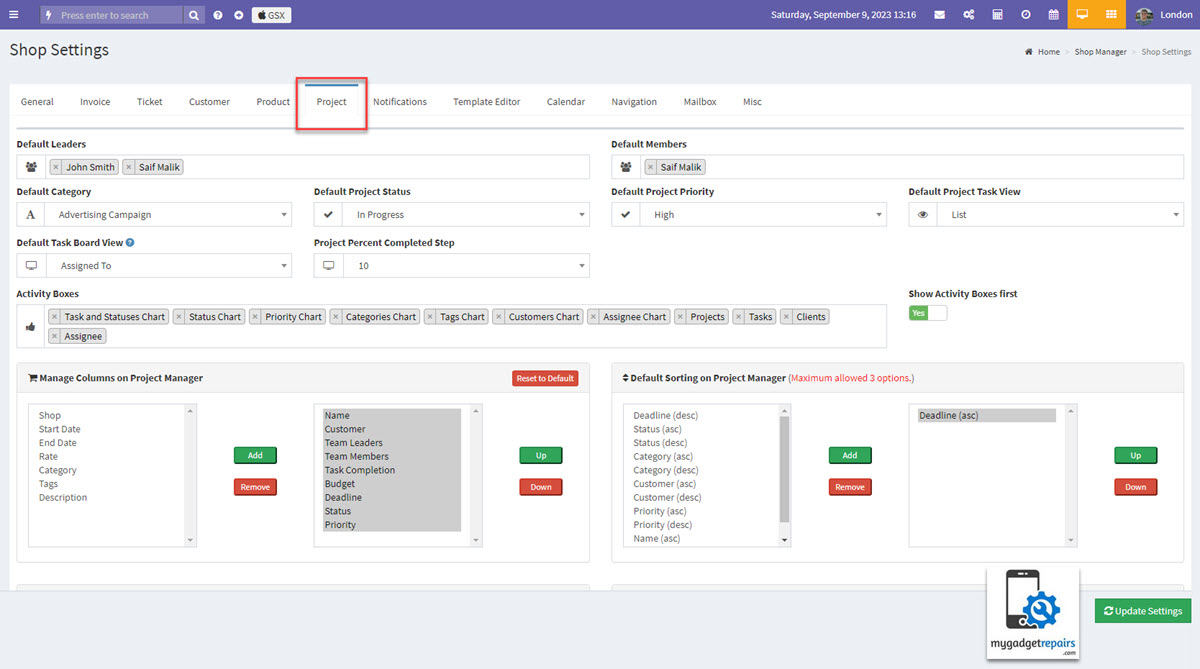
- Default Leaders: These are the individuals who are automatically assigned as leaders for new projects by default.
- Default Members: These are the individuals automatically included as members in new projects as a default setting.
- Default Category: This is the predetermined category or classification assigned to new projects unless otherwise specified.
- Default Project Status: The default status that newly created projects start with, providing an initial indication of their progress or state.
- Default Project Priority: The priority level is automatically set for new projects, indicating their relative importance or urgency.
- Default Project Task View: This is the default view or layout in which project tasks are displayed for team members. The values are “List“, “Table” and “Board“. The default value is “List“.
- Default Filter on the Task View: This setting will allow you to determine which filters should be applied by default on the task views. The default filters are “Active, Not-started, Overdue“. Below is the list of all options. Please note that you can choose more than one option.
- Active: Displays all currently active tasks
- Not-started: Lists tasks that have yet to commence.
- Overdue: Presents tasks that are past their due dates.
- Completed: Shows tasks that have been successfully completed.
- Default Task Board View: The default view that organizes the project board view, offering a visual representation of their progress. The values are “Percent Completed“, “Priority“, “Assigned To” and “Task List“. The default value is “Assigned To“.
- Project Percent Completed Step: This step denotes the predefined increments at which project completion percentages are measured and updated. The values are “1“, “5“, “10” “25“, and “50“. The default value is “10“.
- Activity Boxes: These are customizable containers that display project activities, allowing for the organized tracking of various tasks and events.
- Show Activity Boxes first: A configuration setting that determines whether activity boxes are displayed prominently or not when accessing project information.
- Manage Columns on Project Manager: This feature enables users to customize and arrange the columns displayed in the project management interface to suit their preferences and needs.
- Manage Columns on Task Table View: Similar to the above, this function allows users to tailor the columns shown in the task table view for efficient task tracking and management.
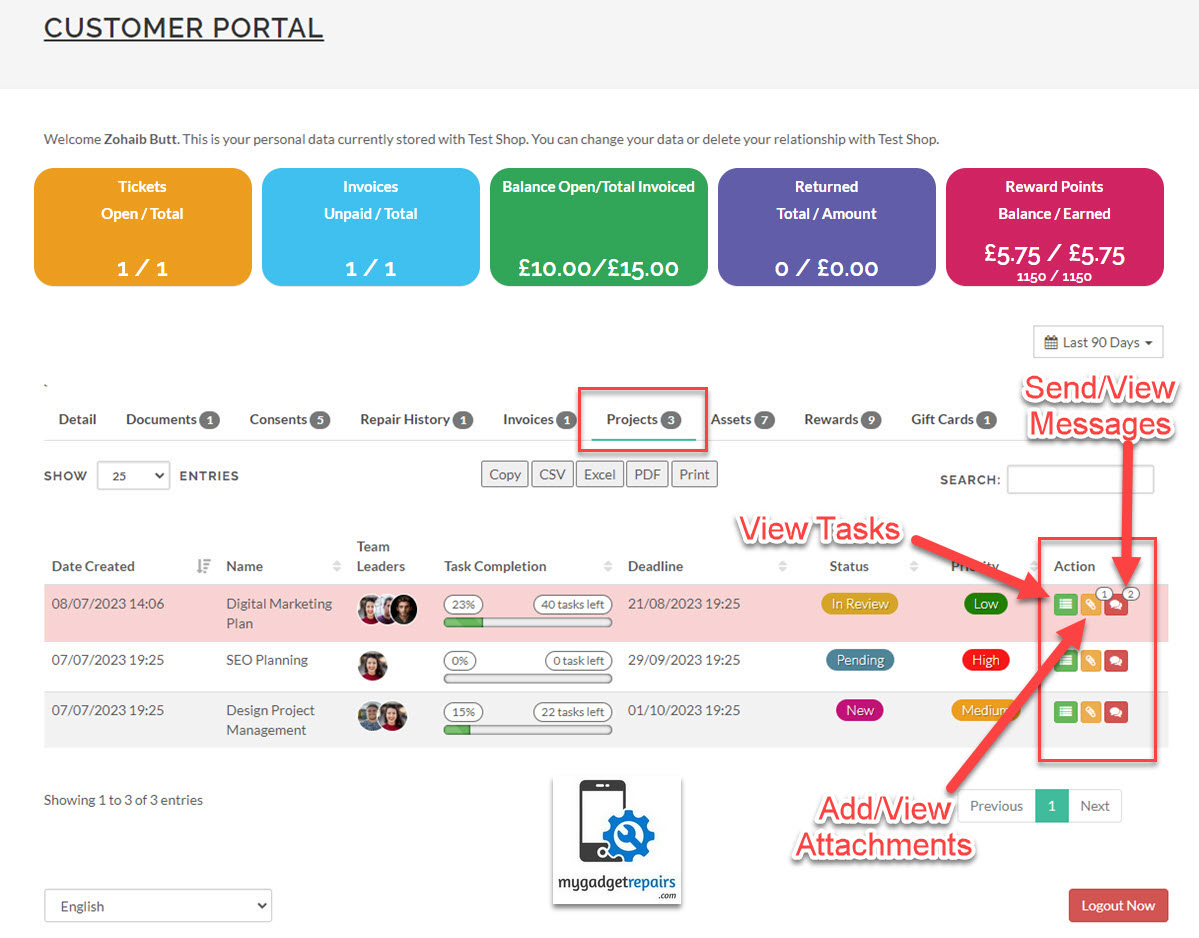
Customer Portal
The customer portal interface is designed to offer your valued clients a comprehensive and user-friendly view of the projects you’re diligently working on for them. This feature is pivotal in promoting transparency and fostering effective communication between our team and your clients.
Through this portal, your customers will have the invaluable capability to gain deep insights into the projects you are actively managing on their behalf. This encompasses not only providing a high-level overview of project progress but also furnishing them with intricate and granular details about each individual task within those projects. By affording this level of transparency and visibility, we empower your customers to remain well-informed about the current status and various stages of both the overarching project and the specific tasks associated with it. This approach not only enhances their understanding but also nurtures a collaborative and highly efficient working relationship between our team and your clientele.
In essence, this project section on the customer portal serves as a powerful tool, facilitating a seamless exchange of information, a clear understanding of project dynamics, and ultimately, ensuring that your clients are actively engaged partners in the success of their projects.
We’ve designed our platform to provide a seamless and comprehensive communication experience for your customers. In addition to the core project functionalities, your customers have the ability to easily attach images, PDF, Word, Excel documents etc. and send messages within the context of each project. This feature empowers our users to effortlessly share visual references, updates, and important information, fostering clear and efficient communication throughout the project lifecycle. Whether it’s clarifying specifications, providing visual inspiration, or simply staying in sync with project progress, our integrated image and messaging capabilities are here to enhance collaboration and streamline your project management needs. Both options can be enabled/disabled via the project settings.
Project Tasks view – Customer Portal
When you click on the “View Tasks” icon within the project interface, you will be seamlessly directed to a dedicated page designed to provide you with a comprehensive overview of all the tasks associated with that specific project. This intuitive interface not only displays all the tasks at a glance but also offers the convenience of sending and managing messages pertaining to each individual task, all within the same user-friendly platform.

Certainly, your valued customers have the ability to enhance their communication and collaboration by attaching images and sending messages at the task level. This feature empowers them to provide detailed context, share visual representations, and convey important information seamlessly within the task-specific conversation, streamlining the workflow and ensuring that everyone is on the same page. This not only fosters clearer communication but also boosts efficiency and productivity within your project management. Both options can be enabled/disabled via the project settings.
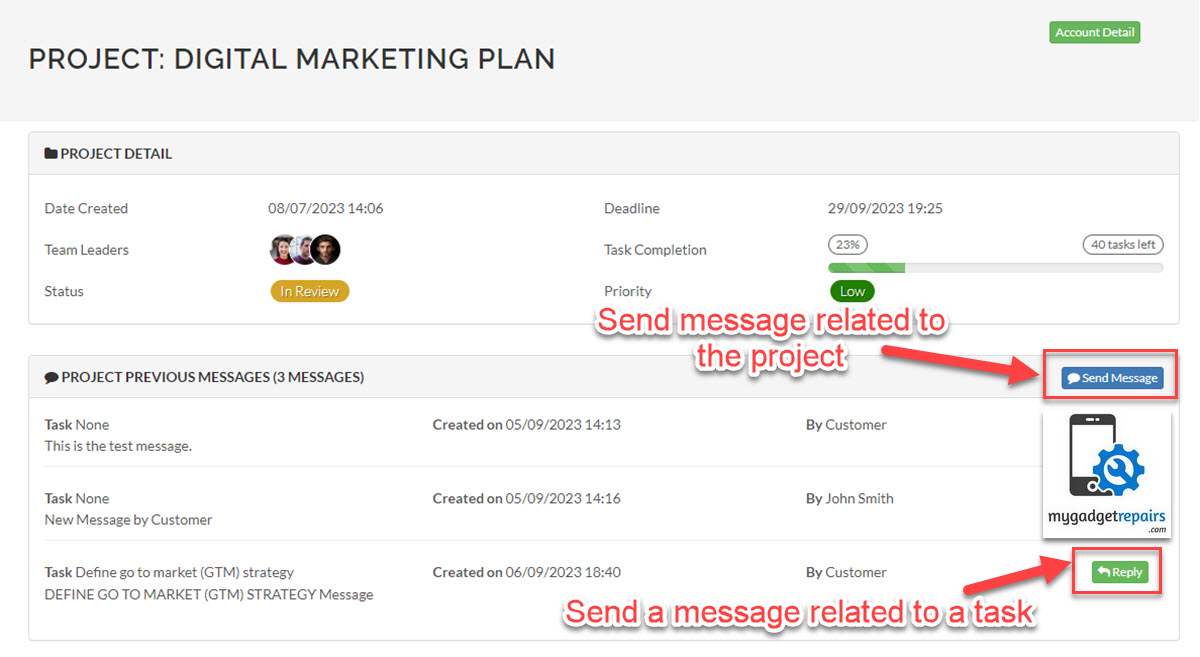
Project Messages – Customer Portal
Your valued customers have the privilege of accessing all public messages and discussions pertaining to the project and its associated tasks. This transparent communication channel empowers them to actively participate by offering their insights and feedback whenever necessary.”
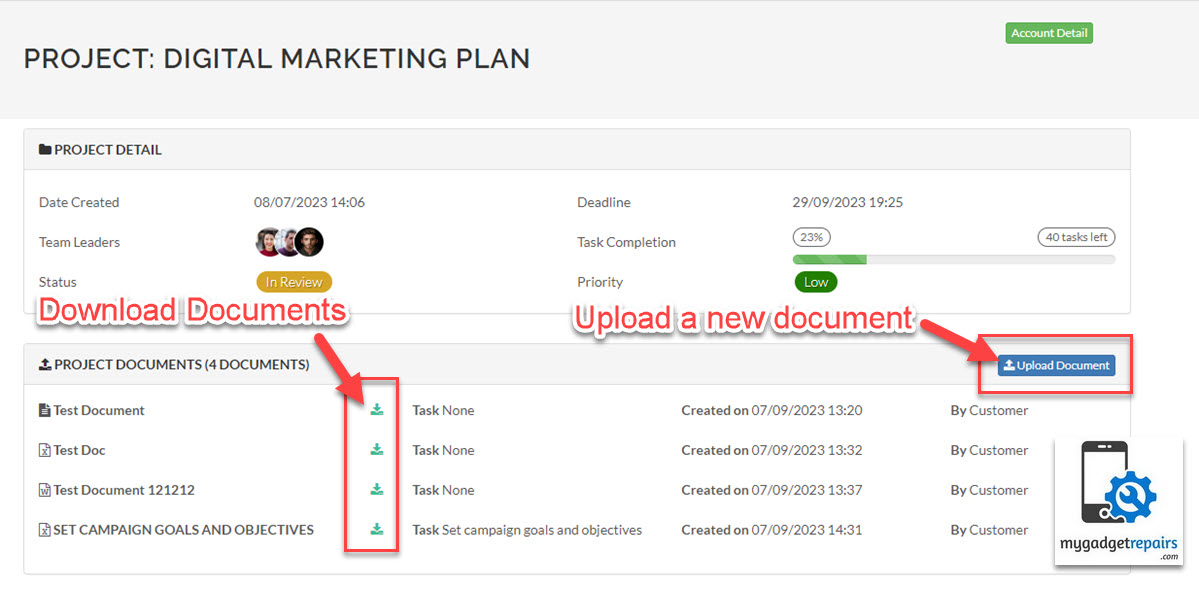
Project Attachments – Customer Portal
Your valued customers have full access to view all public documents associated with the project and tasks. Additionally, they enjoy the privilege of uploading new documents whenever the need arises, ensuring seamless collaboration and information sharing throughout the project lifecycle.
Billing
Coming soon
API Interface
Coming soon
Zapier Integration
Coming soon

