A recurring invoice is a type of invoice that is automatically generated and sent to a customer on a regular, recurring schedule. It is typically used for services or products that are billed on a regular basis, such as monthly subscriptions or retainer fees. You don’t need to schedule reminders or waste any time copying invoices. You can just sit back, relax, and focus your time elsewhere in your business while your invoicing is taken care of.
Recurring invoices can save time and reduce the risk of errors by automating the invoicing process. They can also help businesses to manage their cash flow by ensuring that they receive regular payments from their customers.
This article explains how to set up recurring invoice profiles and then send these recurring invoices automatically to customers. My Gadget Repairs offers a simple solution that automatically handles the invoicing process for recurring jobs. Some jobs are one-off, but others are ongoing, you may have to bill on a weekly, monthly, quarterly, yearly or any other basis. Recurring jobs are often the best jobs, as they provide regular, assured income. But they also come with massive overhead in terms of monitoring and billing at the right time for a correct time frame.
MGR’s “Recurring Invoices” feature automatically creates invoices and sends them to the customers on a regular, pre-configured basis. For each recurring job, you only need to set up the procedure once.
There are 2 different ways you can create recurring invoices in MGR.
- Via the Ticket Invoices / POS Sales – It means you already have customer and billable items in the invoice and you just need to define some additional parameters.
- Create a blank “Recurring Invoice” profile for a “Ticket” or “POS Order” and define all the parameters.
Both interfaces are as good as each other, it all depends on if you already have an invoice or not and if you do then you might as well start the process via the “Ticket Invoices” or “POS Sale” this way is much quicker because the system knows the customer information and the line items.
Let’s start with creating recurring invoices via the Ticket Invoices / POS Sales interface.
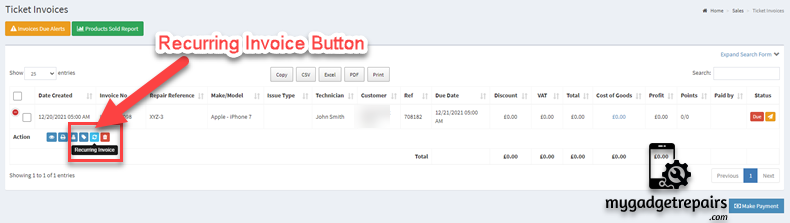
- Let’s go to the Ticket Invoices
- Select the invoice you want to make it recurring. There is a blue icon as shown in the below screenshot
- A new popup will open which will populate the customer details and the line items. You can still add more line items and remove existing line items, Please see the below screenshot.
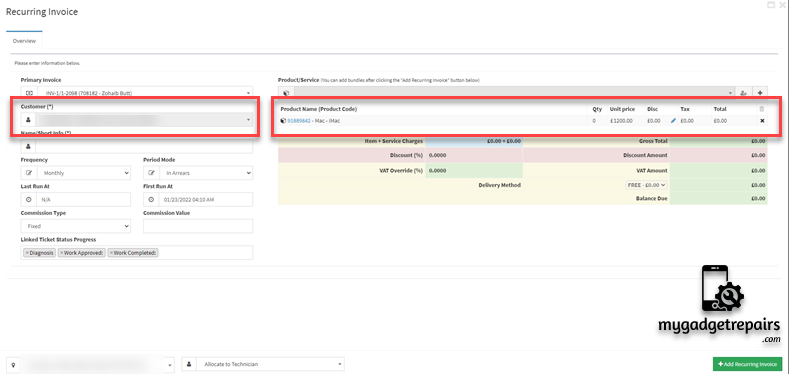
- As you can see you have additional parameters available to configure the recurring invoice profile.
- Type: There are 2 types of recurring invoices, one is related to the ticket and the other one is related to the POS order. Depending on the type the recurring invoice will either create a ticket and then invoice or the POS hold order which then will be converted to an invoice once the customer has made the payment.
- Name: Name of the recurring invoice profile so you know.
- Frequency: Depending on how often you want the invoices to be sent, select a time period from the ‘Frequency’ drop-down menu.
- Period Mode: If it’s “In Advance” or “In Arrears“
- Last Run At When it was the last run so you know the invoice has been sent.
- First Run At When you want the recurring invoice to start.
- Commission Type: If there is any commission for your technicians.
- Commission Value: If so what’s the value?
- Linked Ticket Status Progress: Each invoice will be creating a ticket and this is so you can control the workflow of your ticket. The status set here will be given to the ticket. This field will only show if the recurring invoice “Type” is a ticket invoice.
- Notify Customer: This option will allow you to send the “Ticket Creation” and “Invoice Creation” notifications to the customer, there might be a scenario where you just want to create the invoice and you don’t want to let the customer know as you may need to make some amendments before sending the invoice to the customer.
- Sync Product Prices: This option will allow you to sync the product prices with the recurring invoice line items before creating the invoice. This option is very useful if you’re changing the product price and you want it to reflect on all of the recurring invoices then you will enable this option.
- Once ready then please click on the “Add Recurring Invoice” button. Please see the below screenshot

The flow is the same from the POS Sales as well however you start the process by going to “POS Sales“, the blue icon is exactly the same, and the system will automatically change the recurring invoice type to “POS Sale” and it will hide all the ticket related fields.
The 2nd way of creating recurring invoices is by clicking on the “Add New Recurring Invoice” button, the whole flow is the same as above the only difference is that you don’t select an existing invoice so the system lets you add the line items manually. The additional parameters are exactly the same as in the previous flow, as soon as you select the type the fields related to the ticket will be hidden. Select the customer, set the parameters, add some line items and off you go.
As explained above that both processes are very similar and the only difference is where to get the line items from.
The system will allow you to make changes to your recurring profile at any point, including adding new line items or changes to prices etc, please click on the “Edit” icon to do that, it will also show you all the invoices and tickets related to that recurring profile. You can also click on the “Copy Recurring Invoices” icon to make a clone of the same recurring profile to speed up the creation process.
Please note that if notification no “57 – Ticket Invoice to the customer when a Recurring Invoice was created” is enabled then an automated email will be sent to the customer with a link to make the payment if it’s set as “In Arrears“.

