The stock count is the physical verification of the quantities and condition of items held in an inventory or warehouse. The stock count may be performed as an intensive annual end-of-year procedure or may be done continuously by means of a cycle count. An annual end of year stock count is typically done for use in a company’s financial statements. Once the count has been completed, you can add an adjustment to update your current stock.
Please follow the following steps to undertake a stock count
- Go to the stock count.
- Click on “Count Stock” button.
- A new window will open, please enter a reference number, from type select either “Full” or a “Partial” stock take. “Full” stocktake will be the whole of the inventory and on “Partial” stocktake will be based on a particular brand or a specific category.
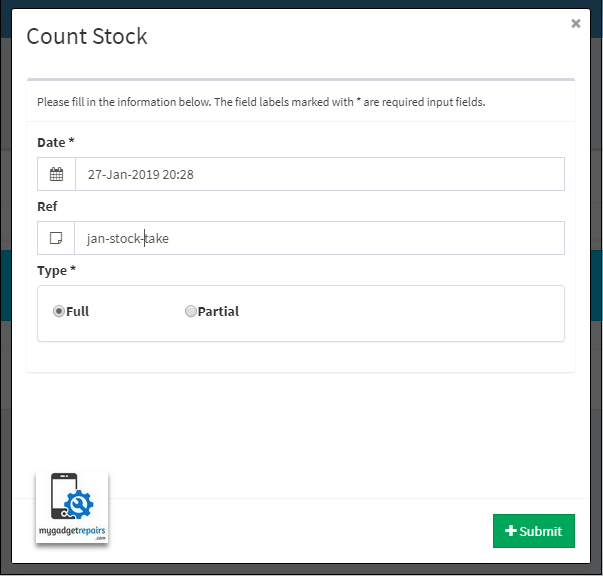
- Click on “Submit”
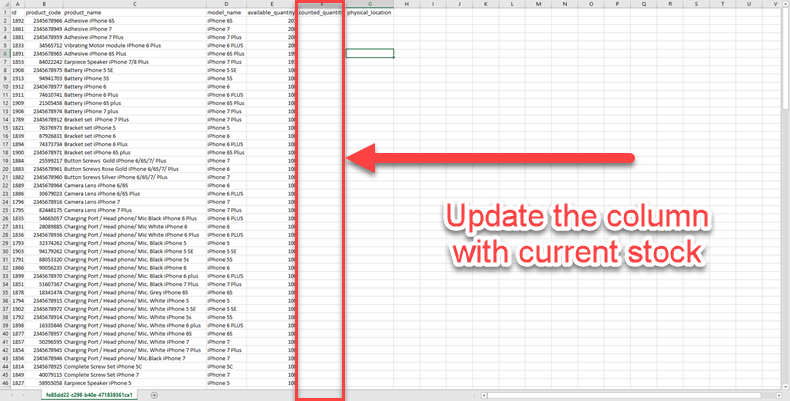
- The system will generate an XLS file, please download the XLS file.

- It will look like the following image. Now populate the column F (counted_quantity) according to your current stock.
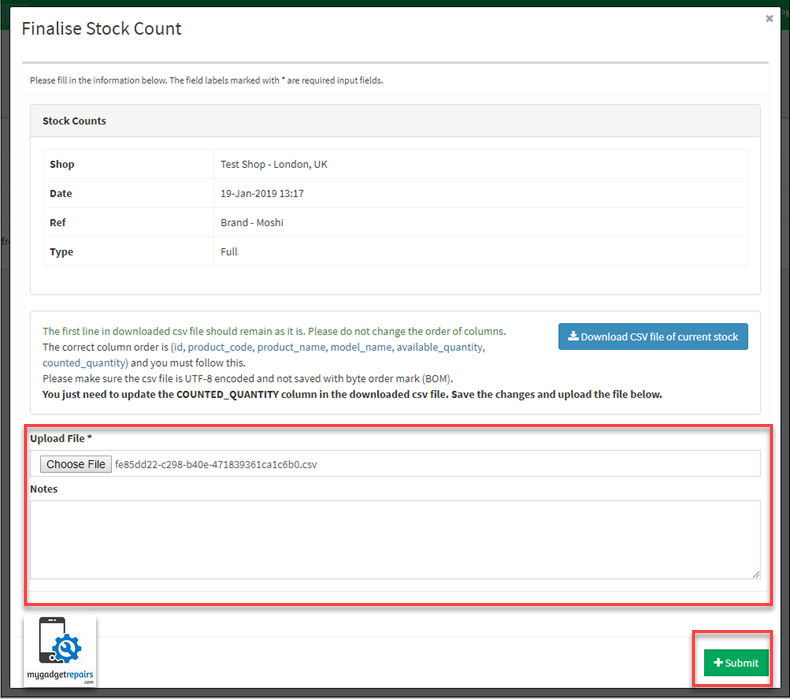
- Once you have finished counting your stock please save the XLS file. Now go back to the stock count page and click on the “Process” button as shown in the following image.
There are also 2 additional columns in the stock count generated file.
Missing: The same ability “Missing” has been added to the stock count process as well. Please set the column called “Missing” to 1 when all the serialised stock is “Missing” for this product. If the product is serialised and there is something in the “Available Quantity” and the “Counted Quantity” is 0 then the system will set all the available serials as “Missing” on the next step.
Serialised: This is to indicate if the product is serialised or not, please note that these products will be ignored during the stock count process unless you use the above “Missing” flag.
- Please click the browse button on the next page and select the XLS file to finalise the stocktake.
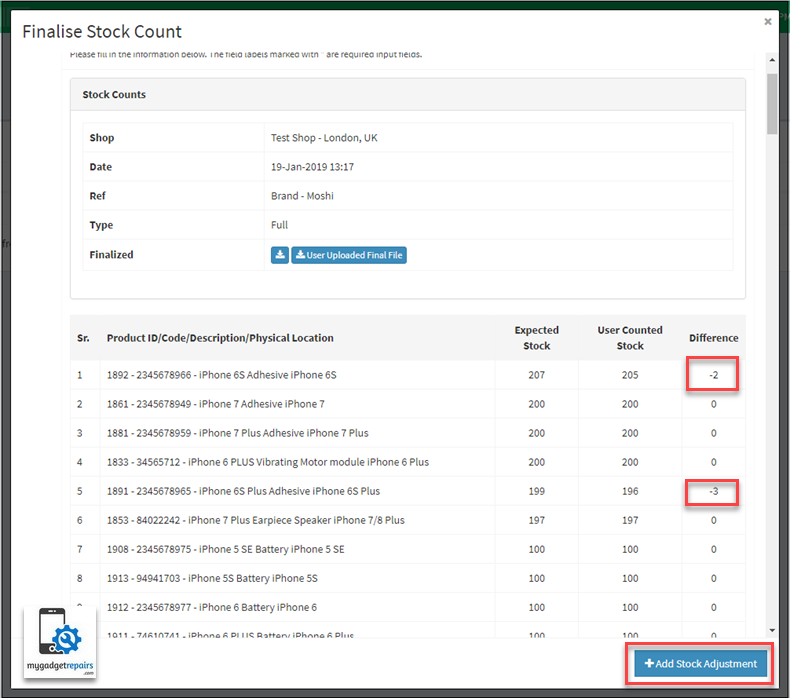
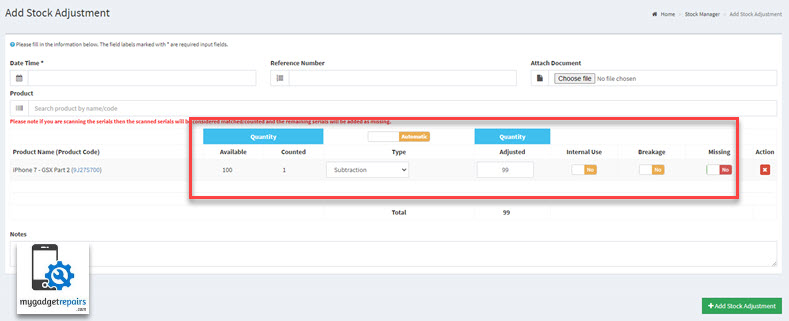
- The next screen will show you all the data as shown in the following picture along with the differences in the stock values. Click on “Add stock Adjustment” to proceed.
- Next screen will only give you the stock items where the difference is. Please add the date-time, reference or attachment if needed. Click on “Add Stock Adjustment” again to finish the process.

Please note that you can also create a Stock Adjustment directly as well without creating the stock count. This will allow you to log the internal use, breakage as well as any other issues with your stock.
Internal Use: Internal use is when you use the stock for an internal repair and don’t want to create a ticket for it but stock needs to be decreased accordingly.
Breakage: Breakage is when you have given the parts to your repairer and he/she accidentally damaged it during the repair. You can also log the “Breakage” via the ticket interface as well.
Missing: Missing is when you have lost the given serials and it will be added as missing which will reduce the stock accordingly.
When there is an “Internal Use” or “Breakage” the system will flag the scanned items as not available and it will be the same case when the items are serialised. Those ones will not available on the ticket or pos interface, The stock serial page will show you a flag next to those ones as “Internal Use” or “Breakage” so you know what happened with them.
Simply scan the bar code and select “Internal Use” or “Breakage” as shown in the following screenshot.
There might be a case when during the repair your technician found out that the part is “Defective“, in such a case you will NOT be using the stock adjustment because this “Defective” part has to be returned back to the supplier for a replacement so your technicians will be using the ticket interface to log the “Defective” part that way the system will add the part in the “RMA – Defective Parts and when you create the PO it will be available there with all the other ones.
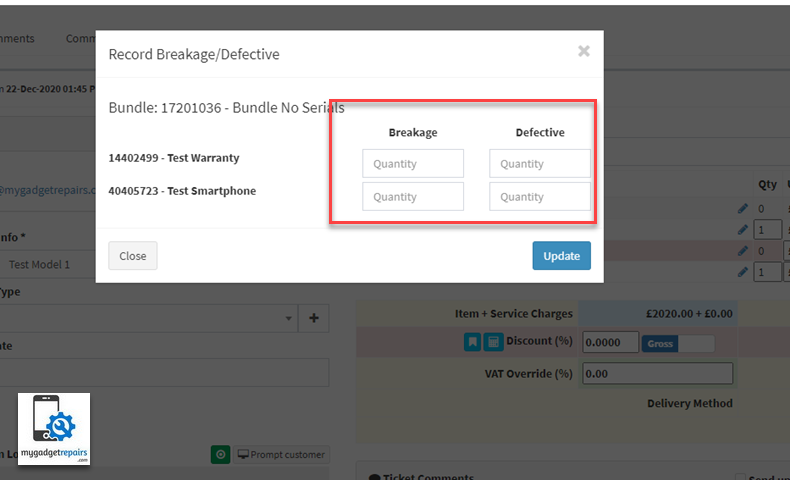
Please make sure that you have enabled “Allow Adding Defective/Breakage?” in the shop settings > tickets first. The following is the screenshot to record “Breakage” or/and “Defective” from the ticket interface. Please click on the icon shown in the following screenshot.

Once clicked it will show the following popup where you can add the values of the “Breakage” and “Defectives“, once entered click on “Update” button.
Please note that in the case of a serialise stock you must record a “Breakage” or “Defectives” first and then scan the replacement serial. This is ONLY if you’re using doing it from the ticket interface.

