Ticket Automation is a powerful feature within MGR that allows you to create rules for handling tickets, ticket automation will allow you to create “Conditions” and “Actions“, and when those conditions are met the system will perform those actions.
The potential uses of Ticket Automation are almost limitless, but a few examples include:
- Assigning tickets to different technicians based on the contents of the “Subject” or if the ticket is related to a particular “Company” of the ticket.
- Setting ticket properties like status, comments, priority, station/location and type based on conditions.
- Setting up appointments for customers or companies based on a condition.
- Setting up auto-reminders based on a condition.
- Setting up SLAs for customers or companies based on ticket properties like status, comments, priority and type.
- Automatically remind customers by sending email/SMS notifications when they haven’t responded to a ticket.
- Managing escalation when a ticket has been opened longer than a certain time.
- Notifying managerial users if a ticket bypasses a specified threshold.
- Routing the ticket to a specific technician depending on keywords in the short info of the ticket.
- Sending an automatic response to a technician or customer by sending an email/SMS with specific tips if certain keywords are in the short info.
- Automatically close a ticket by setting the ticket status to “Resolved/Pickedup” when a ticket has been picked up after a certain time has passed.
- Automatically incorporate ticket line items for unparalleled control and time-saving efficiency. Whether you need to effortlessly apply a diagnostic fee or automatically add a holding fee, or late charges when assets remain unclaimed after a specified period, the possibilities are limitless. This enhancement empowers you to tailor your processes with precision, streamlining your operations for optimal productivity.
- Send SMS reminders before the visit to the customer, based on appointment type. Something like an hour reminder to say that an engineer will be attending their premises to carry out a repair.
- And a lot more can be done with ticket automation. The possibilities are endless.
- We have over 31 conditions and 18 actions to choose from and from time to time we will be adding more.
Points to consider
- Automations run on an hourly basis.
- Automation can ONLY be performed on the “Tickets in Pipeline“, in other words, NOT “Resolved/Pickedup“.
- One automation can ONLY run a maximum of 10 times per Ticket, and then it will no longer run on that ticket.
- Every “Condition” will be matched as an “AND“, you can add as many conditions as you want.
- You can perform multiple “Actions” on the result set extracted from the “Conditions” you have set.
What it doesn’t do
- Perform on the tickets that are already been “Resolved/Pickedup“.
- Use the “Condition” with an “OR” logic.
Let’s start the ticket Automation process.
Please navigate to All Tickets > More > Ticket Automations. The “Automation Manager” will allow you to view a list of your current configured automation. You can do a few things from here.
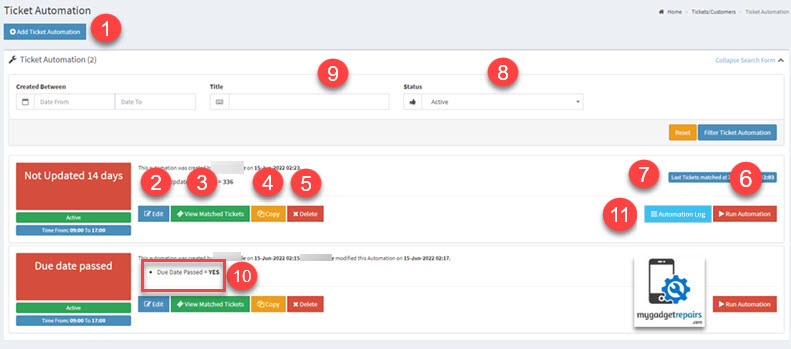
- Start a New Ticket Automation.
- Edit the Automation.
- Shows which Tickets currently meet the criteria for this Automation to run.
- Make a duplicate of the Automation so you can edit it to do something different.
- Delete the Automation.
- Run the Automation right now so that you don’t have to wait an hour for it to run.
- Indicator to show when it was last matched. Please note that it runs every hour regardless but it might not match the “Conditions” every time.
- Show all “Active” and “Not Active” Automations. Click on “Filter Ticket Automation” after the selection.
- Type a full or partial automation name and click “Filter Ticket Automation” to find those matching that name.
- List of “Conditions” that are configured in the automation and their value so you’re aware of what criteria have been set.
- The automation log will give you an insight into which ticket it has run so far and how many times.
Create/Modify an Automation
- In the upper left, click “Add Ticket Automation” to add a new one (or click an “Edit” icon to edit an existing one).
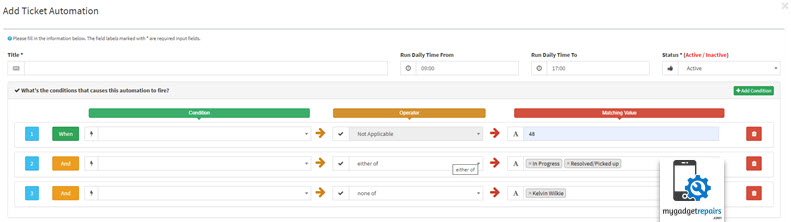
- Fill in the “Title” with a description of what you want it to do.
- Please check the automation “Run Daily Time From” and “Run Daily Time To“, please change it if you want to run the automation 24 hours or just within your business hours.
- Please select the “Max Runs“, the default value is 10 but if you want to run it once then you can select 1 from the dropdown.
- Under the “Condition” panel, click the green “+ Add Condition” button.
- Each condition has “Operator” and “Matching Value“.
- Now add the “Condition” you want tickets to match by selecting or entering values on the left, if “Operator” is available then it will be shown and sometimes the “Matching Value” will be a selection or you type the value. e.g. “Allocated to” will give you a list of your staff, same with the “Ticket Status” however the condition “Hours Until Due Date” needs a value which is in hours so you will have to type that in.
- You can add as many new conditions as you like. These are AND conditions; i.e., “If condition 1 is true AND condition 2 is true, then…” We do not currently have a way to add OR conditions.
- If you need to delete a condition, click on the red delete icon.
- Once you have defined your “Conditions” now it’s time to set the “Actions“. Select an action in the dropdown that appears and enter or select the values to use in the fields that appear. Those actions will be performed when the conditions are true for a ticket.
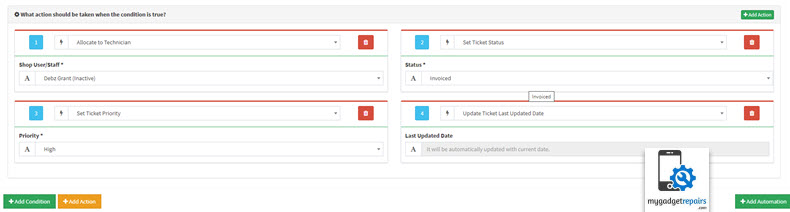
- Automation will keep running on the same tickets as long as the “Conditions” are met, up to 10 times. To run them only once on those tickets, add an Action to make a Condition no longer true. For example, if a Condition is “Ticket Status is New,” have an Action be “Change Status: In Progress” by doing this on the next run it will be false and it will not bring those tickets.
- As with conditions, you may click the green “+ Add Action” button to add as many new actions as you like. When the conditions are met, it will perform all the actions.
- If you need to delete an action, click on the red delete icon.
- Once finished, click “Add Automation”.
- You will be taken back to the “Automation Manager” and your new automation will run every hour within the given timeframe. You can click “Run Automation” to immediately run it.
- Once an Automation runs, it will post an update to each ticket’s comments log that meets the Conditions.
The following is the list of “Conditions” used to extract the data.
- Allocated To: This will search in the “Technician” field.
- Due Date Passed: This will search in the “Ticket Due Date” field but only the ones that have passed.
- Hours Until Due Date: This will search in the “Ticket Due Date” field for the ones that are due in X hours.
- Not Updated in Hours: This will search in the “Ticket Last Updated Date” field, but it hasn’t been updated in X hours.
- Days Since Created: This will search in the “Created Date” field. You may want to automatically set the tickets as resolved after one year. You can use this and set the value to 365 and in actions use the set ticket status option. This can also be used for various scenarios.
- Hours Since Created: This will search in the “Created Date” field. You may want to automatically set the tickets as resolved after a certain hour. You can use this and set the value to 365 and in actions use the set ticket status option. This can also be used for various scenarios.
- Part Order Created: This will search in the “Part Order Created” field.
- Part Order Received: This will search in the “Part Order Received” field.
- Has SLA: This will search in the “Service Level Agreements” field based on any SLA assigned to a ticket.
- Assigned SLA: This will search in the “Service Level Agreements” field based on a selection. This will give you a list of “SLAs” to choose from.
- Ticket Issue Type: This will allow you to search in the ticket “Issue Type” field.
- Ticket Brand: This will allow you to search in the ticket “Ticket Brand” field.
- Ticket Model: This will allow you to search in the ticket “Ticket Model” field.
- Ticket Status: This will allow you to search in the ticket “Issue Status” field.
- Ticket Priority: This will search in the ticket “Priority” field.
- Ticket Subject: This will allow you to search in the ticket “Issue Subject” field.
- Ticket Last Comment: This will search in the “Ticket Comments” field.
- Ticket Last Comment Status: This will search in the “Ticket Comments Last Status” field.
- Ticket Station/Location: This will search in the “Ticket Station/Location” field.
- Invoice Status: This will search in the ticket “Invoice Status” field.
- Invoice Due Date Passed: This will search in the “Invoice Due Date” field.
- Days until Invoice Due: This will search in the “Invoice Due Date” field for the ones that are due in X hours.
- Customer Address: This will allow you to search in the “Customer Address” field.
- Customer Company: This will search in the “Customer Company” field.
- Customer Group: This will search in the “Customer Group” field.
- Customer is: This will search in the “Customer” field.
- Ticket Appointment Type: This will search in the “Appointment Type” field of the appointments that are assigned to a ticket.
- Hours Until Appointment Due Date: This will search in the “Appointment End Date” field of the appointments that are assigned to a ticket.
- Has Asset Attached: This will search in the tickets that have assets associated/attached.
- Has Estimate: This will search in the tickets that have estimates associated/attached.
- Ticket Custom Fields: This will provide a comprehensive list of all available ticket custom fields, allowing you to select the specific ones you wish to utilize as conditions. Notably, within the matching criteria, you have the flexibility to employ the TAG “CURRENT_DATE” which will automatically be transformed into today’s date when used for matching purposes.
Please be aware that when saving custom field data through the ticket interface, empty fields are not stored. Consequently, it’s not possible to match a blank field during retrieval or comparison.
Please note that some of the conditions may have the following operators to give you more control while extracting the data.
- equals to: Given keyword will be matched as equal to.
- is not equal to: Given keyword is not equal to.
- contains: Given keyword contains.
- does not contain: Given keyword does not contain.
- no one: This is used with “Allocated To” which will bring all the tickets that are not allocated.
The following is the list of “Actions” which can be applied to the extracted data.
- Allocate to Technician: This will allow you to change the technician.
- SET Reminder: This will allow you to set a reminder for tickets.
- Set Ticket Status: This will allow you to change the ticket status.
- SET Ticket SLA: This will allow you to set an SLA for tickets that are filtered through the condition.
- Set Ticket Priority: This will allow you to change the ticket priority.
- Set Station/Location: This will allow you to change the ticket station/location.
- Add Ticket Comment: This will allow you to add a new ticket comment.
- Email to Technician: This will allow you to send an email to the technician.
- Email to Customer: This will allow you to send an email to the customer.
- Send Email (Custom): This will allow you to send an email to a custom email address.
- Send SMS to Customer: This will allow you to send an SMS to the customer.
- Send SMS (Custom Number): This will allow you to send an SMS to the custom number.
- Schedule Appointment: This will allow you to create calendar appointments.
- Update Ticket Last Updated Date: This will allow you to update the ticket’s last updated date.
- SET Due Date: This will allow you to set the ticket’s due date. You must enter the number of days in the “Due Date (in days)“.
- Add Line Item: This will allow you to incorporate ticket line items automatically for unparalleled control and time-saving efficiency. Whether you need to effortlessly apply a diagnostic fee or automatically add a holding fee when assets remain unclaimed after a specified period, the possibilities are limitless. This enhancement empowers you to tailor your processes with precision, streamlining your operations for optimal productivity.
- Update Ticket Custom Field: This will allow you to update the ticket’s custom fields. You have the flexibility to employ the TAG “CURRENT_DATE” which will automatically be transformed into today’s date when used for updating purposes. You can also use CURRENT_DATE+1 or any other positive integer value to make it more dynamic to add days in CURRENT_DATE.
- Webhook: This will allow you to effortlessly connect and share information with other systems or services, expanding the possibilities for integration and automation within your workflow.
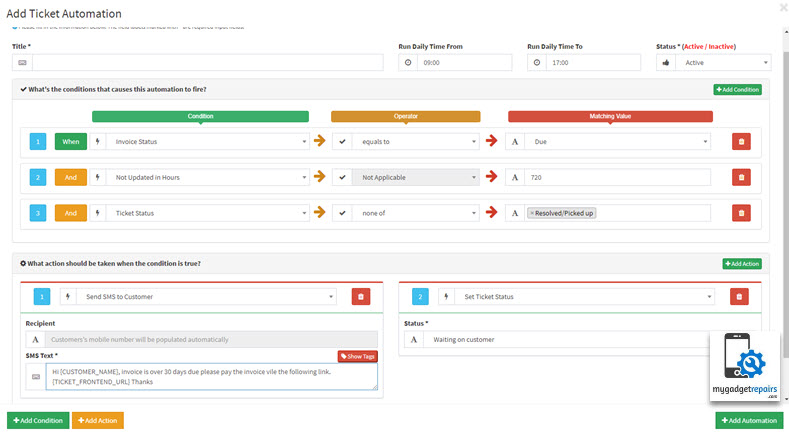
Example Automation
Here is an example of Ticket Automation that you can use to see how a Ticket Automation might look. When the Conditions find invoiced but unpaid Tickets that have been open for too long, it will send an email to the customer as well as the assignee.
Ticket Automation Log
The automation log shows you the log chronologically with the list of tickets the rule has applied to and how many times as the rule will only run 10 times on one ticket.

