Generating bar codes can help you in tracking inventory items as well as giving you the ease to scan multiple items at a counter or while adding inventory. You can generate bar codes for an item in MGR. In this article, we will show you how to generate and print bar codes for tangible inventory items.
Steps:
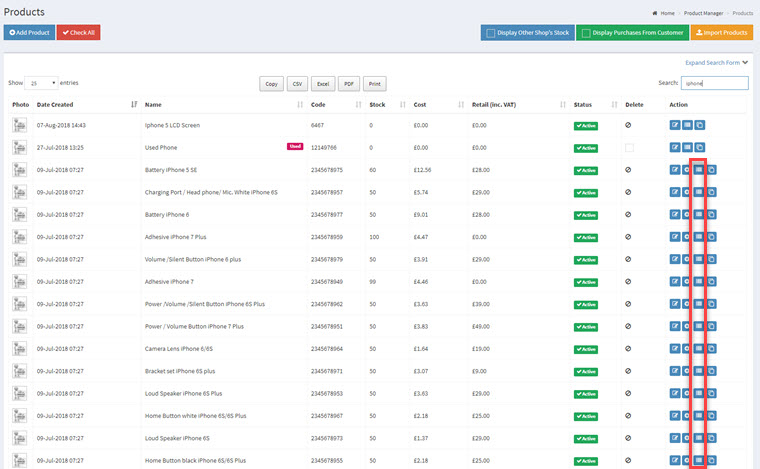
1. Go to Product Manager >> Products.
2. To print the barcode please click on the barcode icon which is located in the action column.
3. It will take you to the “Print Barcode/labels” screen where you manage how many and paper styling (A4 (65 labels, 40 labels etc), continuous paper (Dymo printer) ).
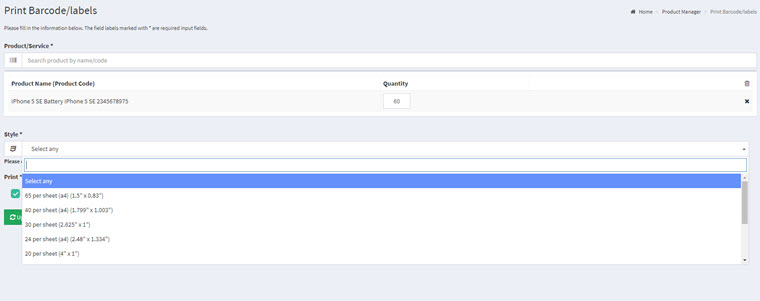
Please change the “Style” depending on your needs and choose what to show on the labels. Click on the “Update” button to proceed.
Please don’t forget to set the correct page size and margin for your printer. You can set the right and bottom to 0 while the left and top margins can be adjusted according to your need.

4. It will show the “Preview” of the labels and once you are happy please click on the “Print” button.

When setting a barcode scanner to any available keyboard modes (KB-wedge / USB-keyboard), it mimics a regular keyboard and sends keystrokes, instead of characters, to the host computer. In order to send the proper keystrokes, the scanner must be configured to the same keyboard layout as the one being used by the host computer.
Label Templates
All the “Label Templates” are located under the shop settings > template editor > labels tab. Please note that all of the templates are HTML based and you can use your own CSS code as well. You can also control the height and width of the label by adding an outer div with height and width. Let’s say you’re using Dymo 30252 labels, the Dymo 30252 Address label measures 1-1/8″ x 3-1/2″ (28.7mm x 88.9mm) your outer div would look like the following.
<div style="height:28.7mm;width:88.5mm;">
template variables will go here
</div>
The following is an example of the product label “54mm” if you want to use <div> rather than tables.
<div style=" text-align:center; width:54mm; margin:0 auto;">
   <div style="font-size:12px; line-height:1;"><b>[NAME]</b></div>
   <div style="font-size:10px;">[DESCRIPTION]</div>
   <hr style="border-bottom:2px solid black; margin:3px;" />
   <div>[BAR_CODE]</div>
   <div style="font-size:12px; line-height:1;">[CODE]</div>
   <div style="font-size:12px; line-height:1;"><b>[PRICE_EX_VAT]</b></div>
</div>
The following is an example of the product label “89x29mm = 3.5inx1.125in” if you want to use <div> rather than tables.
<div style=" text-align:center; width:3.5in; height:1.125in; margin:0 auto; position:relative; text-transform:none; font-size:12px;">
   <div style="line-height:1; position:absolute; top:10px; left:10px; right:10px; text-align:left; "><b>[NAME]</b></div>
   <div style="line-height:1; position:absolute; top:10px; right:10px; text-align:right; "><b>[PRICE_EX_VAT]</b></div>
   <div style="font-size:10px; line-height:1; position:absolute; top:25px; left:10px; right:10px; text-align:left;">[DESCRIPTION]</div>
   <hr style="position:absolute; left:0px; right:0px; top:45px; border-bottom:3px solid black; margin:0;" />
   <div style="position:absolute; top:50px; left:0px; width:100%; text-align:center; overflow:hidden; height:35px;">[BAR_CODE WIDTH=90%]</div>
   <div style="position:absolute; top:87px; left:0px; width:100%; text-align:center; font-size:10px; line-height:1;">[CODE]</div>
</div>
The following is an example of the ticket label if you want to use <div> rather than tables.
<div style="text-align:center;height:27.8mm;width:88.5mm;margin:0 auto;"> <div style="height: 50px; overflow: hidden;">[IMG_BARCODE WIDTH=100%]</div> <div style="white-space: nowrap;">Ref: <strong>[REPAIR_REF]</strong> - Due: <strong>[REPAIR_DUE_DT]</strong></div> <div style="white-space: nowrap;">Name: <strong>[CUSTOMER_NAME]</strong> - <strong>[CUSTOMER_NUMBER]</strong></div> <div>[REPAIR_SHORT_INFO]</div> </div>
The above rule applies to any printer labels. MGR doesn’t know which printer you will be using so we provide a generic template which you can alter based on your requirements. Please note that if you’re using the “Print Node” integration then you don’t need to set the height and width as it’s controlled via the integration setting.
Let’s say you were using a Zebra printer for jewellery tags and your tag labels are generally 13mm x 56mm your outer div would look like the following.
<div style="height:13mm; width:56mm; float:left; margin: 8px 0;"> <div style="width:37mm; float:left;"> <span style="width:17mm; font-size:9px; float:left;"><b>[PRICE_EX_VAT]</b></span> <span style="width:20mm; font-size:9px; float:left;"> </span> <span style="width:37mm; font-size:9px; float:left;"><b>[NAME]</b></span> </div> <div style="width:19mm; float:left;"> <span style="height: 20px; overflow: hidden; width:19mm; font-size:9px; ">[BAR_CODE WIDTH="90"]</span> <span style="width:19mm; font-size:9px; text-align:center;"><b>[CODE]</b></span> </div> </div>
You can control the overflow of long text, such as [NAME] tag or any other tags, using additional CSS properties to ensure the content is restricted to two lines. This technique prevents excessive text from overflowing and maintains a clean layout:
overflow: hidden;
text-overflow: ellipsis;
line-height: 15px;
max-height: 30px; /* Adjust based on line-height to fit exactly 2 lines */
display: -webkit-box;
-webkit-line-clamp: 2; /* Limits the text to 2 lines */
-webkit-box-orient: vertical;
white-space: normal; /* Ensures the text wraps properly within the box */


<div style="font-size:10px; overflow: hidden; text-overflow: ellipsis; line-height: 15px; max-height: 120px; display: -webkit-box; -webkit-line-clamp: 2; -webkit-box-orient: vertical;">[NAME]</div>
This approach uses the -webkit-line-clamp property, along with display: -webkit-box and -webkit-box-orient: vertical, to limit the text to two lines. The overflow: hidden and text-overflow: ellipsis properties ensure that any text beyond the second line is hidden and indicated by an ellipsis, creating a tidy and user-friendly display.

