Mailbox and mailbox rules are designed to automate your ticket workflows, increasing efficiency and saving time for your team. Mailboxes can be used to assign emails to tickets and leads as well as another way of creating tickets automatically.
Creating a mailbox is very simple, you must create a mailbox first before creating mailbox rules.
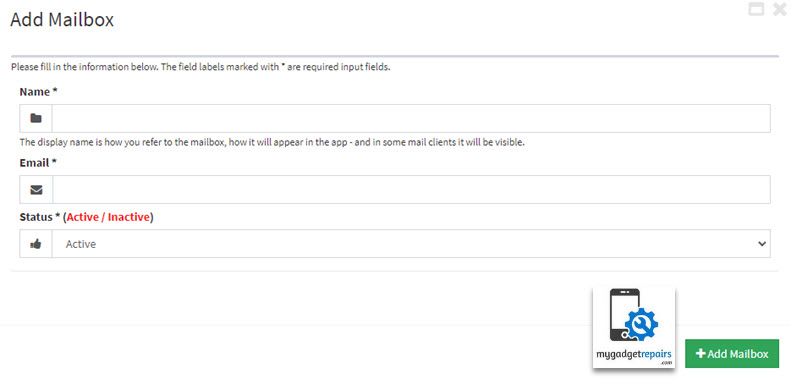
- Please go to “Mailbox Manager” and then click on the “Add Mailbox” button.
- Please fill in all the required information.

- Enter the “Name” this is only for display purposes.
- Enter your “Email“, like “support@yourcompany.com” this is the one you want to set the forward rule on.
- Click on the “Add Mailbox” button.
- Once the mailbox is created in MGR we will give an email address which will be something like “mailbox-name@shop.mygadgetrepairs.com“.
Once the mailbox is created in MGR we need to configure a few things before it starts working. Let’s presume that MGR has given me an email address “test-mailbox-146@shop.mygadgetrepairs.com“.
- Step 1: Forward support@yourcompany.com to test-mailbox-146@shop.mygadgetrepairs.com.
- Step 2: Read our SPF section on this help page: SPF Doc and set up a related DNS record.
- Step 3: Send a test email to support@yourcompany.com.
- Step 4: Check the MGR Inbox and see if an email has arrived as shown in the below screenshot.

After the above, your mailbox should be in working order and as soon as MGR receive an email to “test-mailbox-146@shop.mygadgetrepairs.com” it will match it against the ticket or lead and if there is a match it will be automatically assigned which you can see in the ticket’s communication tab or leads’s communication tab.
You can do more with the mailbox and that’s where “Mailbox Rules” comes in. If the inbound email doesn’t match with a ticket or lead it will then try to match with the rules you defined, if still doesn’t match then the inbound email will be deleted automatically as we don’t need to do anything with that hence why most of the time when you go to mailbox’s “Inbox” it will be empty.
- To create mailbox rules please click on the red “Mailbox Rules” icon located in the “Actions” column.

- A new window will open and it will list all the existing rules set up on this mailbox, please note that you can as many rules as possible on one mailbox. The very first time it will be blank so click on the blue “Add Mailbox Rule” button.

- If you already have mailbox rules then it will show you the list and under the “Actions” column you can perform the followings.
- Edit
- Change Order
- Run Now
- Copy/Clone
- The “Add Mailbox Rule” screen has 2 tabs.
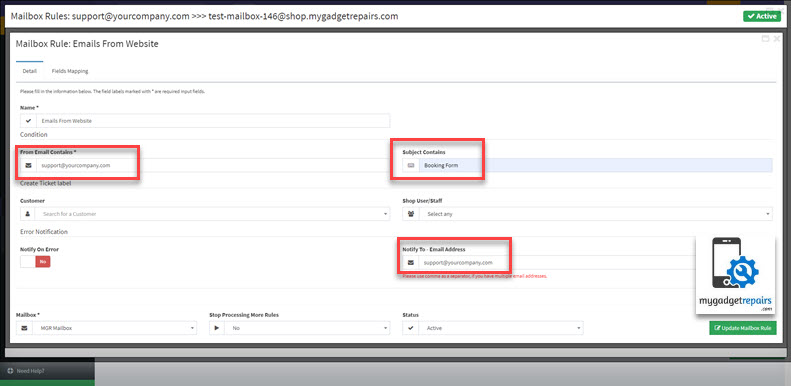
- Detail: The detail tab holds the basic information about the rule such as “From Email“, “Subject” what to do when there is an error and who to notify etc.

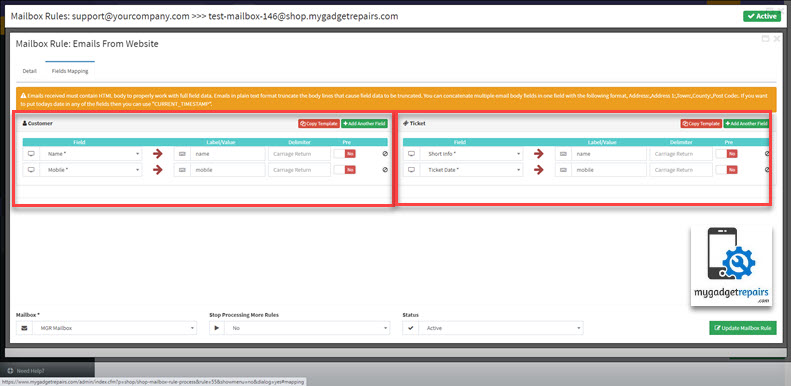
- Field Mapping: This tab is where you map all the email body fields to customer and ticket’s required fields so the system is in the position to create a customer (if needed) and ticket. By default, the system will give the required fields which you must match based on your current configuration. In the following screenshot, I have 2 customer fields required and 2 ticket fields so it’s only showing me those in your case it might be different so just bear that in mind.

- You can add as many fields as possible in the customer and ticket section, just click on the green “Add Another Field“, if you click on the “Copy Template” it will show you how you should send in the email body.
- “Add Another Field” will also list all the custom fields you have created.
- You can also use the “CURRENT_TIMESTAMP” tag if you want to put today’s date in a field.
- You can also use the “Pre” which stands for “Prepopulated” and add a text.
- In the field called “Issue Type“, you can send either the id or the name of the issue type.
- Battery
- 1614
- In the field called “Model“, you can send either the model id, the name of the model or the name of the brand and model.
- 2114
- iPhone 6
- Apple iPhone 6: In this example, the “Apple” is the brand and the “iPhone 6” is the model.
- Detail: The detail tab holds the basic information about the rule such as “From Email“, “Subject” what to do when there is an error and who to notify etc.
- Once you finished mapping then click on the green “Add Mailbox Rule” button. From thereafter every time an email comes in it will perform the above.
An example of a mailbox rule.
The following is an example of a mixture of rules so let’s see what the email body looks like so you can understand the napping.

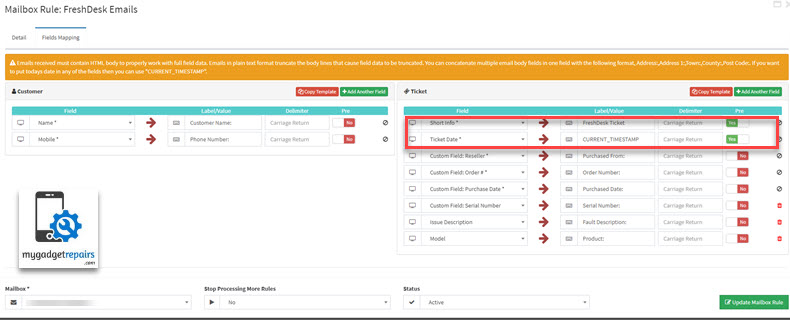
The following is the screenshot of what the mapping would look like based on the above email body.

As you can see from the above screenshot they have added 2 “Pre Populated” fields and the rest are mapped from the email body.
You can also use the mailbox feature to import leads from “Computer Repair Man” to MGR. Please read this KB article.


