A customer asset is a piece of equipment/device that you maintain on behalf of the customer. The asset manager also allows you to track specific information about these equipment/devices, and track an ongoing work history and estimates generated.
The following is the list of what you can do.
- Track the work history of a device.
- Ability to store hardware configurations or any other information you need. You can also create custom fields based on “Asset Types“.
- Print labels for devices to quickly access them via the barcode.
- Quickly create tickets from the “Asset Manager” to start a new repair.
- Quickly create estimates from the “Asset Manager” and send them to the customer.
- If you’re using 3rd party RMM tools or any open-source RMM tools, these Assets can be tied to their RMM counterparts and you can configure them to send notifications to MGR, upon receiving these notifications you can configure automation which can create tickets automatically.
First of all, let’s talk about the difference between “Customer Assets“, “Customer Equipment” and “Ticket Additional Assets” so we are not confused with the terms.
- Customer Assets: In general terms, this is what you’re going to repair and it has been added in MGR as an “Asset“. Please note that not all the “Customer Assets” will have tickets or estimates. You may just add a bunch of “Customer Assets” but some of them may never get any ticket or estimate.
- Customer Equipment: These are still assets you repair but they are not added as “Customer Assets“, please note that you may not add everything as “Customer Assets“, the system will still let you create tickets and estimates but they are categorised separately for your ease.
- Ticket Additional Assets: The customer may leave additional items with the main asset, such as they left the pc which needs work and they left the printer or monitor with it. The printer and monitor will go as “Ticket Additional Assets” so the system knows when you’re giving the PC back you need to give the other stuff too. It’s always best to record everything the customer leaves behind.
Now that’s out the way let’s focus on creating customer assets. Once we have gone through the “Customer Assets” we will talk about the “Ticket Additional Assets” in detail as well.
Let’s head to the Asset Manager.
The asset manager will list all of the customer’s assets, the manager has all of the options like any other manager, there is a “Search Form” to filter the data, and you can also create “Saved Searches” and show them in the activity boxes as you can do on the ticket, customer, product, estimate manager. Export to a different set of files is also available. Let’s go through the different elements of the manager.
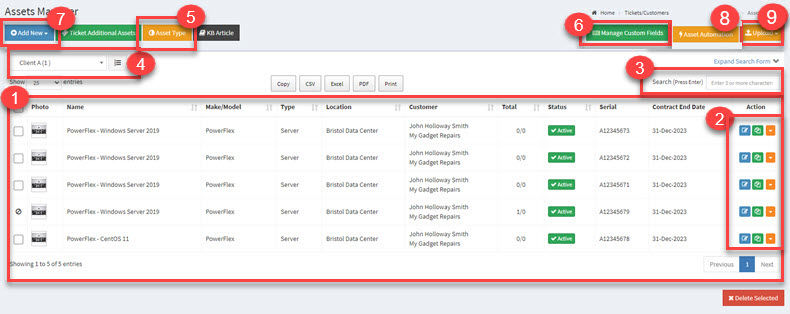
- List of all the “Active” assets.
- Asset Actions
- Quick search option, please note that “Expand Search Form” has extensive search options.
- Saved Searches
- Manage Asset Types
- Manage Asset Type’s custom fields.
- Create New Asset
- Asset Automation
- Import/Export Assets
First of all, we need to configure “Asset Types” and “Custom Fields” related to each asset type.
Asset type manager will allow you to create “Asset Types“, think of “Asset Types” as the categories of devices that service or repair. Common examples would be something like this:
- Phone
- Laptop
- Desktop Computer
- Apple Computer
- Server
- Drone
- 3D Printer
- Printers
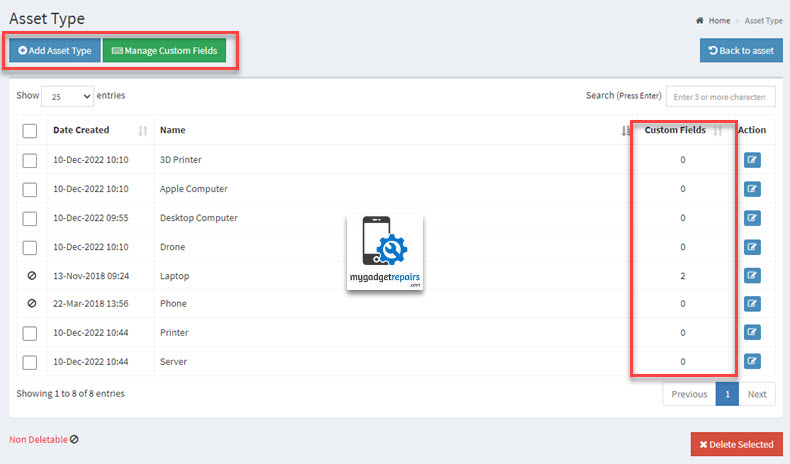
Please click on “Add Asset Type” to create a new asset. You can be as specific or generic as you like. For example, if you wanted to create an “Asset Type” for each model of your device, you could.
Once the assets are created, you need to create “Custom Fields” related to each “Asset Type“. To create “Custom Fields” for asset types please click on the “Manage Custom Fields” button. “Asset Custom Fields” are where you can choose what data to capture about the device you are repairing. Please note that when you create an asset there is already a field called “Unique Identifier” which can be used for unique identification for that asset such as serial number service tag etc so you don’t need to add a custom field for that.
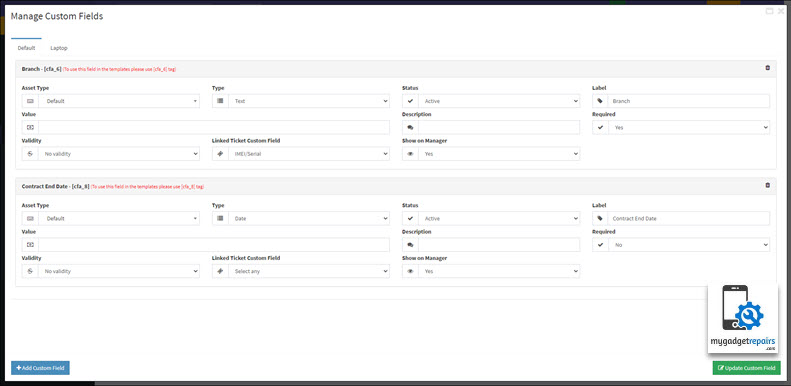
The “Custom Fields” functionality is exactly the same as the tickets, ticket checklists, customers, and products.
Common elements include:
- Asset Type: You can select the “Asset Type” or leave it to “Default” which will show the field in all the asset types.
- Type: The following are the custom field types available.
- Text (Text Box)
- Select (Select box – Dropdown)
- Textarea
- File Upload (Browse Button)
- Section/Group (Separator)
- Date (Calendar with just date)
- Date and Time (Calendar with the date and time)
- Checkbox (Tick boxes, radio buttons, yes/no)
- Pattern Lock
- Multi-Select – Multichoice
- Combi Field (Text+Select) – Combination of a text box and drop-down
- Combi Field (Text+Multi Select) – Combination of a text box and multi-select box
- Link
- IMEI / Unique Identity – This field can be used for the IMEI or any unique Identity you may have for your asset.
- Status – Enabled or not.
- Label – The name that will appear on the page.
- Value – The value that you would like to appear automatically.
- Description – Appears on the settings page. Used to clarify the purpose of the field.
- Required – If it’s required to be filled on the page.
- “Required Rules” – Additional rules based on other “Custom Field’s Data” which will determine if this field should be required or not. E.g. this field will be required only if the user selects “Plus Net” from the “Network” custom field. You can define as many rules on one field.
- Validity – Check the input of the data, there are two values, number and email.
- Linked Ticket Custom Field: If you want to map this custom field with one of the ticket’s custom fields then you map it here, this field will be automatically populated when you create the ticket or the estimate.
- Show On Manager: If this option is set to “Yes” then it will be shown on the asset manager.
Once the assets and asset custom fields are created we are ready to create assets.
Please note that if your assets require an “Expiry Date” field then you can create a custom field for that and if needed you can associate that custom field to an asset type. For example, you may want to capture “Licences” as an asset and some licences have an expiry date so you can create a custom field called “Expiry Date” and associate this to an asset type called “Licences”. This way “Expiry Date” field will only show if the asset type is “Licences”.
Creating Assets
To create a new customer asset please click on “Add New > Customer Asset” and fill in the information. Please note that the system will not let you add the asset with the same “Identifier” as “Active” in other words you can only have one asset active with the same identifier. You also have the option to add a “Tag” separately. You could add the “Serial Number” in the “Identifier” and the service tag in the “Tag” field. It’s entirely up to you how you want to manage it. Don’t forget you can always add “Custom Fields” which are based on “Asset Types“.
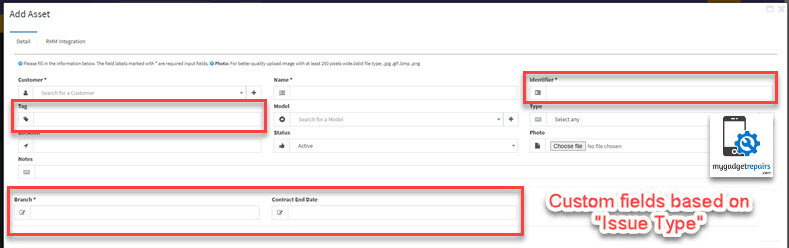
Please note that when you create an asset there is already a field called “Identifier” which can be used for unique identification for that asset such as serial number, service tag etc so you don’t need to add a custom field for that.
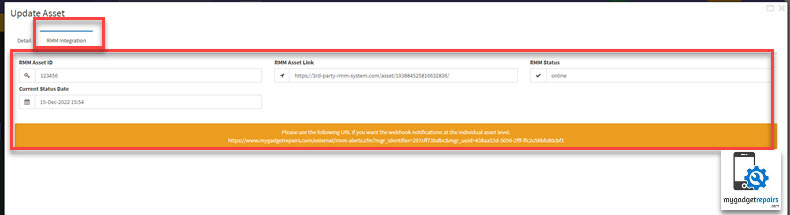
RMM Integration Tab
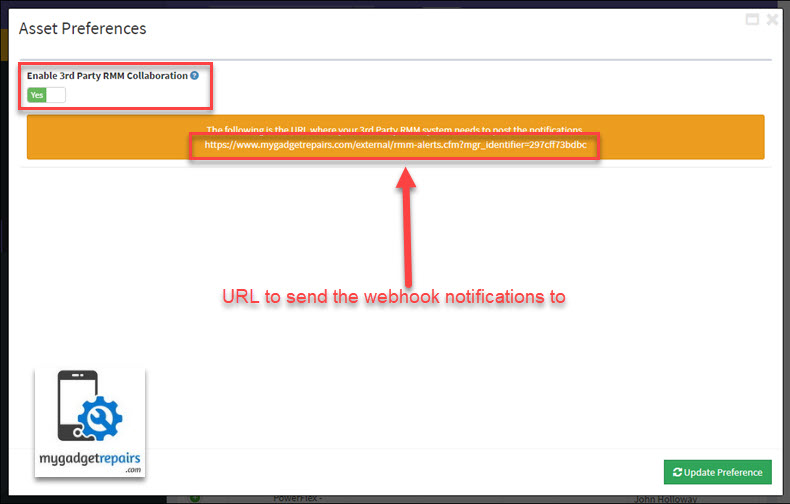
The RMM integration tab holds the information related to the RMM system you’re using and that’s where you tie their RMM counterparts. You must enable that first by clicking on the “Preference” button and then setting “Yes” to the “Enable 3rd Party RMM Collaboration” option.
There are 3 critical associations here.
- RMM Asset ID: This is the RMM system’s asset id which will be linked with the MGR asset.
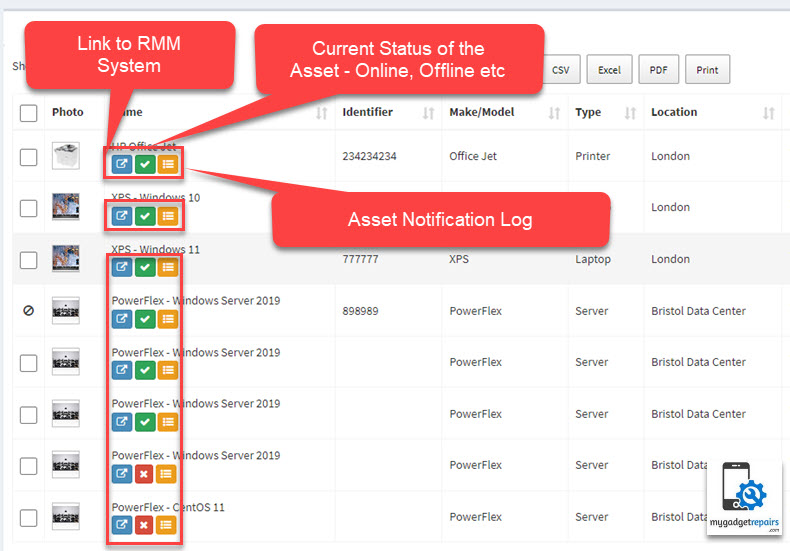
- RMM Asset Link: This is the link to go to the asset’s detail page within your RMM system, in this asset we have used “Tactical RMM” and as you can see the link goes straight to the RMM system’s asset so you can perform additional tasks. This flow makes it easier for you to manage the RMM-related tasks. You will see additional icons when we list the assets so you can access them directly from the “Asset Manager“. Please note that the following icons will only appear if you have added the information in the “RMM Asset Id” and “RMM Asset Link“.
- MGR webhook URL: This is the URL where your RMM system will be sending notifications related to this asset. Some RMM system has the ability to configure each asset’s notifications separately. Please note that MGR also gives you one unique URL where you can send all the notifications and don’t need to configure them at each asset level.
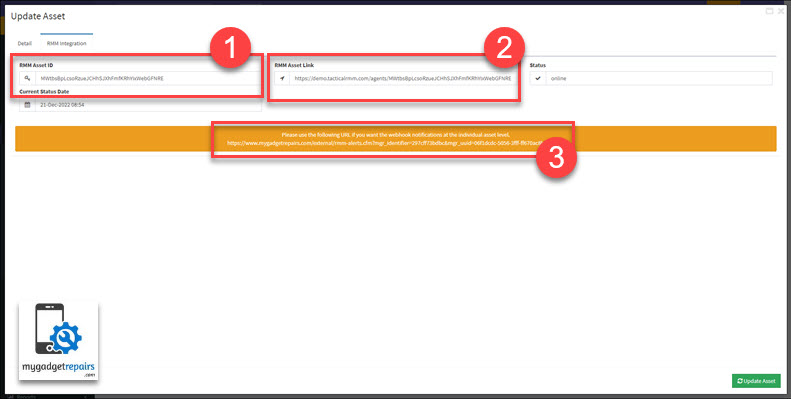
The field called “Status” and “Current Status Date” will be updated automatically when MGR receives the webhook notifications for this asset.
Once ready please click on the “Add Asset” button. Once the asset is added you can create a ticket, estimate or print asset labels. The followings are the option with the “Action” column for each asset. Please note that you can also create assets from the ticket interface as well.
Actions
The following is the list of “Actions” you can perform on each asset.
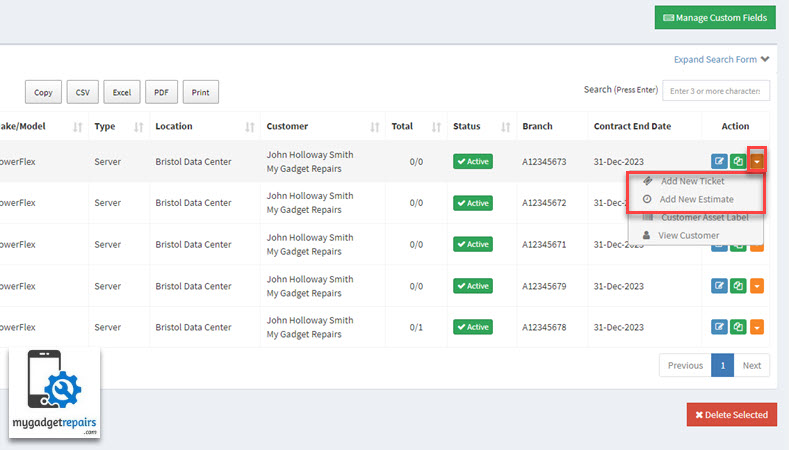
- Edit Asset: This icon will allow you to edit the asset along with showing you historical information such as tickets and estimates created for that asset.
- Copy Asset: Copy asset option will allow you to quickly copy the asset information and then create a new one.
- View Customer: This will show the customer’s information.
- Add New Ticket: This option will allow you to create a new ticket.
- Add New Estimate: This option will allow you to create a new estimate.
- Asset Label: This option will allow you to print asset labels. Please make sure that you have made the changes to the label template if needed.
Saved Searches
You can use the Saved Search feature to save the defined search criteria to ease your search experience. This allows you to quickly perform a search without needing to manually enter all of the search conditions each time. You can create, modify, and delete a saved search. As soon as you created a saved search, there will be a new drop-down on the search form which will list all of the saved searches.
You can also share the saved searches that you think may be useful to other staff members.
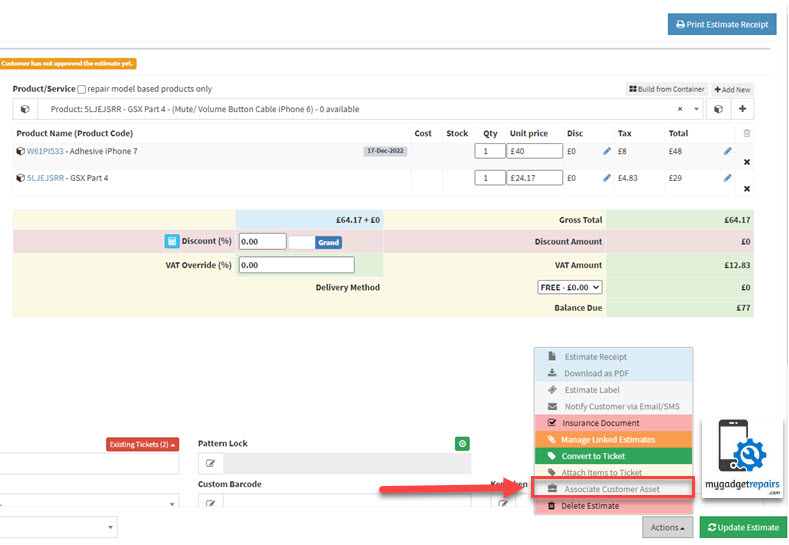
Creating a Ticket For an Asset
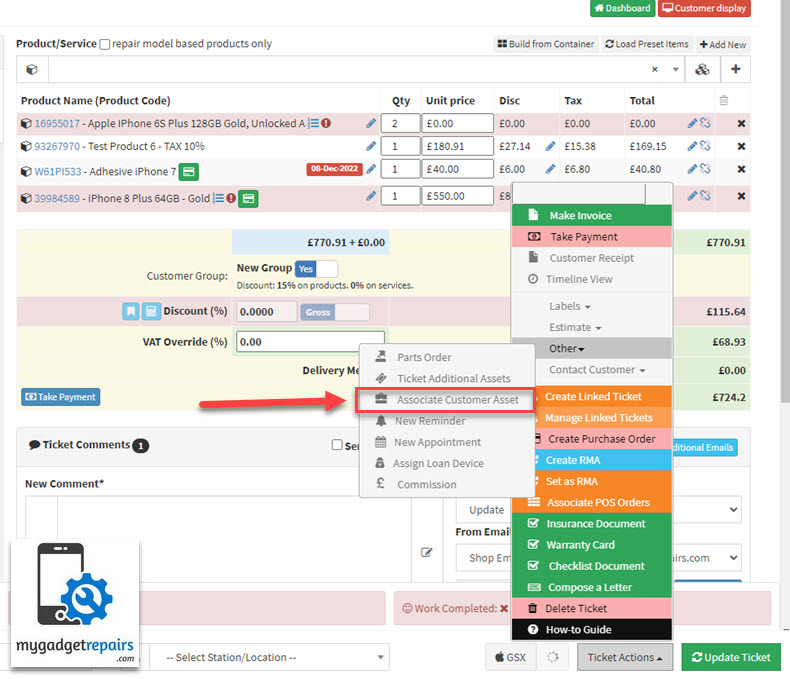
You can either create the ticket for an asset from the asset manager or from the “Create New Ticket” interface. If you are in the asset then please click on the menu in “Actions” and choose “Add New Ticket“, this action will take you to the ticket interface and all the information related to the asset will be prefilled including the asset custom fields you mapped with the ticket custom fields.
Once the ticket is created the asset will be associated with the ticket and you will see the increase in the “Total” column on the “Asset Manager“.
You can also do the same from the Ticket Interface. Once you have selected the customer you will be given the option to choose the assets.
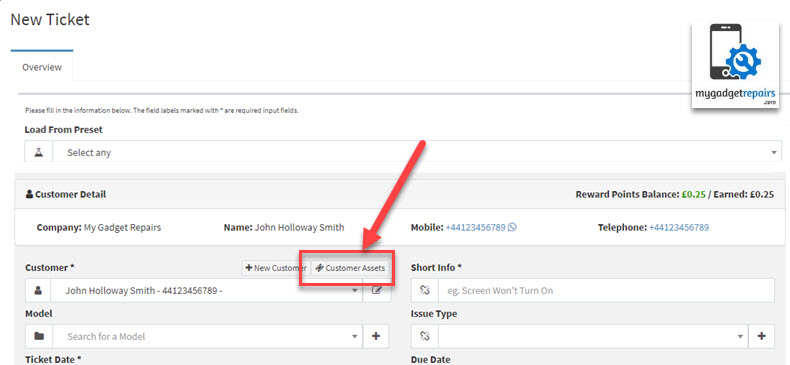
Please click on the “Customer Asset” button and choose the asset by clicking on the ticket icon. If the asset is not listed then you can also create a new asset by clicking on the “Add New Asset” button.
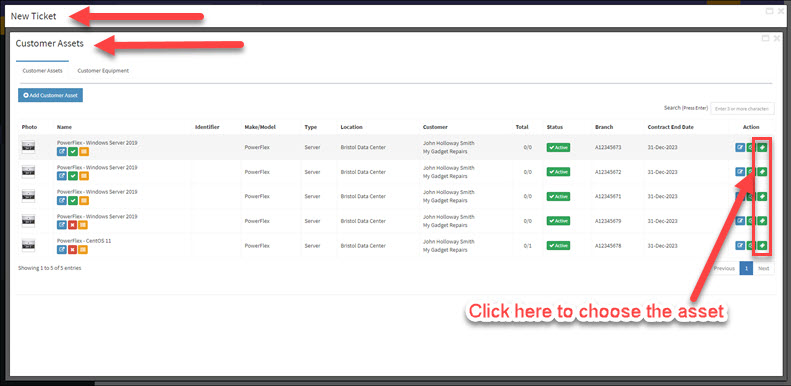
If you have forgotten to attach the asset don’t worry you can always go back to the ticket and associate the asset or you can always change the asset if you have made a mistake.
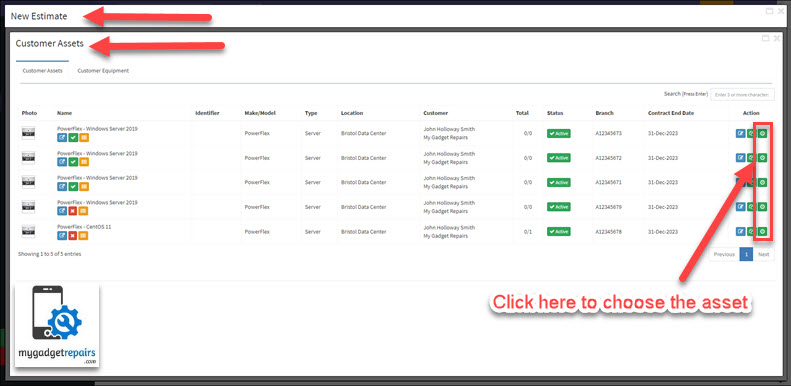
Creating an Estimate For an Asset
You can either create the estimate for an asset from the asset manager or from the “Create New Estimate” interface. If you are in the asset then please click on the menu in “Actions” and choose “Add New Estimate“, this action will take you to the estimate interface and all the information related to the asset will be prefilled including the asset custom fields you mapped with the ticket custom fields.
Once the estimate is created the asset will be associated with the estimate and you will see the increase in the “Total” column on the “Asset Manager“. When the estimate is converted to a ticket the same asset information will be carried over to the ticket as well.
You can also do the same from the Ticket Interface. Once you have selected the customer you will be given the option to choose the assets.
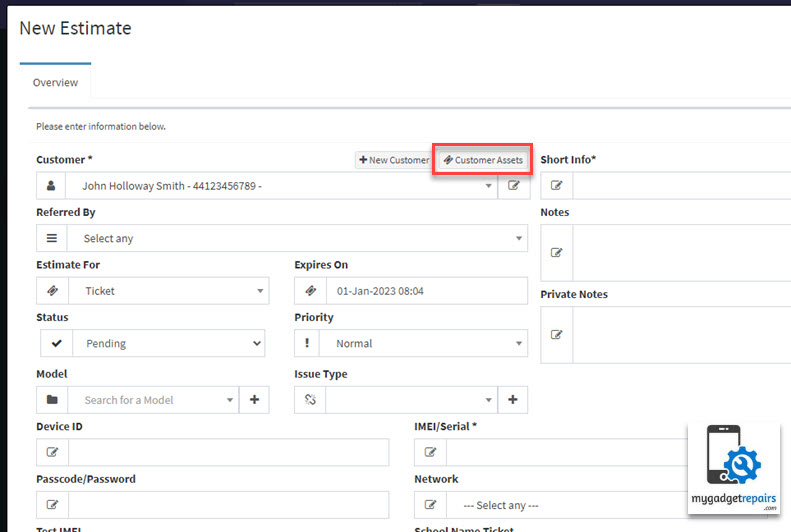
Please click on the “Customer Asset” button and choose the asset by clicking on the ticket icon. If the asset is not listed then you can also create a new asset by clicking on the “Add New Asset” button.
If you have forgotten to attach the asset don’t worry you can always go back to the estimate and associate the asset or you can always change the asset if you have made a mistake.
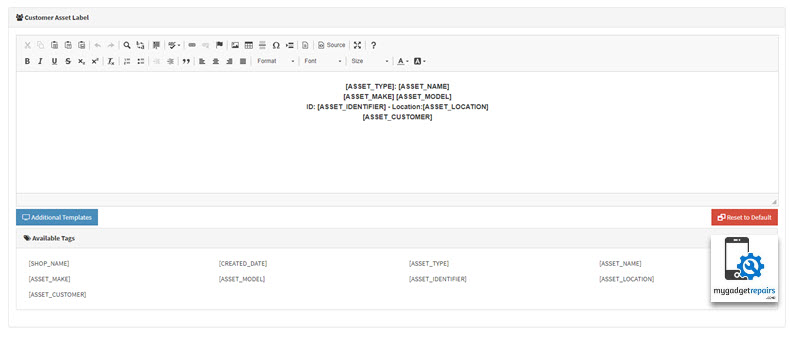
Printing An Asset Label
You can also print the asset labels if needed and stick them on the devices so when they come back for repairs you know how to find them. We have added a new template called “Customer Asset” in the “Templates Editor“.
Import Export Assets
You can also import and export assets as well as you may have a large number of assets to create and adding one by one will take a lot of time. We always give you a sample file to use, please download the sample file and populate it as you wish one ready please use the same file to import the assets.
You can also use the same file to update assets as well. There is an option during the import process called “Update Existing Assets” this setting will perform an update.
How to receive Webhook notifications from 3rd Party RMM systems
What is a webhook?: A webhook is a user-defined HTTP request that is sent from a source site to a unique URL of an application when a particular event takes place. Webhooks allow applications to communicate between themselves and facilitate operations in a fast and effective way.
Every MGR asset has the ability to receive real-time notifications from any 3-rd Party RMM system. To enable this feature please click on the “Preference” button and set the “Enable 3rd party RMM Collaboration” to “Yes“.
Once the setting is enabled you will see a new tab called “RMM Integration” with additional fields such as “3rd party RMM Asset ID” during the asset creation and modification process. This id will be used to match when we receive a notification from 3rd party. You will also see the “RMM Asset Link” which will be the 3rd party RMM system’s link to the asset.
You will also see an additional icon next to each asset showing the current status of the asset in terms of “Online” or “Offline” and a date so you know “Since” when it was online or offline along with the option to view the “Notification Log“. You will also see another icon which will show you all the notifications received for this asset from the 3rd party. Please note that we only keep 1 month of notifications. The reason behind that is so we can monitor the notifications in real-time and create the tickets if needed. You will have a comprehensive log in your RMM system so there is no need to duplicate the data.

- View the RMM system URL for this asset
- A green tick means that the asset is online and a red tick means that the asset is offline, it also shows you when the asset is online or offline.
- The asset notification log viewer
The following is the MGR payload which you need to configure in the 3rd party RMM system so they can send all the notifications via the webhook.
It needs to be posted to the following URL please replace the whole {portal_identifier} with the one provided in the “Preference“.
https://www.mygadgetrepairs.com/external/rmm-alert.cfm?mgr_identifier={portal_identifier}
You can also set webhook notifications at the individual asset level, when you modify the asset the system will give you an individual URL. This is only used if you’re configuring your RMM system at the individual asset level as you want to send different assets notification to different systems. The URL will look like the following.
https://www.mygadgetrepairs.com/external/rmm-alert.cfm?mgr_identifier={portal_identifier}&mgr_uuid={uuid}
{
    "rmm_asset_id": "123456",
    "alert_date": "2022-12-15T15:54:32.114Z",
    "alert_text": "Server is online",
    "alert_link": "https://3rd-party-rmm-software/193884525816632836/summary",
    "alert_severity": 1,
    "current_status": "online",
    "alert_param_1": "",
    "alert_param_2": "",
.....
    "alert_param_10": ""
}
rmm_asset_id * = 3rd party asset id, if you’re using mgr_uuid then this can be blank.
alert_date * = Date that the event occurrence was detected. The format used is yyyy-MM-dd’T’HH:mm:ss.SSSXXX. The date sent in UTC time. If alert_date is blank then now() will be used.
alert_text * = Description of the alert notification
alert_link = URL of the alert notification 3rd party RMM system URL
alert_severity * = Numerical value of the alert severity: 1=Emergency, 2=Critical, 3=Warning, or 4=Informational
current_status = Current status of the device such as online, offline etc
alert_param_x = Alert parameters 1 to 10 allow you to pass any value. These parameters are available in the “Asset Automation” section. Additionally, you can use these parameters to customize alerts and enhance automation processes, ensuring a more flexible and efficient system.
How to create a ticket automatically based on the Webhook notifications – RMM Automation
Upon receiving the notification alerts you can let the system know what to do with them by creating “Automation“. Asset Automation is a powerful feature within MGR that allows you to create rules, asset automation will allow you to create “Conditions” and “Actions“, and when those conditions are met the system will perform those actions.
The potential uses of Asset Automation are almost limitless, but a few examples include:
- Create a Ticket based on the information received via the notification. For example, you just received a notification that states that the asset’s “Hard Drive” has less than 10% free space, MGR already knows who the asset belongs to, you could then create a ticket with the Subject “Automation: Cleanup required for {asset_name}“.
- You could also set the following attributes during the ticket creation.
- Assign to a Technician
- Set Ticket Issue Type
- Set Ticket Status
- Set Ticket SLA
- Set Ticket Priority
- Set Ticket Due Date
- Set Ticket custom field data
- You could also set the following attributes during the ticket creation.
- Update existing ticket data, if there is already a ticket created for the asset with the same “Subject” then you can do the following.
- Add Ticket Comments
- Set Ticket custom field data
- Managing escalation when a ticket has been opened longer than a certain time.
- Notifying managerial users if a ticket bypasses a specified threshold.
- Setting up appointments for customers or companies based on a condition.
- Setting up auto-reminders based on a condition.
- And a lot more can be done with ticket automation. The possibilities are endless.
- We have over 16 conditions and 8 actions to choose from and from time to time we will be adding more
Points to consider
- Automations run when MGR receives a new RMM notification.
- Automation related to “Ticket Update” can ONLY be performed on the “Tickets in Pipeline“, in other words, NOT “Resolved/Pickedup“.
- Every “Condition” will be matched as an “AND“, you can add as many conditions as you want.
- You can perform multiple “Actions” on the result set extracted from the “Conditions” you have set.
What it doesn’t do
- Perform “Ticket Update” on the tickets that are already been “Resolved/Pickedup“.
- Use the “Condition” with an “OR” logic.
Let’s start the Asset Automation process.
Please navigate to Asset Manager > Asset Automation. The “Automation Manager” will allow you to view a list of your current configured automation. You can do a few things from here.
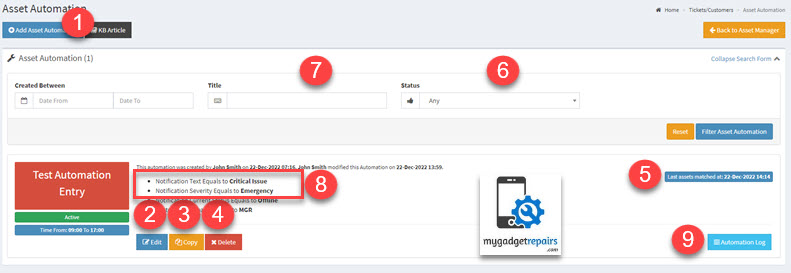
- Start a New Asset Automation.
- Edit the Automation.
- Duplicate the Automation so you can edit it to do something different.
- Delete the Automation.
- The indicator will show when it was last matched.
- Show all “Active” and “Not Active” Automation. Click on “Filter Asset Automation” after the selection.
- Type a full or partial automation name and click “Filter Asset Automation” to find those matching that name.
- List of “Conditions” that are configured in the automation and their value so you’re aware of what criteria have been set.
- The automation log will give you an insight into which asset it has run so far and how many times.
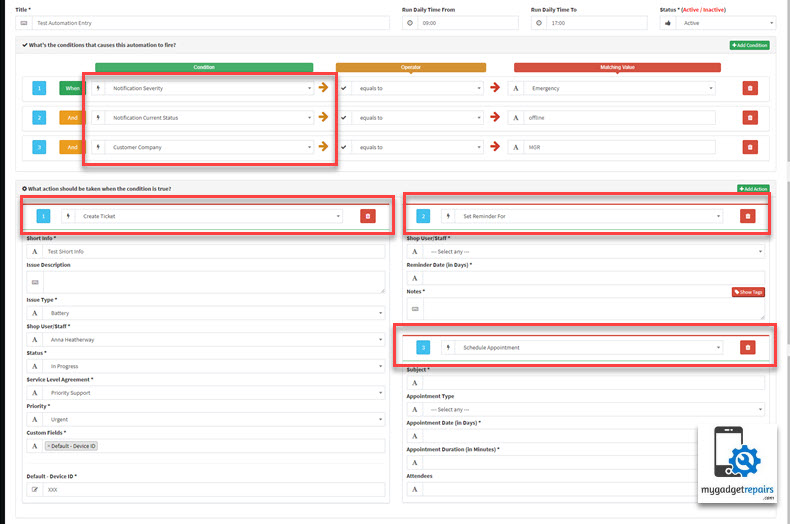
Create/Modify an Automation
- In the upper left, click “Add Asset Automation” to add a new one (or click an “Edit” icon to edit an existing one).
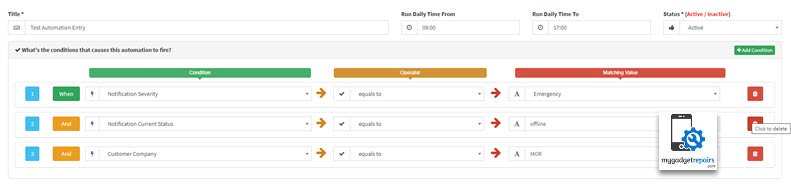
- Fill in the “Title” with a description of what you want it to do.
- Please check the automation “Run Daily Time From” and “Run Daily Time To“, please change it if you want to run the automation 24 hours or just within your business hours.
- Under the “Condition” panel, click the green “+ Add Condition” button.
- Each condition has “Operator” and “Matching Value“.
- Now add the “Condition” you want assets to match by selecting or entering values on the left, if “Operator” is available then it will be shown and sometimes the “Matching Value” will be a selection or you type the value. e.g. “Notification Severity” will give you a list that will contain “Emergency, Critical etc” however the condition “Notification Current Status” needs a value which you will have to type in.
- You can add as many new conditions as you like. These are AND conditions; i.e., “If condition 1 is true AND condition 2 is true, then…” We do not currently have a way to add OR conditions.
- If you need to delete a condition, click on the red delete icon.
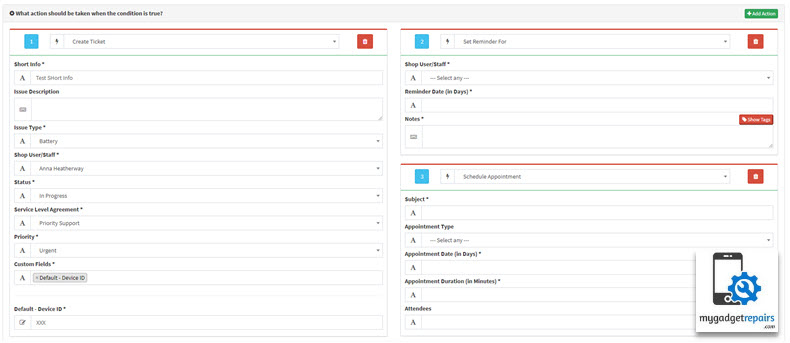
- Once you have defined your “Conditions” now it’s time to set the “Actions“. Select an action in the dropdown that appears and enter or select the values to use in the fields that appear. Those actions will be performed when the conditions are true.
- Automation will keep running on the same tickets as long as the “Conditions” are met.
- As with conditions, you may click the green “+ Add Action” button to add as many new actions as you like. When the conditions are met, it will perform all the actions.
- If you need to delete an action, click on the red delete icon.
- Once finished, click “Add Automation”.
- You will be taken back to the “Automation Manager” and your new automation will be ready to process the automation within the given timeframe.
- Once an Automation runs, it will post an update to each asset’s log that meets the Conditions.
The following is the list of “Conditions” which are used to extract the data.
- Notification Text: This will search in the “Notification Text” field.
- Notification Severity: This will search in the “Notification Severity” field.
- Notification Current Status: This will search in the “Notification Current Status” field.
- Customer Name: This will search in the “Customer” name field.
- Customer Address: This will search in the “Customer Address” field.
- Customer Company: This will search in the “Customer Company” field.
- Asset Name: This will search in the “Asset Name” field.
- Asset Tag: This will search in the “Asset Tag” field.
- Asset Make: This will search in the “Asset Make” field.
- Asset Model: This will search in the “Asset Model” field.
- Asset Type: This will search in the “Asset Type” field.
- Asset Location: This will search in the “Asset Location” field.
- Hours Since Created: This condition allows filtering assets based on the time elapsed since their creation in hours. It helps refine searches by specifying a time frame since an asset’s creation.
- Days Since Created: Similar to the ‘Hours Since Creation’ filter, this condition provides the flexibility to set criteria based on the number of days that have passed since an asset was created, offering a broader temporal range for filtering.
- Not Updated in Hours: With this condition, assets that haven’t been updated within a specified number of hours can be easily filtered. It’s particularly useful for identifying stagnant or untouched assets within a defined time span.
- Asset Custom Fields: This will search in the “Asset Custom Fields”.
Please note that some of the conditions may have the following operators to give you more control while extracting the data.
- equals to: Given keyword will be matched as equal to.
- is not equal to: Given keyword is not equal to.
- contains: Given keyword contains.
- does not contain: Given keyword does not contain.
The following is the list of “Actions” which can be applied to the extracted data.
- Create a New Ticket: This will allow you to create a new ticket with all the required attributes. You can also set the following during the ticket creation process.
- Short Info
- Issue Description
- Shop User/Staff
- Status
- Service Level Agreement
- Priority
- Custom Fields
- Trigger Email Notifications
- Trigger System Notifications
- Add Ticket Comment: If the ticket is found for this asset with the same “Short Info” then it will append the data to the ticket notes.
- SET Reminder For: This will allow you to set a reminder for tickets.
- Email to Technician: This will allow you to send an email to the technician.
- Send Email (Custom): This will allow you to send an email to a custom email address.
- Send SMS to Customer: This will allow you to send an SMS to the customer.
- Send SMS (Custom Number): This will allow you to send an SMS to the custom number.
- Schedule Appointment: This will allow you to schedule appointments.
Example Automation
Here is an example of Asset Automation that you can use to see how an Asset Automation might look. When the incoming notification’s severity is “Emergency“, the notification’s current status is “Offline” and the asset belongs to a company called “MGR” then “Create a Ticket“, set the ticket “Issue Type“, assign the ticket to “Technician“, set ticket’s “Priority” as well as “SLA“, as you can see it’s also setting up a reminder and an appointment.
Recommended RMM systems
The following are the recommended RMM systems which can be easily integrated with MGR webhook notifications and asset automation. As soon as there is a notification triggered the automation will run in MGR accordingly.
- Tactical RMM – Tactical RMM is a remote monitoring & management tool built with Django, Vue and Golang. It uses an agent written in Golang and integrates with MeshCentral.
- Teamviewer-like remote desktop control
- Real-time remote shell
- Remote file browser (download and upload files)
- Remote command and script execution (batch, PowerShell and Python scripts)
- Event log viewer
- Services management
- Windows patch management
- Automated checks with email/SMS alerting (CPU, disk, memory, services, scripts, event logs)
- Automated task runner (run scripts on a schedule)
- Remote software installation via Chocolatey
- Software and hardware inventory
- Refer to the documentation
- Zabbix – Zabbix is an open-source software tool to monitor IT infrastructures such as networks, servers, virtual machines, and cloud services. Zabbix collects and displays basic metrics. Zabbix enables you to collect metrics but isn’t limited to:
- Network devices
- Cloud services, containers, virtual machines
- OS level monitoring
- Log files
- Databases
- Applications
- Services
- IoT sensors
- Web page monitoring
- HTTP/HTTPS endpoint monitoring
- Support for full range of industry standard protocols
- Collect data from external API end-points
- Webhooks
- Monitor anything
- Level.io – Level is reinventing remote monitoring and management tools. Save your team thousands of hours with an easy-to-use, profoundly proficient, and ultra-secure RMM tool.
- Automation
- Remote control
- Inventory
- Background management
- Monitoring and alerting
- Patch management
- Scripting
- Security
- Rport – Rport helps you to manage your remote servers without the hassle of VPNs, chained SSH connections, jump-hosts, or the use of commercial tools like TeamViewer and its clones.
- Rport is 100% open source. Client and Server. Remote management is a matter of trust and security. Rport is fully transparent.
- Rport will come with a user interface making the management of remote systems easy and user-friendly.
- Rport is made for all operating systems with native and small binaries. No need for Python or similar heavyweights.
- Rport allows you to self-host the server.
- Rport allows clients to wait in standby mode without an active tunnel. Tunnels can be requested on-demand by the user remotely.
- End-User documentation
- Technical documentation
- Nagios – IT infrastructure monitoring and management software that enables organizations to identify and resolve problems before it gets out of hand.
- checkmk – Οne of the leading tools for IT infrastructure and application monitoring that uses an agentless and agent-based approach to monitor the health of IT infrastructure. Quickly gain a complete view of your IT infrastructure, no matter how complex. Checkmk provides powerful monitoring of networks, servers, clouds, containers and applications. Fast. Effective.
- OpenNMS – Αn open-source network management and monitoring tool developed and managed by the OpenNMS Group and a community of developers.
- PRTG – Monitor your IT infrastructure with Paessler PRTG. How to configure notification templates.
- And many more. You can use any RMM system as long as they support notifications via webhooks.
Asset Automation Log
The automation log shows you the log chronologically with the list of assets the rule has applied to and how many times.

