Repair with Spare, loan device module.
Is the device in repair!? Don’t have a spare? Loan one from us.
The “Loan devices” is a really good feature to offer your customers so they are not without a device while you repair their faulty device. In today’s dynamic business landscape, efficient management of resources and assets is essential for success. Whether you run a tech company lending out devices to your customers or oversee equipment rentals, an effective loan device/rentals module can be a game-changer.
Key Features and Functions
- Inventory Management: The module helps you maintain a comprehensive inventory of all available devices or assets. This includes detailed information about each item, such as its unique identifier, description, condition, and location.
- Loan/Rental Records: Every transaction involving the lending or renting of an asset is recorded. This includes the borrower’s information, loan/rental period, and any associated fees or penalties.
- Check-In/Check-Out: Streamlining the check-in and check-out process is a core function of the module. It automates the process, reducing human error and saving time.
- Due Date Management: The module can calculate and notify borrowers about due dates, helping them return items on time and avoid late fees.
- Renewals and Extensions: Some modules allow for renewing or extending the loan/rental period, making it convenient for both borrowers and administrators.
- Damage and Maintenance Tracking: You can record any damage or maintenance requirements for each asset, ensuring that it’s in good condition for the next borrower.
- Reporting and Analytics: Comprehensive reporting tools help you analyze asset utilization, borrower behaviour, and other key metrics. This data can inform decision-making and resource allocation.
Let us walk you through the whole process.
- Add Loan Devices
To add loan devices please go to Ticket/Customers > Loan Devices, and click on the “Add Loan Device” button from the top.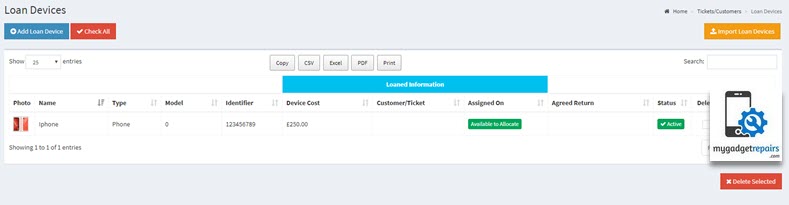
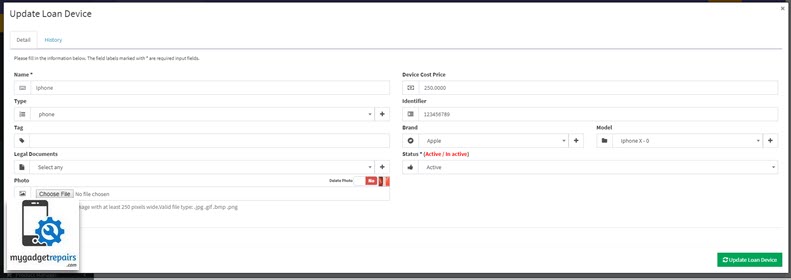
- If there are any legal documents to sign then please select them here, the system will prompt them to agree and sign during the “Assign loan device” process.
- Once all the devices are added, you will be able to assign them via the ticket interface.
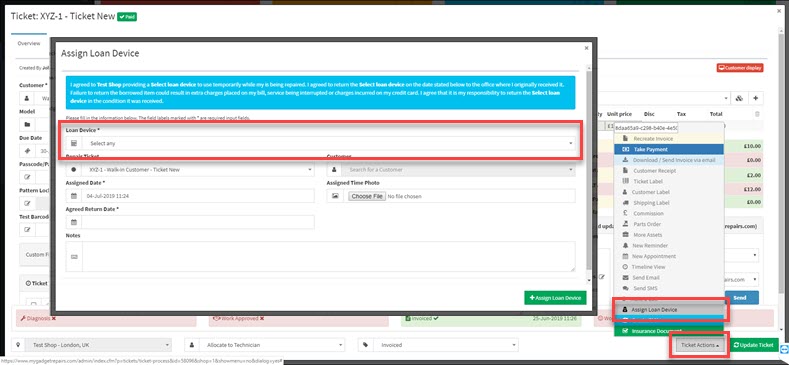
- The system will only show you the available device from the drop-down. Once selected the system will generate the appropriate paperwork if configured. Please select the “Agreed Return Date” and add pictures before they take the device so you know the condition when they took it. When ready click on the “Assign Device” button. You can also print a label which you can stick on the back of the device so the customer knows when to return the device, however, they will get email / SMS notifications a few days before anyway.
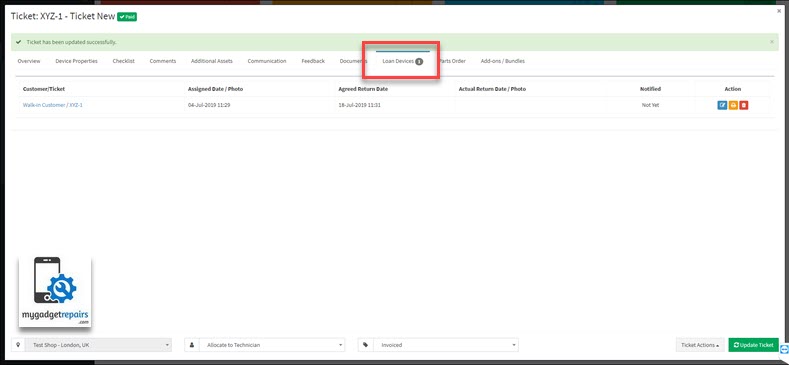
- You will now see a new tab in the ticket called “Loan Devices“, the loan device page will show the relevant information.

- When it comes to billing your valued customers for rentals, we’ve streamlined the process for you. Simply create dedicated services for your rentals. As you would typically have a ticket, add these services to it, assign the loan/rental device, and voilà! When the device is returned, generating the invoice is a breeze.

