Changes in the Article
- 2024-06-15: Added Field Labels Detail
Before we talk about the support for a new tag [LINE_ITEMS] in MGR templates, let’s have a quick overview of existing tags for printing line items in templates for repair invoices, estimates that MGR already supports. For example, in a repair invoice template [INVOICE_LINES] tag is already used to show line items in an invoice and the tag [INVOICE_TOTALS] is used to show additional lines of subtotal, tax, discount, and grand total. Both keywords are separate in an invoice template for some flexibility. However, in receipt templates for repair, and estimate, a single tag is used to print lines, subtotals, and grand totals. For example, in a repair receipt, the tag [REPAIR_ITEMS_DETAIL] is used while a tag [ESTIMATE_ITEMS] is used in an estimate template for the same purpose.
Though all the existing tags serve the purpose for most of our clients, these are not fully flexible in some cases where it’s not required or needed to print a certain column in the lines. For example, for some businesses, it’s not permissible to print payable amounts to their end customers. They usually have third-party billing enabled with different templates where they would print payable amounts. There are many use cases where simply a client wouldn’t want to print a product code or detailed description or to add an additional column with static or dynamic material from the line item. Such as in one column there could be a dynamic material from the item line e.g. line price, alongside a static material that could simply be a label e.g. “exVAT” in one column. This is now possible with our new more flexible tag [LINE_ITEMS]. More importantly, it’s a single usable tag across multiple templates (where supported) unlike the existing tags above.
How to use the tag [LINE_ITEMS]?
The tag supports a limited set of attributes well-enclosed with double quotes around the attribute values. The most important attributes for the tag to function are the COLUMNS – a list of column labels, and respective numbered attributes COLUMNx as column references where “x” is the sequential number starting from 1 matching the order of columns in the attribute COLUMNS.
For example, consider the attribute and value COLUMNS="Item Code,Item Name,Quantity,Price". It tells the system to show 4 columns with the specified labels. Now, to print line items for respective columns, 4 attributes COLUMN1 COLUMN2 COLUMN3 COLUMN4 will be required to point to the respective fields in the line item – check the supported line item fields below.
With the scenario above of four columns, the referenced attributes will be like COLUMN1="product_code" COLUMN2="product_description" COLUMN3="quantity" COLUMN4="price".
Using Numbered Columns
[LINE_ITEMS
    COLUMNS="Item Code,Item Name,Quantity,Price"
    COLUMN1="product_code" COLUMN2="product_description" COLUMN3="quantity" COLUMN4="price"
]
If the numbered columns are not so good for you, you can avoid using them and instead use a single COLUMN_REFS attribute to follow the main COLUMNS attribute. The above example can also be written as follows.
Using COLUMN_REFS
[LINE_ITEMS
    COLUMNS="Item Code,Item Name,Quantity,Price"
    COLUMN_REFS="product_code,product_description,quantity,price"
]
Both the above examples will produce the identical result as follows shown below.

Although using COLUMN_REFS is more desirable, it should be used with care. Make sure to avoid white spaces around the item fields when separated by commas. The same care should be taken when using the main COLUMNS attribute – avoid using spaces around the labels separated by commas.
Static and Dynamic Field Content
You can easily tell that the examples above will show the dynamic field content from the line item as described below. However, the system will automatically detect if the field is a valid line item field. If it is, the content from that line item field will be displayed dynamically. If it’s not a valid/supported field, the system will consider it as static content and will show it exactly as it is.
Consider the following example and note the addition of the first column “Serial No.” and the last column which is a white space in the COLUMNS attribute. The white space is required to draw a column with no label. Likewise in the COLUMN_REFS attribute, a field “index” is added for the “Serial No.” and a field “exVAT” is added under the additional no-label column.
[LINE_ITEMS
    COLUMNS="Serial No.,Item Code,Item Name,Quantity,Price, "
    COLUMN_REFS="index,product_code,product_description,quantity,price,exVAT"
]
The field “index” is system reserved to show a sequential serial no in ascending order with the line items. The “exVAT” in the last column will be considered as a static text as it’s not present in the supported line item fields.
The example above will produce the following result. If you don’t want serial numbers such as 1, 2, 3, and so on with the line item rows, simply don’t use the “index” field.

The fields such as prices normally show a currency code alone with it. In the above example, you don’t see it in the price column. So remember that the system will only produce a resulting value for a certain field without any formation. However, it will keep the decimal places, as configured in the client’s shop settings, for numeric fields except “quantity”. Check the highlighted fields in the supported line item fields below.
Showing Currency Symbols and Combination of Static and Dynamic Fields
Sure, many businesses want to show currency symbols along with the costs and prices in invoices and receipts. It’s super simple to do that by using curly {} brackets around the fields and anything before or after. For example, using £{price} will serve your purpose. So with that in mind, you can use any text, number, symbol, or combination of all that along with a field within curly brackets e.g. £{price} exVAT. Not only that, you can combine two or more dynamic fields as well like {product_code} - {product_name}.
[LINE_ITEMS
    COLUMNS="Serial No.,Item Code,Item Name,Quantity,Price"
    COLUMN_REFS="index,{product_code} - {product_name},{product_description},quantity,£{price} exVAT"
]
Consider the above example and note a little difference at the end of the column labels. The no-label column has been removed from the end. Likewise, in column references, the static text “exVAT” has been combined with the price field £{price} exVAT to show under one column – Price. We have also used the currency symbol as a static text character. Also, note the second column Item Code which now shows the combination of two dynamic fields {product_code} - {product_name}.
The above example produces the following result.

Note: An attribute/value TYPE="Product" or TYPE="Service" can be provided to list only products or services respectively.
Note: To specify column widths, you can use an attribute WIDTHS="10%,20%, ,10%,...". Numbered attributes can also be used such as WIDTH1="10%" WIDTH2="20%" WIDTH4="10%".
[LINE_ITEMS
    TYPE="Product"
    COLUMNS="Serial No.,Item Code,Item Name,Quantity,Price"
    COLUMN_REFS="index,{product_code} - {product_name},{product_description},quantity,£{price} exVAT"
    WIDTHS="10%, ,30%,10%,20%"
]
The above example will produce list items only containing products, not the services. With regard to WIDTHS it will set 1st column at 10% of the full width, 3rd, 4th, and 5th columns will be set at 30%, 10%, and 20% of the total width respectively. Note the white space in 2nd column; it will be auto-adjusted by the browser with the remaining width.
Supported Line Item Fields
FIELD           DESCRIPTION
———————————————————————————————————————————
product_type         – product type will always be "product" or "service"
product_code         – the product code of the item.
product_name         – the product name of the item currently set in the system.
product_description  – the item's description set at line item level.
product_location     – the item's physical location set at product level.
product_barcode      - the item's barcode.
quantity             – item quantity set for a line.
serial_numbers       – show serial numbers of the stock used.
warranty_end_dt      - shows the warranty end date.
warranty_desc        - shows the warranty description.
price                – item unit price set for a line.
subdiscount          – total discount amount in a line.
discount_rate        – discount rate applied to a line.
subtax               – total tax amount applied to a line.
tax_rate             – tax rate applied a line.
price_inc_tax        – item unit price + line item tax amount.
netprice             – the line total amount without tax after subtracting subdiscount (discount amount).
subtotal             – the line total amount after tax amount applied to netprice.
Highlighted fields are number-masked with the decimal places as configured in the shop’s settings.
Product custom fields can also be added to line items by using the custom field tag variable which is shown on every product custom field. For example {cf_123456}.
Field Labels
The [LINE_ITEMS] tag generates tabular data with customizable column labels for each field. Sometimes, you may want to combine multiple fields into a single column instead of adding extra columns for each field.
For example, simply combining fields like this {product_code} - {product_name} works well.
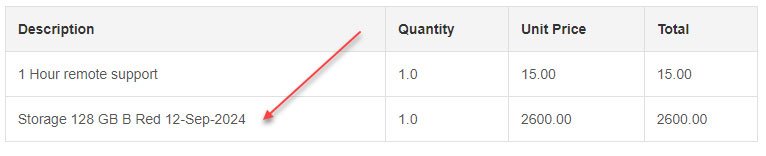
However, simply concatenating fields isn’t always meaningful, especially when a field is optional and may not appear in every row. For instance, {warranty_end_dt} can be added as a separate column labeled “Warranty ends at.” If most products have a warranty, you can add this as a column. But if only a few items have a warranty or you only want to display the warranty date when it’s present, consider combining it with another field, such as: {product_name} {warranty_end_dt}
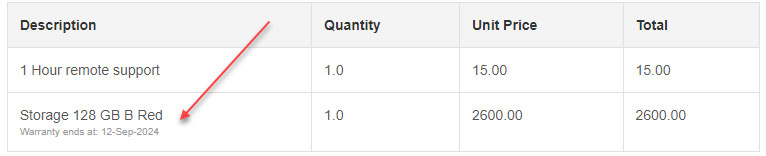
Showing a date next to the product name without context isn’t informative. Instead of adding an extra column for optional fields, you can use the “field_name_label” attribute to provide clarity.
The “field_name_label” attribute consists of two parts: the field name and the label you want to display. To label the {warranty_end_dt} field, you would use:
[LINE_ITEMS warranty_end_dt_label="Warranty ends at: "]
This adds the specified label before the warranty date, making it clear and meaningful. This approach ensures that additional information is displayed only when available, without cluttering the table with unnecessary columns.
See the following example of showing a date next to the product name which doesn’t make sense.
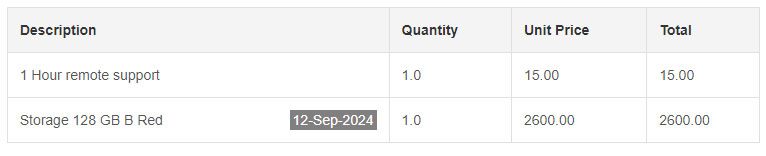
Now take a look at the following example of showing a label before the date and with some CSS styling.
You can apply some simple CSS styling (explained after the break) to distinct the date from the product name like below but it stil doesn’t tell what the date is about.
Availability: the “field_name_label” attribute works the same way for all fields. For example product_name_label=”Product Name: ” will apply a label before the {product_name} output.
Note: you can use extensive CSS styling to add inline labels via content property without using the field_name_label attribute.
Customising and Styling (for developers)
The new [LINE_ITEMS] tag produces a simple tabular output. This tag allows you to set classes for CSS styling at TABLE, THEAD, TBODY, and TD levels.
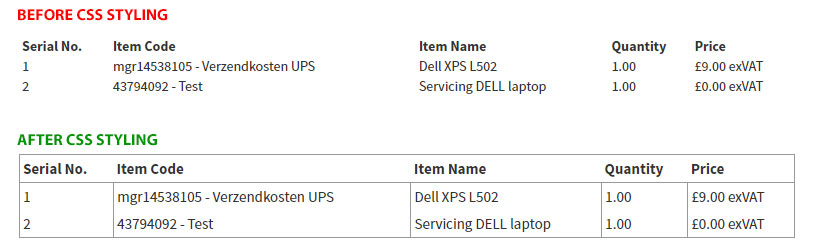
Consider a previous example (example 3) for content output and applying CSS classes – see highlighted lines.
[LINE_ITEMS
    COLUMNS="Serial No.,Item Code,Item Name,Quantity,Price"
    COLUMN_REFS="index,{product_code} - {product_name},{product_description},quantity,£{price} exVAT"
    CLASS="line-items"
    THEAD_CLASS="bordered"
    TBODY_CLASS="bordered"
    TD_CLASS="bordered brd-b0 brd-t0"
]
Use the following sample CSS code block
<style type="text/css">
    #template { font-size:15px; margin:10px auto; }
    #template table.line-items { border: 1px solid #999; }
    #template table.line-items thead th, #template table.line-items tbody td { padding: 3px; }
    #template table .bordered { border:1px solid #999; }
    #template table .brd-l0 { border-left: none!important;}
    #template table .brd-r0 { border-right: none!important;}
    #template table .brd-t0 { border-top: none!important;}
    #template table .brd-b0 { border-bottom: none!important;}
</style>
See the result with “before” and “after” using the CSS styling.
Note: Make sure of using a top/parent container block in templates to keep your CSS styling limited to the templates and not conflict with the MGR’s system interfaces. The above examples work with #template container. For example, your templates should be wrapped within <div id="template"></div>.
Companion Tags for Subtotals and Grand Totals
The tag [LINE_ITEMS] only shows line items in a template. It won’t show totals of the lines, subtotal, total tax amount or discount amount. There are several other tags that will help further customising your templates. Use the following tags to simply show its content anywhere in the template.
[TOTAL_PRICE_PRODUCT]Use this tag to show the total sum of items (of type product).[TOTAL_PRICE_SERVICE]Use this tag to show the total sum of items (of type service/labour).[NET_TOTAL]This tag will show the total sum of the without VAT/tax.[TOTAL_VAT]VAT/tax amount can be separately displayed with this tag.[TOTAL_DISCOUNT]The total discount on the invoice/order can be printed with this tag.[TOTAL_DELIVERY_COST]Delivery cost, in case, if your business charges delivery costs to customers.[GRAND_TOTAL]Use this tag for the grand total of the invoice/order/estimate.[TOTAL_PAID]This tag can be used to show the total paid amount on an invoice.[BALANCE_DUE]This tag can be used to show the due balance on a partially paid invoice.
Note: These tags might be required when using [LINE_ITEMS] because there is no other way of printing totals. However, these tags can be used even when you are not using [LINE_ITEMS].
Note: The tag [LINE_ITEMS] will not work if any of these tags [REPAIR_ITEMS_DETAIL] [INVOICE_LINES] [ESTIMATE_ITEMS] are used in the same template.
Supported Templates
The tag [LINE_ITEMS] is currently supported in the following templates.
- Repair Invoice
- Repair Receipt
- Estimate Receipt
- Ticket Repair Label (Ticket Label)
- Customer Label
- Shipping Label
- Picking Slip
- POS Order

