The PBX Caller ID Lookup Source supports Trixbox, FreePBX, Anveo, PIAF, Vonage, FusionPBX/FreeSwitch, RingCentral and 3CX.
We have an API you can configure for your PBX to use your CRM as a “Caller ID Lookup Source”.
You just configure the PBX to use a URL like this to do caller id lookup:
https://www.mygadgetrepairs.com/external/pbx-call.cfm?uuid={uuid}&did=07912345678
The result will be a text string that your phone will show as caller id. This will show an inbound/outbound call entry in the communication tab of the ticket.
To log an outbound call, add &dir=outbound to query in the PBX settings that log outbound calls if available.
The payload is in text format which is used for most applications. You can have the integration return the payload as JSON by updating the URL and add a new variable called type=json.
Text Payload Type:
https://www.mygadgetrepairs.com/external/pbx-call.cfm?uuid={uuid}&did=07912345678
N: Test Customer
JSON Payload Type:
https://www.mygadgetrepairs.com/external/pbx-call.cfm?uuid={uuid}&did=07912345678&type=json
{“contact”:{“telephone”:447912345678,”firstname”:”Test Customer”,”id”:345537,”email”:”customer_email@hotmail.com”,”customvalue”:””,”url”:”https://www.mygadgetrepairs.com/admin/index.cfm?p=tickets/customers&trigger=345537″,”company”:””,”mobile”:””,”status”:””}}
If you want the system to return any “Customer’s Custom Fields” data then you can send the custom field name in the “cf_name” parameter.
https://www.mygadgetrepairs.com/external/pbx-call.cfm?uuid={uuid}&did=07912345678&type=json&cf_name=cf_70932
{“contact”:{“telephone”:447912345678,”firstname”:”Test Customer”,”id”:345537,”email”:”customer_email@hotmail.com”,“customvalue”:”THIS FIELD WILL HAVE CUSTOMER’S CUSTOM FIELD DATA”,”url”:”https://www.mygadgetrepairs.com/admin/index.cfm?p=tickets/customers&trigger=345537″,”company”:””,”mobile”:””,”status”:””}}
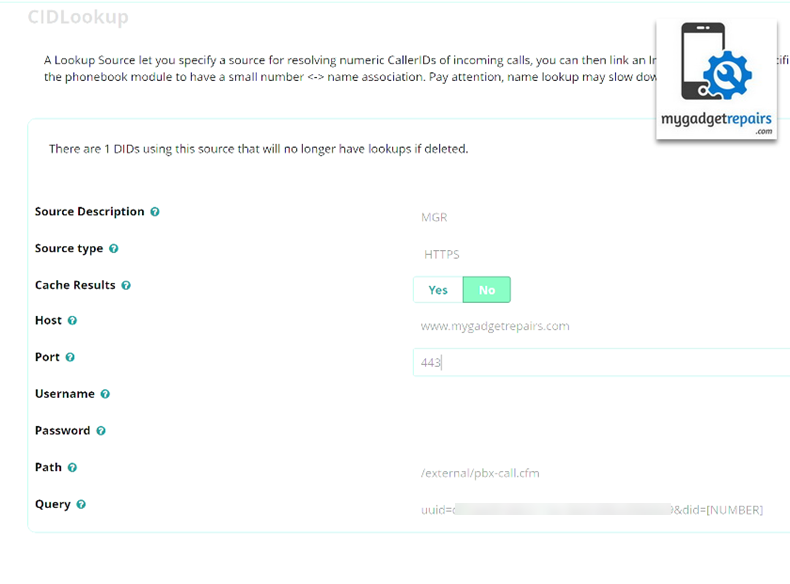
FreePBX configuration:

1. Go to caller id lookup sources, add one like above
2. Go to your inbound route, and specify it should use the lookup source you just created – done!
Be sure to add &uuid={uuid} ({uuid} is available on the integration page)
Also, in some versions of FreePBX you may have to use “http://” instead of “https://” in the HOST setting but please try with https:// first.
Anveo configuration:
Add and configure an “HTTP” call control (found under “Integration Call Controls”), add www.mygadgetrepairs.com in the server box. The variable $[CLIENT.NAME]$ will now contain the lookup result and can be used in the remainder of the call flow.

Vonage Configuration (special shout out to Chad from The Old Red Barn for this):
1. Download the Vonage Desktop Connect client to your desktop.
2. Make a test call and make sure that you do not have pop-ups blocked.
3. Switch over to MGR and go to 3rd-party integration and click on the “VOIP/PBX Call Handling” integration and make sure its “Activated” and copy the value of the UUID.
4. Switch back to Vonage Desktop Connect and go to the settings area.
5. In settings click on the Web Launcher tab.
6. In Web Launcher use the following variables:
-URL – type in “MGR” (note: do not use the quotes)
-In the box next to the name put this URL in minus the quotes – “https://www.mygadgetrepairs.com/external/pbx-call.cfm?did=[NUMBER]&uuid=uuid-from-mgr”
7. Now click the Add button. You should see the URL you just built in the box below the Insert button.
8. Check the box for Incoming Calls and then click Save.
9. Test by making a call into the system from a customer record associated with you calling from a number on your record.
Note: We have been told that Vonage Business uses a different format for the URL
http://mygadgetrepairs.com/external/pbx-call.cfm?did=%%phone_number%%&uuid=uuid-from-mgr
FusionPBX / FreeSWITCH Configuration (special shout out to Tyler from TAP Tech):
After you have copied uuid from the “VOIP/PBX Call Handling“, modify the FusionPBX cidlookup.config.xml file to include:
The cidlookup.config.xml file for FusionPBX is typlically located in /etc/freeswitch/autoload_configs
<configuration name=”cidlookup.conf” description=”cidlookup Configuration”>
<settings>
<param name=”url” value=”https://www.mygadgetrepairs.com/external/pbx-call.cfm?did=[${caller_id_number}]&uuid=uuid-from-mgr”/>
<param name=”cache” value=”false”/>
Note: the & in the above URL is correct.
on your inbound route, create an action, set with this as the text:
effective_caller_id_name=${cidlookup(${caller_id_number})}
RingCentral
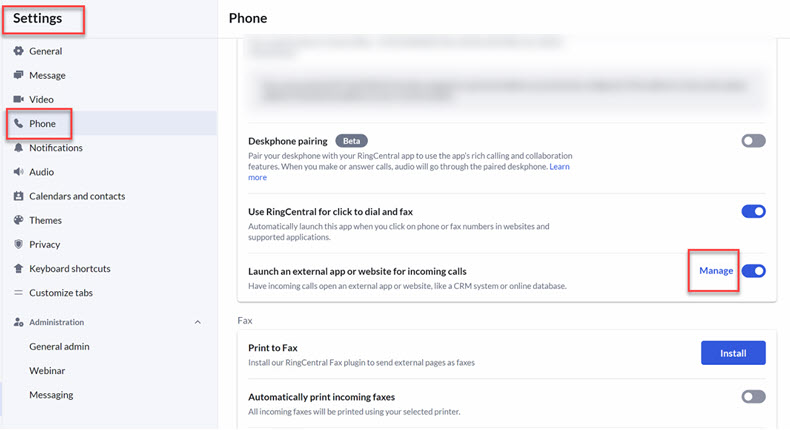
You can now add RingCentral without popups! Here is what you need to do:
1) Please go to Settings > Phone > Manage (Launch an external app or webpage for incoming calls)

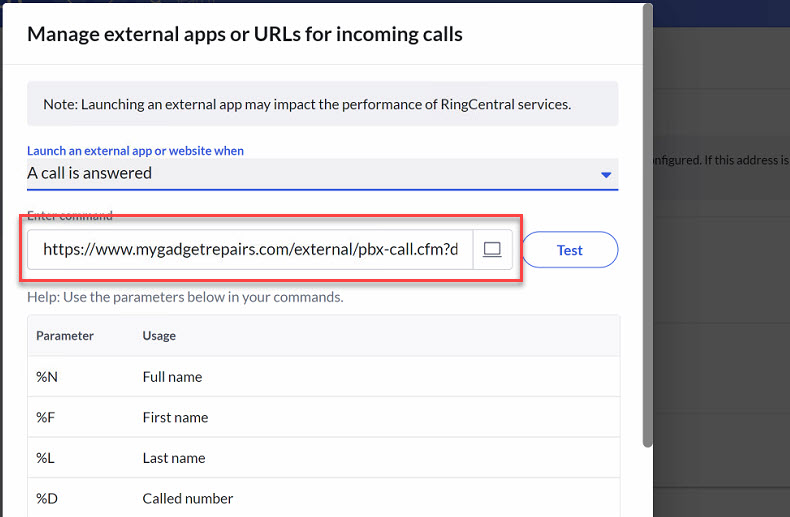
2) From the Manage screen please enter the below URL. Please ensure to replace ‘uuid-from-mgr’ with your unique UUID, which can be found in the VOIP integration settings in MGR.
https://www.mygadgetrepairs.com/external/pbx-call.cfm?did=%E&uuid=uuid-from-mgr

And that’s it!
Redirect to Resource
Some VOIP applications allow you to open the webpage in that case you can redirect the page to the lead, ticket or customer. To redirect, simply add a parameter called redirect=yes to the above URL. The full URL will look like the one below.
https://www.mygadgetrepairs.com/external/pbx-call.cfm?uuid={your-uuid}&did={caller-did}&redirect=yes
2. Set the 3cx windows behaviour settings to open wget.exe and paste the following in the program parameters https://www.mygadgetrepairs.com/external/pbx-call.cfm?did=%CallerNumber%&uuid=uuid-from-mgr


