Purchase Orders (or POs) are records used to document the transaction between you and your suppliers. From a retailer’s perspective, a purchase order will include information such as the specific goods that you will be purchasing, as well as the agreed-upon price point and delivery date.
By utilizing purchase orders, you streamline the purchasing process, as well as have a legal document that helps avoid messy situations like incorrect stock order or prices.
With that in mind, MGR gives you a robust purchase order capabilities, making it easy for you order stock. It even includes features such are automation so the system monitors the “Back Orders” and “Low Stock” and it will create the PO when stock is low or on backorder, and best of all it’s easy to set up!
There are a few things to keep in mind which are very important for the Purchase Ordering process. You need to make sure that your products have the following information. You might have to enable some settings based on your requirements. This document will cover most of it anyway.
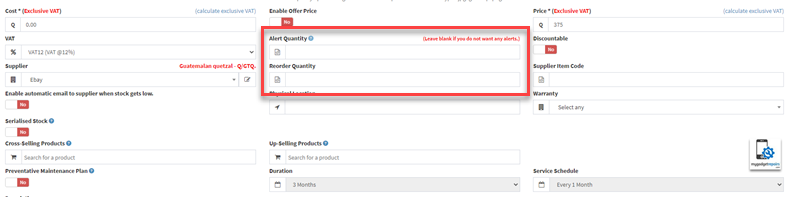
- Supplier and Supplier Item Code: With a supplier association the system will not know where you order the item from.
- Alert Quantity and Reorder Quantity: If you want the system to monitor your low stock then you must specify a value.
- Back Order: If you want to enable the “Back Order” functionality then you must enable “Allow to sell items with no stock” in the shop settings.
- Back Order Automation: You may wish to automate the PO creation for backorders then you must enable “Create a purchase order from backorders automatically” in the shop settings.
- Low Stock Automation: You may wish to automate the PO creation for low stock then you must enable “Create a purchase order from the low stock automatically” in the shop settings.
There are various ways to create a Purchase Order. Please note that you don’t have to have all the followings, you can use the ones best suited to your business workflow.
-
Create New Purchase Order – Purchase Order Manager
-
From Ticket Manager
-
Manual – Back Orders
-
Manual – Low Stock
-
Manual – Parts Order
-
Manual – RMA and Defective Parts
-
Automation – Back Order
-
Automation – Low Stock
-
Franchise Interface
-
Warehouse Flow
Create New Purchase Order – Purchase Order Manager
Before we look at how to add, edit and delete Purchase Orders, let’s take a look at the Purchases section, to give you an overview on how the screen is presented so that you can easily understand the information.
To begin, click on Purchases > Purchase Order from the left-hand menu and navigate to the Purchase Order screen. This is where you’ll find all your existing Purchase Orders, and where you’ll be able to create or edit POs, as necessary.
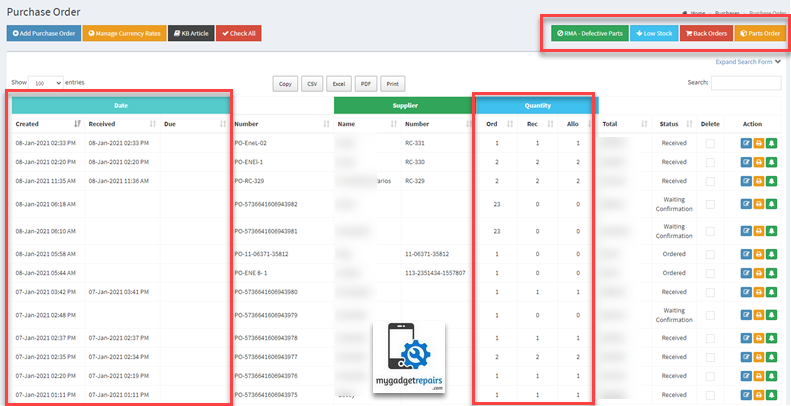
The Purchase Order Manager will list all the data in columns. Below we’ll go through what each column means:
Date Created: The date on which the Purchase Order was created.
Date Received: The date on which the Purchase Order was fully received.
Date Due: The date on which the Purchase Order was expected to be fully received.
Number: The Purchase Order’s reference number. A simple way to identify a purchase order, by supplying it with a unique reference number.
Supplier name: The name of the supplier you are purchasing from.
Supplier Number: The supplier’s order reference number.
Ordered Quantity: The quantity of the stock you have ordered.
Received Quantity: The quantity of the stock you have received.
Allocated Quantity: The quantity of the stock you have allocated to a shop.
Total: The total cost of the Purchase Order.
Status: The current status of the Purchase Order.
Delete: Checkbox to delete the Purchase Order in bulk.
Actions: List of actions which can be performed on the Purchase Order such as Edit, Delete, Print, Add Reminder etc.
Click on the “+ADD Purchase Order” to begin a new Purchase Order.
From here, the Purchase Order form will load, providing you with the details to complete the various sections of the Purchase Order. You can always edit these details at any time – up until the PO has been marked as Received.
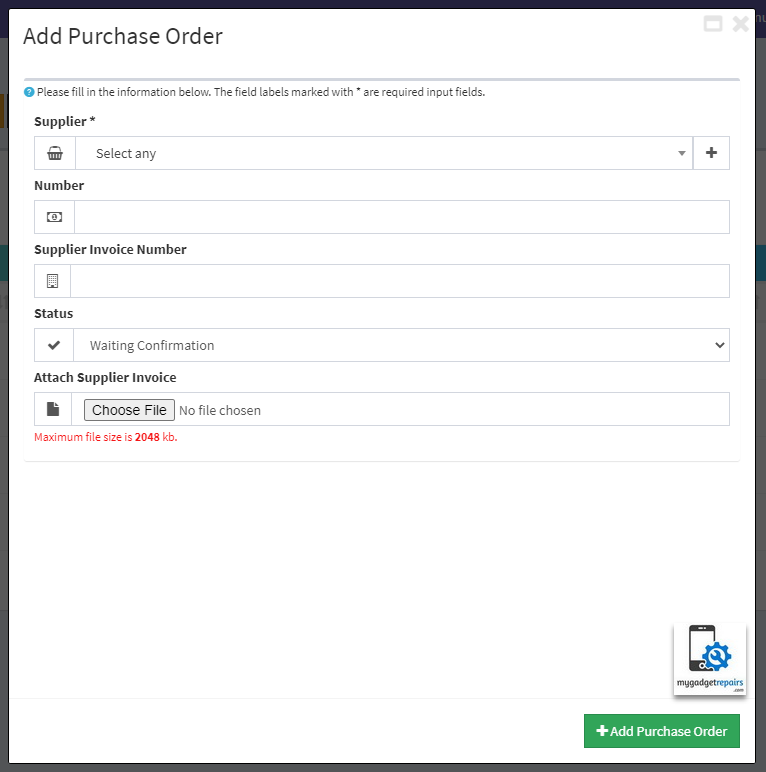
Once you have added the information, please click on “+ Add Purchase Order“, you will see the following screen. That’s the screen where you will provide most of the information related to the Purchase order.
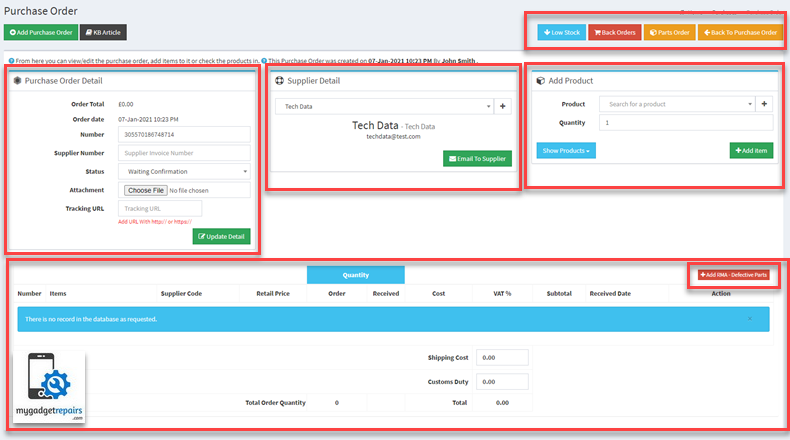
The actual screen is split into 4 Sections.
- Purchase Order Detail: The Purchase Detail section of the PO, allows you to confirm and change the various elements of the Purchase Order. e.g. key dates related to the PO, the status of the purchase order. Please don’t forget to click on “Update Detail” every time you make a change in this section.
- Supplier Detail: Select from the drop-down box, the supplier form which you are adding stock from. If your supplier is not listed, then click on the + icon to create a new supplier. You can also email the supplier by clicking on the “Email To Supplier” button.
- Add Product: Use this search bar to find the products that you will be ordering in this Purchase Order. Choose the product, select the quantity and then click on the “+ Add Item“. “Show Products” dropdown will allow you to filters the products further.
- All Low Quantity Items: By clicking on this button will only show all the “Low Stock” items.
- All Back Order Items: By clicking on this button will only show all the “Back Order items.
- All Items from this Supplier: By clicking on this button will only show all the “Items from this Supplier” items.
- Show All Items: By clicking on this button will only show all the items.
- Purchase Order Item Lines: This section will show you all the line items related to this Purchase Order.
- “Low Stock“, “Back Orders” and “Parts Order” buttons: You can also add items from these buttons.
- “Add RMA – Defective Parts” Button: This will list all the RMA or defective parts, the system will remember what parts to send back (RMA or Defective).
Once you have added the products you screen will look like the following screenshot.
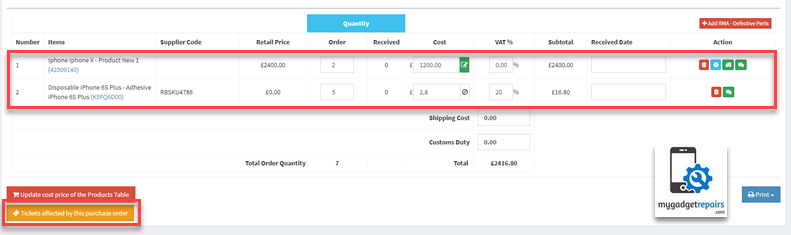
Each item line has its own set of actions, once you’re ready you can use the “Email to Supplier” button to send the email and then change the Purchase Order status to “Ordered“. You can also enter “Due Date” if you know when it’s scheduled to come.
There is also a button called “Update cost price of the Products Table” which will allow you to bulk update the cost price of the products if the supplier has changed their prices, otherwise, you will have to manually update the cost price of each product.
Indeed, changing the cost price of a product may arise from several different reasons including:
- A change in cost from the Supplier.
- A one-time cost-price change.
- A mutually agreed upon new cost price, that has yet to been updated on the system.
Whatever the reason may be, users may find themselves needing to update the cost price on the Purchase Order itself. Please note that the system will only update the cost price of the product, the selling price will stay the same, if you wish to update the selling price too then you will need to click on the product code and update the retail price accordingly.
You can also use the button called “Tickets affected by this purchase order“, which will list all the tickets which can’t be repaired until we have this purchase order.
Please note that if the notification number “16 – Notify shop-admin when purchase order passed due date and some items still left to be delivered” is enabled and purchase order has a “Due Date” and it’s passed the due date then you will get this email.
The next process would be receiving the Purchase Order which again can be received full or partial, please read this “How to Receive or Partially Receive a Purchase Order?” article.
From Ticket Manager
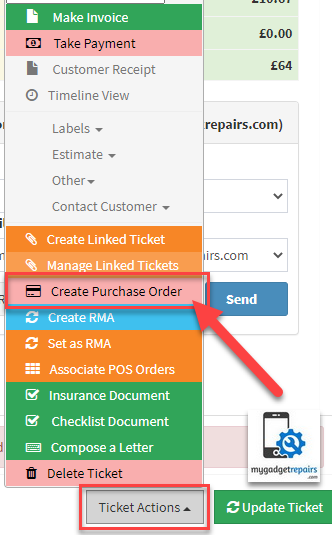
You can also create a Purchase Order from the ticket interface. Please note that if you create the PO from the ticket it will create a direct association between the ticket and PO.
Let’s create a PO from the ticket. Please head to the ticket you need the PO for, from the “Ticket Actions” select “Create Purchase Order“.
You may have more than one item lines in the ticket which are from different suppliers, in such a case the system will create one PO for each supplier and add the item lines in.
The “Create New Purchase Order” screen will be the same as the above process however here you will only get the list of suppliers are involved rather than the full list.
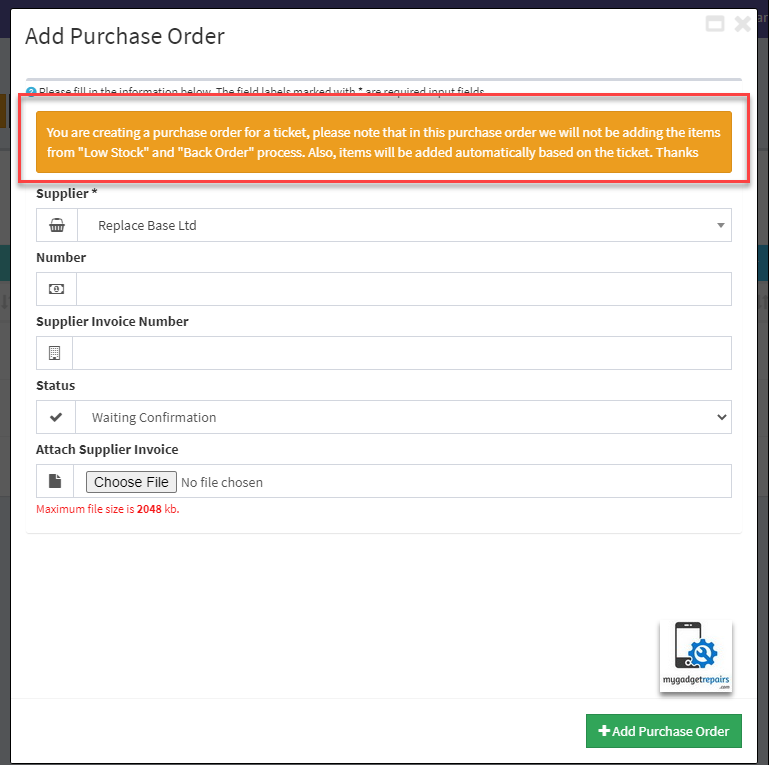
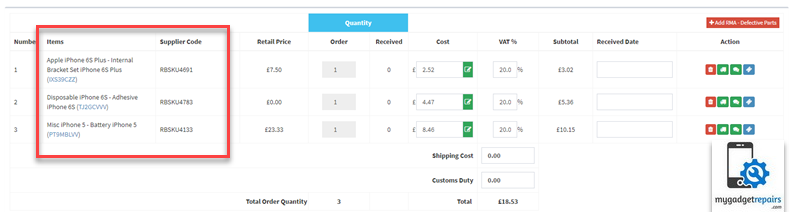
Click on the “Add Purchase Order” to create the PO, the system will automatically add the item PO lines in for you based on what you have in the ticket. As you can see from the following screenshot that I had 3 items from the same supplier in my ticket and when I created the PO I had the same 3 items in my PO too.
Ticket
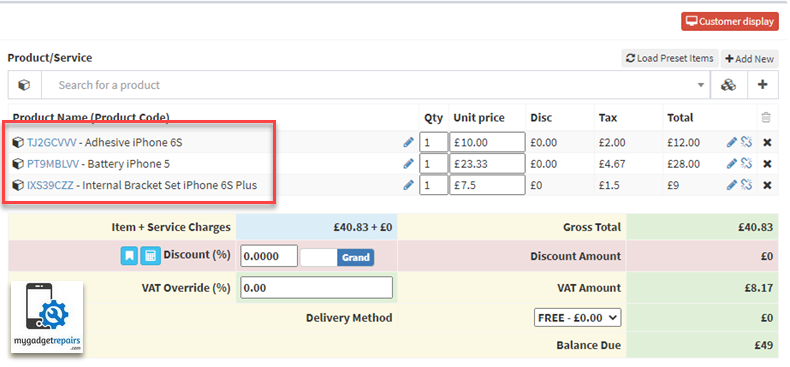
Purchase Order
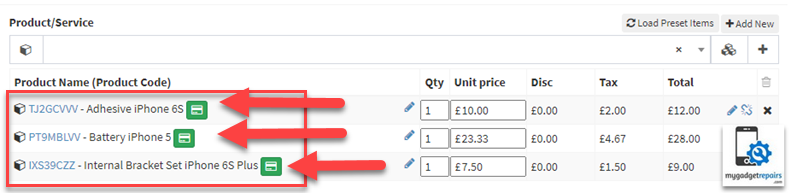
If you now go back to the ticket it will show you an icon next to each item line to let you know that there has been a PO with the ticket item line, by clicking on the icon will take you to the purchase order.
Any changes you make in the ticket item line will reflect the PO automatically, e.g. if you change the item line quantity it will change the PO item line quantity as well and if you delete the ticket item line it will delete the PO item line as well. Please note that you will ONLY be allowed to do that until the PO is in “Waiting Confirmation” state, as soon as it’s submitted to the supplier you will not be able to make any changes in the ticket item line either. The system will prompt you to delete the PO first. In an ideal scenario, you shouldn’t be making the changes once submitted and if you’re then you can always delete the PO and start again.
There might be another case where you have already created the PO and you need to add another item line in the ticket, so you add the item line in the ticket first, there might be 2 scenarios here.
- Item line is related to a different supplier: If the supplier is different then you would create a new PO anyway.
- Item line is related to the same supplier: If it’s the same supplier then, please go to the PO which is already created, you will see a new button called “+ Add ticket Item Lines” as shown in the following screen, by clicking gon this button will add all the missing items in the PO as long as they are from this supplier.
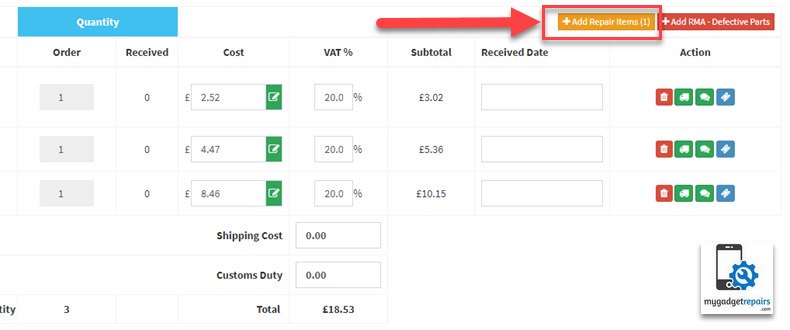
As soon as I clicked on the button the system added the newly added ticket item line in the PO as shown in the following screen. You will notice that the “+ Add ticket Item Lines” button has disappeared as there are no ticket item lines which are missing.

That’s the real benefit of associating the PO with ticket, this will allow you to have great control over the PO process, your workflow might require to have one PO per ticket rather than one massive PO.
Once you’re ready you can use the “Email to Supplier” button to send the email and then change the Purchase Order status to “Ordered“. You can also enter “Due Date” if you know when it’s scheduled to come.
You can also use the button called “Tickets affected by this purchase order“, which will list all the tickets which can’t be repaired until we have this purchase order.
Please note that if the notification number “16 – Notify shop-admin when purchase order passed due date and some items still left to be delivered” is enabled and purchase order has a “Due Date” and it’s passed the due date then you will get this email.
The next process would be receiving the Purchase Order which again can be received full or partial, please read this “How to Receive or Partially Receive a Purchase Order?” article.
Manual – Back Orders
If you have “Allow to sell items with no stock” enabled them you will have a negative stock which means all of those products will be shown in the “Back Order” screen.
On the Purchase Order Manager, we will list all the “Back Order” products as well so when you’re ordering from the supplier you’re aware of the back order too. You can access the “Back Order” list from the manager and also from the modify purchase order, if you’re in a PO then it will only show you the backorder list of that supplier and from the manager, it will list everything.

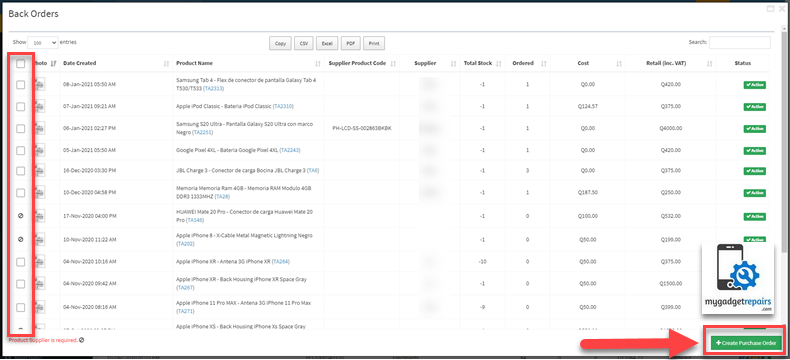
By click on “Back Order” will open a new window and list all the backorder products as shown in the following screenshot. You can select the ones you need to add in the PO and click on the “+ Create Purchase Order” button. The system will automatically check if there is already a pending purchase order for that supplier, it will add the items in that PO or it will create a new PO and then add the items in.
If you’re modifying the PO and adding the items via the backorder then it will just add the items in the existing PO if PO status is “Waiting Confirmation” else it will create a new one and add the items in.
Please note that you can also automate the whole “Back Order” process by enabling the “Create a purchase order from backorders automatically” in the shop settings which is another really good feature of our system. That way the system will be creating the PO in the background however the same rules will be applied. One purchase order one supplier.
If there is no supplier associated with the products then the system will not let you add the product in the PO as it can’t create the PO without the supplier information.
Once you’re ready you can use the “Email to Supplier” button to send the email and then change the Purchase Order status to “Ordered“. You can also enter “Due Date” if you know when it’s scheduled to come.
Please note that once the product has been added in the PO it will still remain in the “Back Order” until you have received the goods and allocated the stock to the shop however you will be able to see what has been ordered in the “Ordered” column. So please don’t expect it to disappear after you have created the PO.
You can also use the button called “Tickets affected by this purchase order“, which will list all the tickets which can’t be repaired until we have this purchase order.
Please note that if the notification number “16 – Notify shop-admin when purchase order passed due date and some items still left to be delivered” is enabled and purchase order has a “Due Date” and it’s passed the due date then you will get this email.
The next process would be receiving the Purchase Order which again can be received full or partial, please read this “How to Receive or Partially Receive a Purchase Order?” article.
Manual – Low Stock
If you have set “Alert Quantity” and “Reorder Quantity” with the products, as soon as the product stock hits that quantity it will be shown in the “Low Stock” screen.
On the Purchase Order Manager, we will list all the “Low Stock” products as well so when you’re ordering from the supplier you’re aware of the low stock too. You can access the “Low Stock” list from the manager and also from the modify purchase order, if you’re in a PO then it will only show you the low stock of that supplier and from the manager, it will list everything.

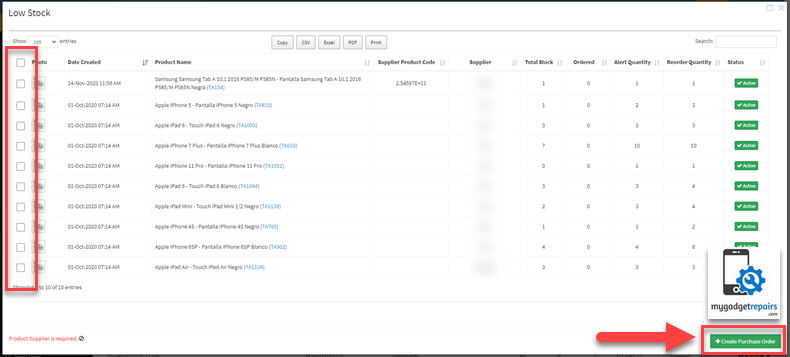
By click on “Low Stock” will open a new window and list all the low stock products as shown in the following screenshot. You can select the ones you need to add in the PO and click on the “+ Create Purchase Order” button. The system will automatically check if there is already a pending purchase order for that supplier, it will add the items in that PO or it will create a new PO and then add the items in.
If you’re modifying the PO and adding the items via the low stock then it will just add the items in the existing PO if PO status is “Waiting Confirmation” else it will create a new one and add the items in.
Please note that you can also automate the whole “Low Stock” process by enabling the “Create a purchase order from the low stock automatically” in the shop settings which is another really good feature of our system. That way the system will be creating the PO in the background however the same rules will be applied. One purchase order one supplier.
If there is no supplier associated with the products then the system will not let you add the product in the PO as it can’t create the PO without the supplier information.
Once you’re ready you can use the “Email to Supplier” button to send the email and then change the Purchase Order status to “Ordered“. You can also enter “Due Date” if you know when it’s scheduled to come.
Please note that once the product has been added in the PO it will still remain in the “Low Stock” until you have received the goods and allocated the stock to the shop however you will be able to see what has been ordered in the “Ordered” column. So please don’t expect it to disappear after you have created the PO.
You can also use the button called “Tickets affected by this purchase order“, which will list all the tickets which can’t be repaired until we have this purchase order.
Please note that if the notification number “16 – Notify shop-admin when purchase order passed due date and some items still left to be delivered” is enabled and purchase order has a “Due Date” and it’s passed the due date then you will get this email.
The next process would be receiving the Purchase Order which again can be received full or partial, please read this “How to Receive or Partially Receive a Purchase Order?” article.
Manual – Parts Order
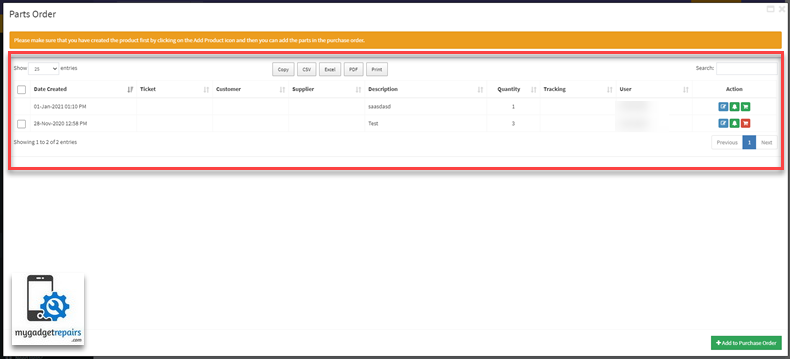
If your technicians have requested “Part Order” which is not in the inventory then it will be shown in the “Parts Order” screen. Please note that you must convert the part order into a product and then add in the Purchase Order.
On the Purchase Order Manager, we will list all the “Parts Order” products as well so when you’re ordering from the supplier you’re aware of them too. You can access the “Parts Order” list from the manager and also from the modify purchase order, if you’re in a PO then it will only show you the parts order of that supplier and from the manager, it will list everything.

By click on “Parts Order” will open a new window and list all the parts order as shown in the following screenshot. You can select the ones you need to add in the PO and click on the “+ Create Purchase Order” button. The system will automatically check if there is already a pending purchase order for that supplier, it will add the items in that PO or it will create a new PO and then add the items in.
If you’re modifying the PO and adding the items via the parts order then it will just add the items in the existing PO if PO status is “Waiting Confirmation” else it will create a new one and add the items in.
Once you’re ready you can use the “Email to Supplier” button to send the email and then change the Purchase Order status to “Ordered“. You can also enter “Due Date” if you know when it’s scheduled to come.
Please note that once the product has been added in the PO it will still remain in the “Parts Order” until you have received the goods and allocated the stock to the shop however you will be able to see what has been ordered in the “Ordered” column. So please don’t expect it to disappear after you have created the PO.
You can also use the button called “Tickets affected by this purchase order“, which will list all the tickets which can’t be repaired until we have this purchase order.
Please note that if the notification number “16 – Notify shop-admin when purchase order passed due date and some items still left to be delivered” is enabled and purchase order has a “Due Date” and it’s passed the due date then you will get this email.
The next process would be receiving the Purchase Order which again can be received full or partial, please read this “How to Receive or Partially Receive a Purchase Order?” article.
Manual – RMA and Defective Parts
Please follow the following kb articles which will cover the “RMA and Defective” process.
RMA process with Suppliers for Defective Parts – Returns to Vendor.
How to Receive or Partially Receive a Purchase Order?
Automation – Back Order
You can also automate the whole “Back Order” process by enabling the “Create a purchase order from backorders automatically” in the shop settings which is another really good feature of our system. That way the system will be creating the PO in the background however the same rules will be applied. One purchase order one supplier.
Automation – Low Stock
You can also automate the whole “Low Stock” process by enabling the “Create a purchase order from the low stock automatically” in the shop settings which is another really good feature of our system. That way the system will be creating the PO in the background however the same rules will be applied. One purchase order one supplier.
Franchise Interface
Franchise interface also allows managing Purchase Orders for all the shops you have in one place. All of the following options are available in the franchise interface. The process is exactly the same as described above the only difference is that here you will see the data of every shop you have which gives you a wider insight over the stock requirements of all your shops.
-
Create New Purchase Order – Purchase Order Manager
-
From Ticket Manager
-
Manual – Back Orders
-
Manual – Low Stock
-
Manual – Parts Order
-
Manual – RMA and Defective Parts
Warehouse Flow
You can set a shop as a “Warehouse” which means all the stock handling and PO ordering happens here, once you have received the stock in the warehouse you can then “Move the Stock” to the relevant shop when needed.
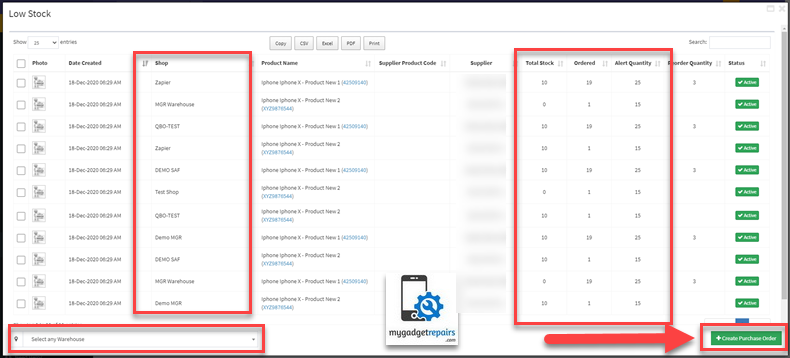
Please note that from the Franchise account you can also create a purchase order for the “Warehouse” too as you can see an overall view of the stock requirement from the franchise account it’s best to create the purchase order from the franchise account if you have one or more that one “Warehouse“.
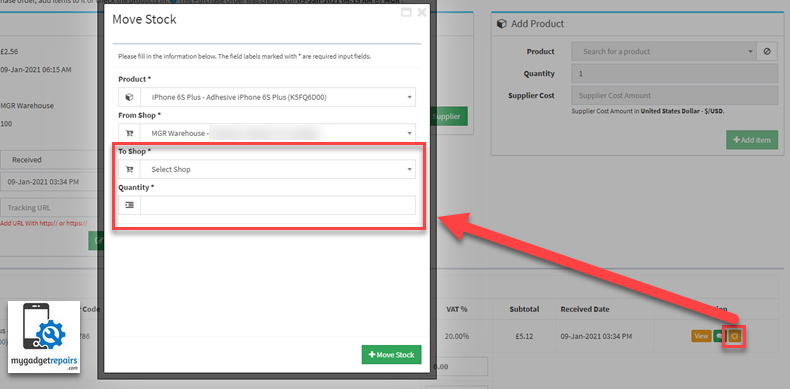
As you can see from the following screenshot, that from the franchise account I can easily create a PO which is needed for my other shops. Once received in the “Warehouse” I can then easily move the stock from “Warehouse” to any shop.
Once the stock is received and allocated you can “Move the Stock” easily by using the “Move Stock” option as shown in the following screenshot.