Creating a New Ticket
There are a ton of ways of creating Tickets!
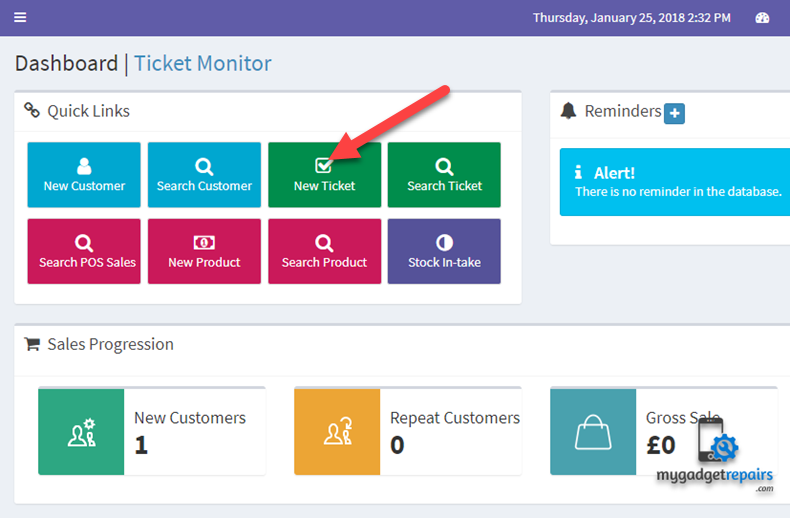
You can click on the big green button “New Ticket” on the Dashboard screen.
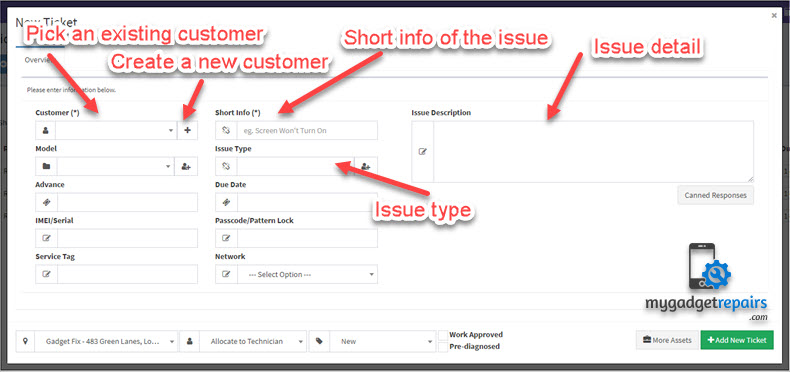
Fill in the fields, the issue description does get emailed like any public ticket comment. The email will have your header and footer on it, and a link to the Track Ticket where they can see the progress of their ticket.
Ticket Workflow
The ticket system tries to help with workflow, but you can ignore that if you want. It starts out with the ticket needing a diagnosis. To do that, just put a comment on the ticket with the subject ‘Diagnosis’. Now the ticket is a regular in-progress ticket.
Next, you probably want to let the system and your team know if/when the job was approved, to do that just make a comment with the subject ‘Approval’. Maybe something like;
“Per our phone call, thanks for approving us to proceed with the repair – we’ll contact you as soon as it’s ready!”
Now the ticket will have the second item in the progress list checked off, it’s been diagnosed, and approved, and you are ready to do the repair.
Be sure to comment every 3 or 4 days if the job is going to take a while to complete, that will keep the ticket from turning yellow or red in the ticket list. It’s a good practice to make ‘public’ comments instead of hidden tech notes, or at least make one public comment for every hidden comment. This way your customer will be comforted with the knowledge that their repair is progressing, and keep them from calling in asking for a status update(usually frustrated).
Completing a Ticket
Now that you have finished their repair, there are a few ways to proceed.
First of all, to close the ticket, just go to the ticket and change the status to “Resolved” – that’s it! Once resolved, the system knows you are done with that job, and it won’t show in the ticket list any more.
There are some things many users do just before that step to keep themselves organized;
- When the repair is complete, but you are waiting for the customer to come to pick it up, use the status “Invoiced” – to mean, invoiced, but here waiting for the customer to come.
- When the repair is complete, and you want to bill the customer, use the “Make Invoice” button on the ticket detail screen, it will link the invoice to the ticket, and if you like, it will put the ticket details on the bottom of the invoice.
- Once the customer comes to pay, you go back and change the ticket from Invoiced to “Resolved/Picked up”. If you forget, the system will email you a note every day about tickets that are open with a paid invoice attached.
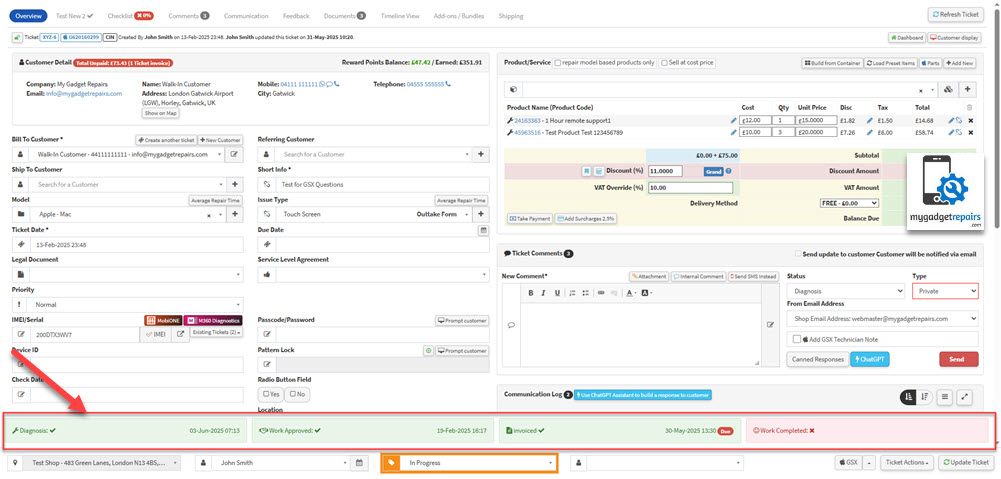
The 5 Key Milestones in a Successful Repair Journey
At MGR, we believe that every successful repair follows a structured and transparent journey. To ensure consistency, quality, and customer satisfaction, we have defined five critical milestones that represent the complete lifecycle of a repair ticket. These milestones help track progress, automate workflows, and keep both staff and customers informed.
1. Diagnosis
Objective: Identify and confirm the fault accurately.
Before any repair can begin, it’s essential to perform proper diagnostics to determine the root cause of the issue. This stage validates that a technician has examined the asset and confirmed what is wrong.
How to Trigger:
Add a comment to the ticket with the ticket comment status set to “Diagnosis”.
This action logs that the diagnostic has been performed and sets the foundation for the next step.
Best Practices:
-
Include clear notes on what tests were performed.
-
Mention the exact fault(s) identified.
-
Optionally, attach photos or diagnostic reports if available.
2. Work Approved
Objective: Gain the customer’s consent to proceed.
Once diagnostics are complete, the customer must be informed of the findings and the associated repair costs. No work should commence without their approval.
How to Trigger:
Add a comment with the ticket comment status set to “Approval”.
This signifies that diagnostic findings and pricing were communicated and that the customer has approved the repair work.
Best Practices:
-
Ensure pricing, parts, and estimated turnaround time are included in the approval communication.
-
Maintain records of the customer’s approval (verbal, written, or digital).
3. Invoiced
Objective: Document the financial transaction for the repair.
After the customer approves the repair, an invoice must be created to track payment and close the financial loop.
How to Trigger:
An invoice must be created and associated with the ticket.
This milestone confirms that the repair cost has been formalised and shared with the customer.
Best Practices:
-
Clearly outline the services and parts billed.
-
Include any applicable taxes, discounts, or warranty terms.
-
Ensure payment status is monitored (paid, unpaid, partial, etc.).
4. Work Completed
Objective: Finish the repair and verify its quality.
The repair work is now complete, and the device or asset has passed final testing and quality assurance.
How to Trigger:
Add a comment with the ticket comment status set to “Repair Completed”.
This marks the job as completed by the technician and ensures that final checks have been done.
Best Practices:
-
Confirm the issue has been resolved.
-
Log any replaced parts or final remarks.
-
Perform and record any post-repair diagnostics to prove the issue is resolved.
5. Resolved / Picked Up
Objective: Hand the repaired item back to the customer.
This is the final step where the customer collects the repaired asset, and the ticket is formally closed.
How to Trigger:
Set the ticket status to “Resolved/Picked up”.
This action records that the item has been returned and that the repair process is complete.
Best Practices:
-
Ensure the customer signs off on the collection (digitally or physically).
-
Provide a receipt or invoice copy.
-
Offer care instructions or warranty coverage information, if applicable.
Why These Milestones Matter
-
Operational clarity: Every team member knows what’s been done and what’s pending.
-
Customer communication: Helps keep customers informed at every step.
-
Automation triggers: These events can be used to trigger SMS/email updates, generate reports, or escalate workflows.
-
Audit trail: Clear documentation of actions taken and who performed them.
By consistently following these steps, your team can deliver efficient, professional, and high-quality repair services that build trust and satisfaction with your customers.

