A recurring invoice is a type of invoice that is automatically generated and sent to a customer on a regular, recurring schedule. It is typically used for services or products that are billed on a regular basis, such as monthly subscriptions or retainer fees. You don’t need to schedule reminders or waste any time copying invoices. You can just sit back, relax, and focus your time elsewhere in your business while your invoicing is taken care of.
Recurring invoices can save time and reduce the risk of errors by automating the invoicing process. They can also help businesses to manage their cash flow by ensuring that they receive regular payments from their customers.
This article explains how to set up recurring invoice profiles and then send these recurring invoices automatically to customers. My Gadget Repairs offers a simple solution that automatically handles the invoicing process for recurring jobs. Some jobs are one-off, but others are ongoing, you may have to bill on a weekly, monthly, quarterly, yearly or any other basis. Recurring jobs are often the best jobs, as they provide regular, assured income. But they also come with massive overhead in terms of monitoring and billing at the right time for the correct time frame.
MGR’s “Recurring Invoices” feature automatically creates invoices and sends them to the customers on a regular, pre-configured basis. For each recurring job, you only need to set up the procedure once.
There are 2 different ways you can create recurring invoices in MGR.
- Via the Ticket Invoices / POS Sales – It means you already have customer and billable items in the invoice and you just need to define some additional parameters.
- Create a blank “Recurring Invoice” profile for a “Ticket” or “POS Order” and define all the parameters.
Both interfaces are as good as each other, it all depends on if you already have an invoice or not and if you do then you might as well start the process via the “Ticket Invoices” or “POS Sale” this way is much quicker because the system knows the customer information and the line items.
Let’s start with creating recurring invoices via the Ticket Invoices / POS Sales interface.
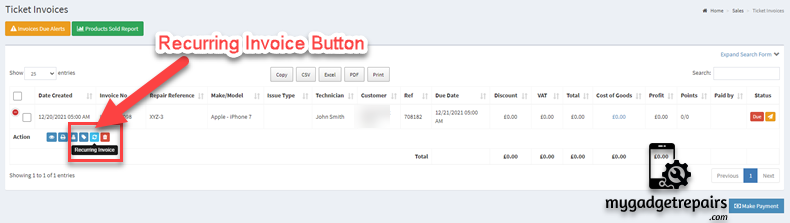
- Let’s go to the Ticket Invoices
- Select the invoice you want to make it recurring. There is a blue icon as shown in the screenshot below
- A new popup will open which will populate the customer details and the line items. You can still add more line items and remove existing line items, Please see the below screenshot.
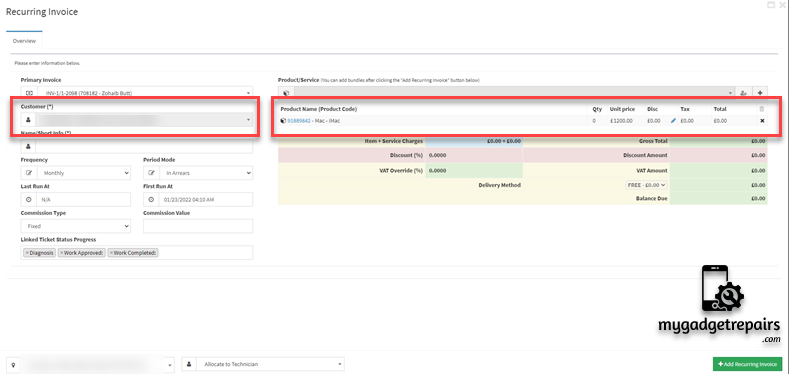
- As you can see you have additional parameters available to configure the recurring invoice profile.
- Type: There are 2 types of recurring invoices, one is related to the ticket and the other one is related to the POS order. Depending on the type the recurring invoice will either create a ticket and then invoice or the POS hold order which then will be converted to an invoice once the customer has made the payment.
- Name: Name of the recurring invoice profile so you know.
- Frequency: Depending on how often you want the invoices to be sent, select a time period from the ‘Frequency’ drop-down menu.
- Period Mode: If it’s “In Advance” or “In Arrears“
- Last Run At: When it was the last run so you know the invoice has been sent.
- First Run At: When you want the recurring invoice to start.
- Commission Type: If there is any commission for your technicians.
- Commission Value: If so, what’s the value?
- Linked Ticket Status Progress: Each invoice will be creating a ticket and this is so you can control the workflow of your ticket. The status set here will be given to the ticket. This field will only show if the recurring invoice “Type” is a ticket invoice.
- Notify Customer: This option will allow you to send the “Ticket Creation” and “Invoice Creation” notifications to the customer, there might be a scenario where you just want to create the invoice and you don’t want to let the customer know as you may need to make some amendments before sending the invoice to the customer.
- Sync Product Prices: This option will allow you to sync the product prices with the recurring invoice line items before creating the invoice. This option is very useful if you’re changing the product price and you want it to reflect on all of the recurring invoices, then you will enable this option.
- Create Invoice: This option determines whether an invoice is automatically generated each time the recurring schedule runs. By default, it is enabled to ensure regular billing without manual intervention. However, in some cases, such as scheduled follow-ups, internal reminders, or non-billable services, you may want to generate the recurring ticket without creating an invoice. Simply disable this option to skip invoice creation while still maintaining the recurring schedule.
- Note: Recurring schedules without any line items will not generate tickets or invoices. To ensure the scheduler functions correctly, please add at least one line item to the schedule.
- Once ready then please click on the “Add Recurring Invoice” button. Please see the screenshot below.

The flow is the same from the POS Sales as well however you start the process by going to “POS Sales“, the blue icon is exactly the same, and the system will automatically change the recurring invoice type to “POS Sale” and it will hide all the ticket related fields.
The 2nd way of creating recurring invoices is by clicking on the “Add New Recurring Invoice” button, the whole flow is the same as above, the only difference is that you don’t select an existing invoice so the system lets you add the line items manually. The additional parameters are exactly the same as in the previous flow, as soon as you select the type the fields related to the ticket will be hidden. Select the customer, set the parameters, add some line items and off you go.
As explained above that both processes are very similar and the only difference is where to get the line items from.
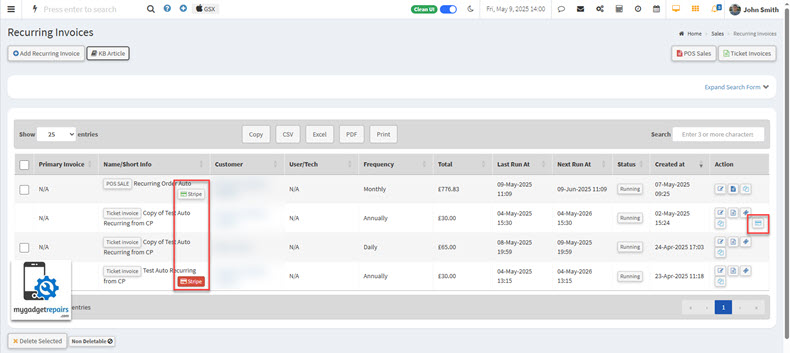
The system will allow you to make changes to your recurring profile at any point, including adding new line items or changes to prices etc, please click on the “Edit” icon to do that, it will also show you all the invoices and tickets related to that recurring profile. You can also click on the “Copy Recurring Invoices” icon to make a clone of the same recurring profile to speed up the creation process.
Please note that if notification no “57 – Ticket Invoice to the customer when a Recurring Invoice was created” is enabled, then an automated email will be sent to the customer with a link to make the payment if it’s set as “In Arrears“.
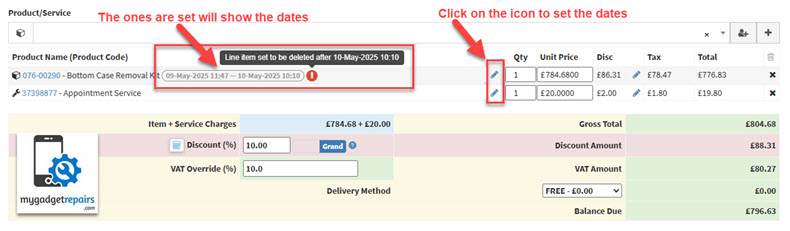
Line Item Scheduling – Time Span
You can control the visibility of each line item on your recurring invoices using Start Date, End Date, and an optional Auto Delete After setting. This makes it easy to handle seasonal charges, limited-time services, or temporary discounts, all without manual adjustments every billing cycle.
-
Start Date: The date from which the line item becomes active and starts appearing on generated invoices.
-
End Date: The date after which the line item will stop appearing on invoices.
-
Auto Delete After: When enabled, this removes the line item from the recurring invoice after its End Date, so you don’t need to manually clean it up.
How It Works
-
Go to your Recurring Invoice.
-
Add or edit a line item.
- Click on the “Edit” icon for line item scheduling.
-
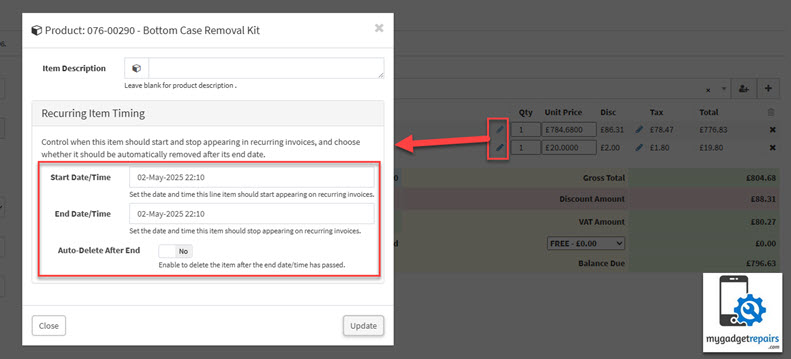
Set:
-
Start Date: The earliest date this line item should appear on generated invoices.
-
End Date: The last date this line item should appear.
-
Auto Delete After (optional): Enable this if you want the line item to be automatically removed from the recurring invoice after its End Date.
-
-
Save your changes.
Please note: If no Start or End Date is set, the item will behave as a regular recurring line item and appear on all generated invoices.
After clicking on the “Edit” icon, you will see the following pop-up.
Use Cases
- Holiday Service Charge
- Line Item: “Holiday Rush Fee – £25”
- Start Date: December 15 2025
- End Date: January 5 2025
- Auto Delete After: ✅
- Use Case: Apply a temporary service fee during the peak holiday season without needing to manually remove it later.
- Extended Warranty Add-On (Fixed Period)
- Line Item: “6-Month Extended Warranty – £9.99”
- Start Date: Invoice creation
- End Date: 6 months later
- Auto Delete After: ✅
- Use Case: Add warranties with limited duration — they’ll automatically disappear from the recurring invoice when expired.
- Temporary Staffing Support
- Line Item: “Additional Tech Support – £200/week”
- Start Date: July 15 2025
- End Date: August 15 2025
- Auto Delete After: ✅
- Use Case: You’ve hired extra staff for a busy season or temporary project, and want to charge a specific business client accordingly.
- Device Insurance Plan
- Line Item: “Device Insurance – £5/month”
- Start Date: March 1 2025
- End Date: March 1 next year
- Auto Delete After: ✅
- Use Case: Add time-limited insurance coverage for devices under a recurring billing agreement.
- Store Renovation Surcharge
- Line Item: “Temporary Surcharge – £10”
- Start Date: August 1 2025
- End Date: September 30 2025
- Auto Delete After: ✅
- Use Case: Charge a small surcharge to customers to offset temporary relocation or reduced service during store renovations.
- Training or Onboarding Fee
- Line Item: “Technician Onboarding Fee – £100”
- Start Date: Invoice creation
- End Date: 1 month later
- Auto Delete After: ✅
- Use Case: Apply a short-term service fee for new B2B clients receiving technician training or system setup.
These examples show how you can automate time-sensitive charges and keep your recurring invoices clean and accurate, without constant manual intervention.
Tips – Line Item Scheduling
-
You can use just a Start Date or End Date if needed, both can be used individually or together.
-
Set Auto Delete After only if you want to permanently remove the item after expiration.
-
You can view or edit scheduled items anytime from the recurring invoice.
AutoPay – Automatic Payment Collection
Your customers can use AutoPay, a feature that securely stores their payment details for automatic invoice payments for recurring invoices (Ticket + POS Hold). This helps streamline your billing process and offers a more convenient experience for your customers.
How AutoPay Works
When a customer pays an invoice, they have the option to save their card details securely. Once saved, the system will automatically charge the stored card for future invoices on the due date, no manual action needed.
Customers have full control over their payment information and can update, change or delete their stored card anytime via the Customer Portal.
Customer Benefits
-
Convenience: Customers don’t need to manually pay each invoice. Payments are taken automatically, saving time and effort.
-
Avoid Late Payments: AutoPay helps prevent missed or late payments by automatically charging the due amount on time.
-
Secure Storage: Payment details are stored securely using industry-standard encryption and PCI-compliant processes.
-
Self-Service Updates: Customers can update or remove their card details directly from the Customer Portal whenever needed.
-
Improved Cash Flow: Timely payments mean fewer follow-ups and a healthier cash flow for your business.
- GDPR Compliant: All stored payment data is handled in accordance with GDPR regulations, ensuring privacy, transparency, and control over personal information.
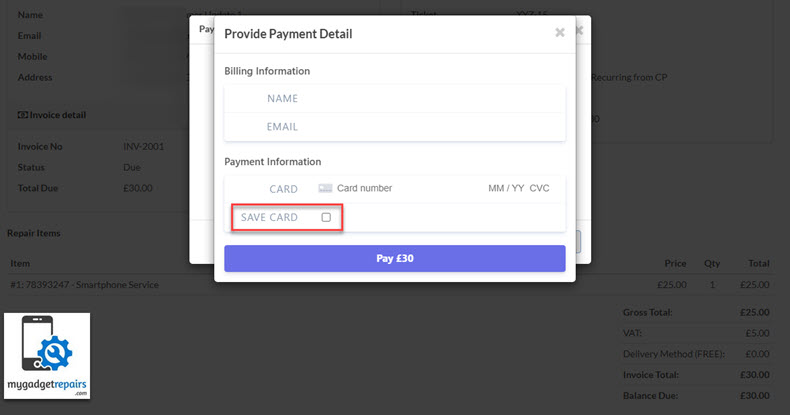
When an invoice is generated from a recurring schedule and the customer is ready to make a payment from the link, the following message is displayed:
To enable automatic payments (“AutoPay”) for a recurring invoice, simply click on the “Save Card” option in the next screen. Once a card is saved, all future payments for that recurring invoice will be processed automatically.

This message ensures that customers are informed about the benefits of enabling AutoPay. Once they click “Proceed to Pay”, they’ll be presented with the option to securely save their card for future automatic charges.
Once a payment is successfully processed, the payment provider returns a secure token representing the customer’s card information. This token is safely stored and associated with both the customer profile and the specific recurring invoice.
Customers can also choose to reuse the same stored card (token) across multiple recurring invoices, making future payments effortless and consistent. Please note that we do not store any physical card details, only the token provided by the payment gateway, which ensures PCI-compliant handling of sensitive payment data.
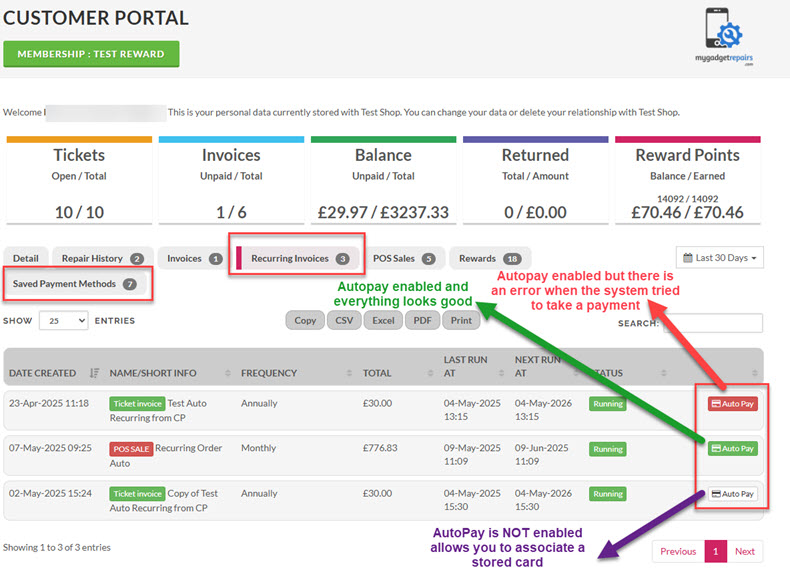
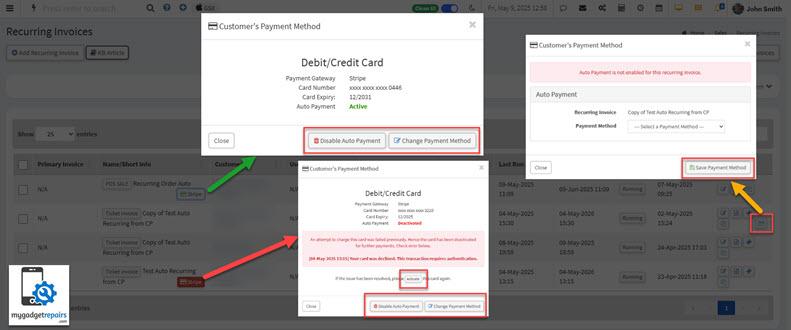
On the customer portal, users can view detailed information about any AutoPay setup associated with their recurring invoices. This includes the current payment method, payment history, error messages (if any), and the status of each scheduled payment. Customers can easily associate a different stored card with an existing recurring schedule or update the card details as needed.
Additionally, your customers have full control over their stored payment methods, they can edit, delete, or add new cards at any time. The interface is designed to be intuitive and secure, ensuring a seamless experience for managing automated payments.
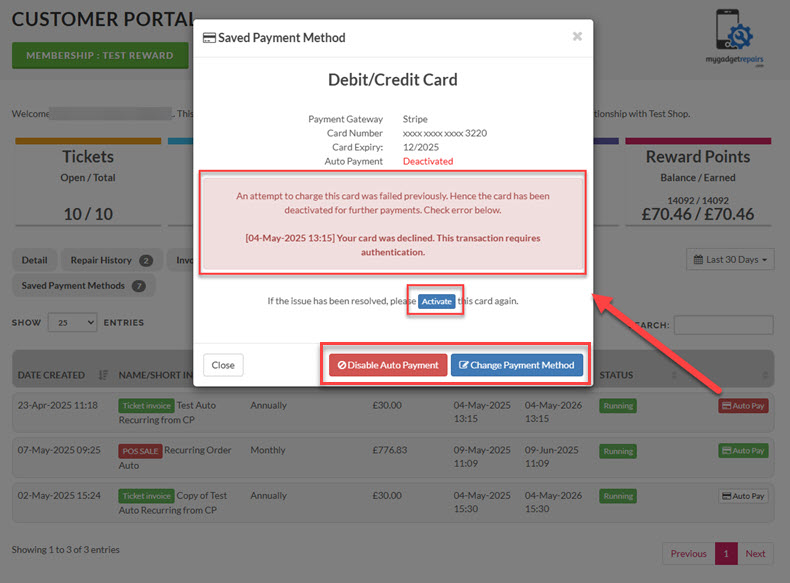
In the event of an error during the autopay process for a recurring invoice, the system will automatically trigger a notification no. “87 – Notify Customer of Declined Autopay on Recurring Invoice“. Additionally, a corresponding entry will be recorded in the “System Notifications” log for administrative tracking. This ensures both the customer and the support team are promptly informed, allowing for timely resolution and follow-up.
In the event of a payment error, customers are shown the complete error details to help them understand why the transaction was declined, information that can be useful if they need to contact their bank. Once the issue is resolved, they have the flexibility to reactivate the same payment method, select an alternative payment option, or disable AutoPay entirely for any of their recurring schedules.
This approach ensures customers retain full control over their automated payments, empowering them to manage their billing preferences according to their needs. Additionally, it aligns with GDPR requirements by promoting transparency, data protection, and user consent in all aspects of payment handling.
Important Note About Declined Payments and AutoPay Deactivation
Please be aware that if a scheduled payment is declined, the system will automatically deactivate the AutoPay feature on that particular recurring schedule. This is done to prevent further failed attempts and ensure your billing information is up to date.
Make sure the following actions are clearly stated in your notification email to customers:
-
Reactivate AutoPay via the customer portal if they wish to continue using the same payment method.
-
Update or select a new payment method before the next scheduled billing cycle to avoid service interruption.
We strongly recommend customers take immediate action upon receiving a failed payment notification to maintain uninterrupted service and avoid potential late fees.
When there are no issues with AutoPay, the interface will appear as shown in the screenshot below. However, your customers still have the option to disable AutoPay at any time or update their payment details as needed. It’s important to regularly remind customers to keep their payment information up to date to avoid any service disruptions.

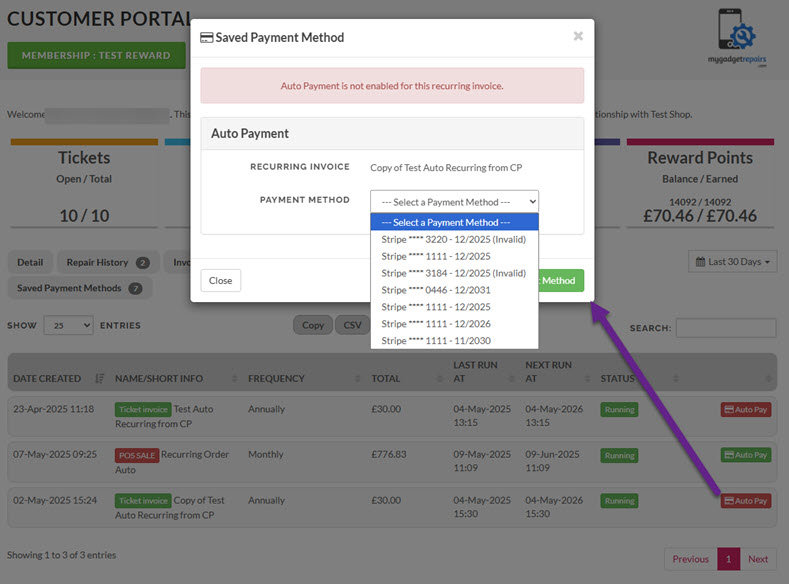
If AutoPay is not set up for a recurring schedule, your customers will have the following options:
-
They can choose from their existing saved payment methods to complete the payment.
-
Alternatively, they can use the secure payment link we send to pay manually and, if desired, add and store a new card for future use.
This ensures a smooth and flexible payment experience, even without AutoPay enabled.
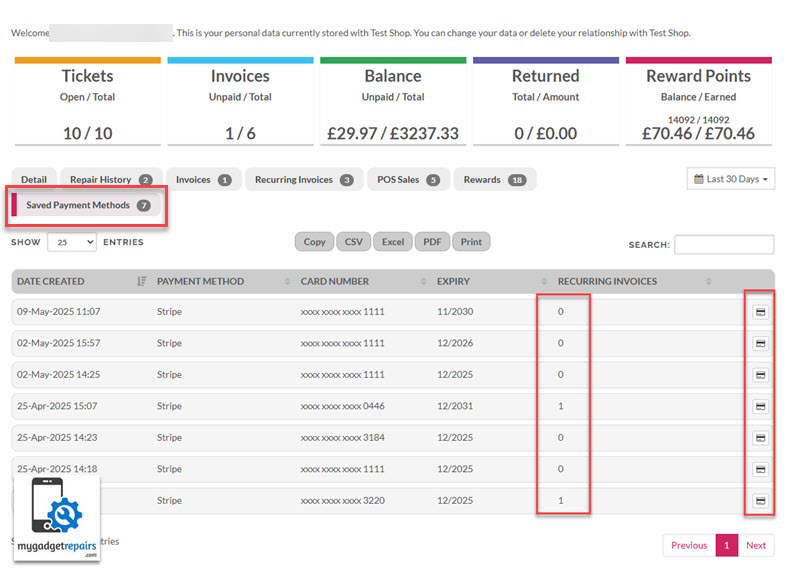
Saved Payment Methods Tab
The “Saved Payment Methods” tab will display all stored payment methods, along with the count of associated recurring schedules for each method. This feature enables users to quickly identify how many recurring schedules rely on a specific payment method. In case of any issues with a payment method or if the customer decides to delete it, the tab will clearly show how many recurring invoices would be impacted by this action.
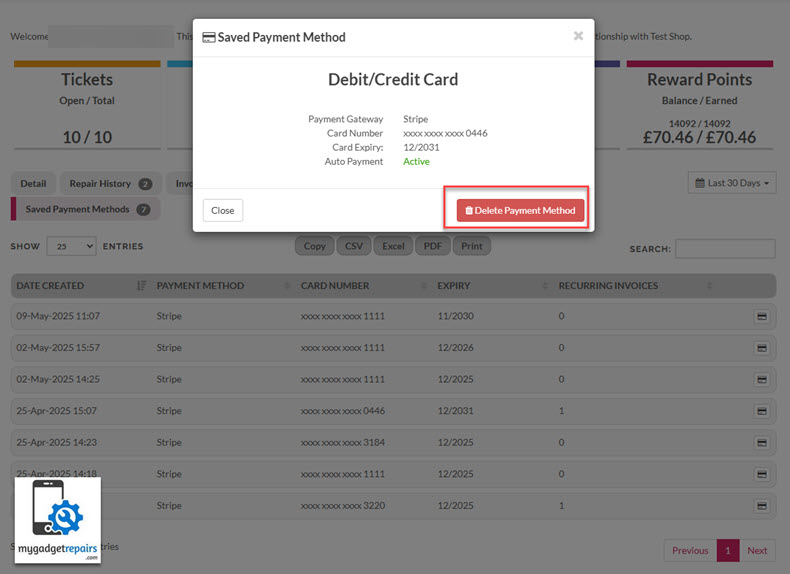
Additionally, customers will have the option to delete their payment information directly from this tab. This functionality ensures compliance with GDPR, providing customers with the control to manage and remove their stored payment details at any time. Once a payment method is deleted, all associated recurring schedules and invoices will automatically be removed, maintaining data integrity and ensuring that no payments will be processed from the deleted method.
The key advantage is that your customers maintain full control over the entire “AutoPay” process, from setup, modifications, to cancellation, ensuring transparency, consent, and compliance with GDPR regulations. This empowers your customers to manage their payment preferences securely and confidently, fostering trust and reducing friction.
Customers’ Cards Expiring Soon – Automated Monitoring and Notification
To ensure uninterrupted service and avoid any billing issues, the system continuously monitors the expiration dates of all stored customer payment cards. When a card is set to expire within the next 30 days, the system will automatically trigger Notification No. 88 – “Notify customer that their stored payment card is expiring soon.”
This proactive approach is critical for both customer experience and operational efficiency. Many customers may be unaware that their card is nearing expiration, and without timely intervention, this could lead to failed transactions, missed payments, and service disruptions.
By notifying customers in advance, we provide them with ample time to update their payment information, helping to:
-
Prevent involuntary service interruptions
-
Reduce the risk of failed invoice payments
-
Maintain smooth continuity of subscription or recurring services
-
Improve customer satisfaction and trust in the system’s reliability
The notification includes clear instructions and a secure link directing customers to update their billing details promptly. This ensures that their account remains active and in good standing without any administrative overhead or delays.
Recurring Invoice Manager – Admin
Admins have full access to manage AutoPay settings on behalf of their customers. They can easily view which accounts have “AutoPay” successfully enabled, identify those experiencing payment issues, and see which customers have not yet set up AutoPay. Additionally, admins can update payment methods, enable or disable AutoPay, and receive alerts for failed transactions, ensuring proactive support and smoother billing operations.
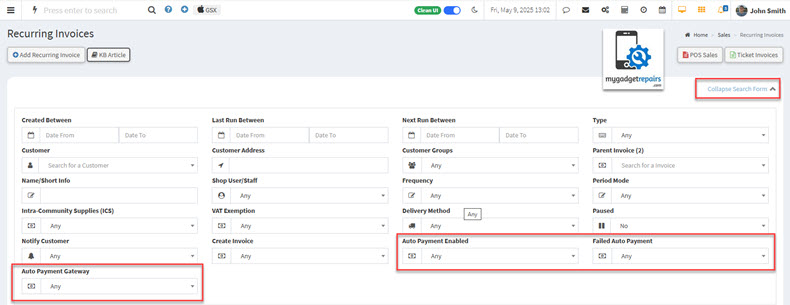
In the Search Form, additional filters are available to help you manage and narrow down your AutoPay data efficiently. These filters are designed to give you greater control and visibility over automated payment activities:
-
Auto Payment Enabled: This field allows you to filter customers or records based on whether AutoPay is currently enabled (
Yes) or disabled (No). It’s useful for quickly identifying which customers are set up for automatic payments. -
Failed Auto Payment: Use this filter to view records where the most recent AutoPay transaction failed. This helps in identifying payment issues and taking necessary follow-up actions, such as notifying customers or retrying the payment.
-
Auto Payment Gateway: This dropdown allows you to filter records by the payment gateway used for AutoPay (e.g., Stripe, BlockChyp, PaymentSense). It’s helpful for analyzing performance or issues tied to specific gateways.
These filters are also integrated into the Saved Search feature, enabling you to create and reuse custom views or reports based on your AutoPay criteria. For example, you can create a Saved Search that shows all customers with AutoPay enabled via Stripe and who have had no failed payments in the last 30 days.
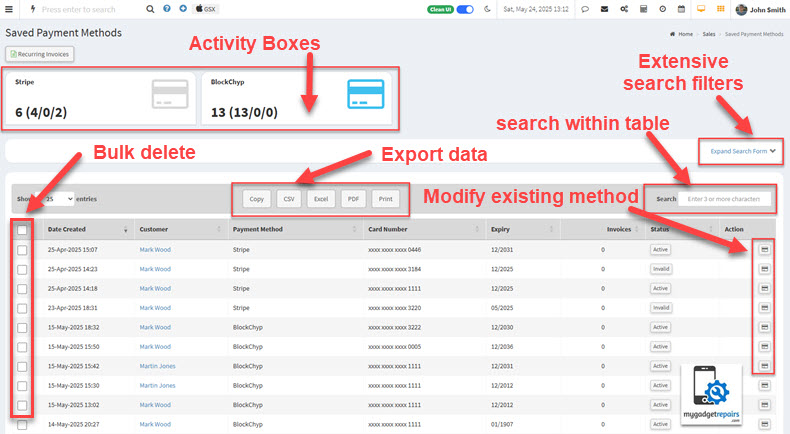
We’ve added a dedicated manager for handling Saved Payment Methods used in Recurring Invoices, giving you greater control and visibility into customer billing data. This guide outlines the key features and how to use them effectively. The manager includes the following capabilities:
- Search & Filter Functionality: A robust search form allows you to quickly locate saved payment methods using filters such as customer name, card type, last four digits, expiry date, and associated recurring invoice ID. This ensures fast access to relevant data, especially when dealing with large datasets.
- View Tied Recurring Invoices: Instantly see how many active recurring invoices are linked to each saved payment method. This provides better insight into billing dependencies and helps assess the impact before removing or modifying a payment method.
- Individual Delete Option: You can now delete a specific saved payment method directly from the list view. This action is protected with a confirmation prompt to prevent accidental deletions and ensures the method is no longer used for future billing cycles.
- Bulk Delete Capability: For convenience, multiple saved payment methods can be selected and deleted in a single action. This is especially useful for cleaning up expired or inactive entries in bulk, improving overall data hygiene.
- Export Functionality: The system allows exporting saved payment method records to common formats like CSV or Excel. This is ideal for audits, backups, or offline analysis, and includes all relevant details based on current filters applied in the search.
AutoPay Availability Across Payment Integrations
The following payment providers currently support AutoPay functionality in MGR:
-
Stripe – Fully supported
-
BlockChyp – Fully supported
Coming soon:
- PaymentSense / Dojo – Integration underway
- Square – AutoPay functionality coming soon
-
SumUp – Support planned in upcoming updates
We’re continuously working to expand AutoPay support across more providers to offer greater flexibility and convenience for your recurring payments.

