The Estimate module in My Gadget Repairs (MGR) CRM helps you create, manage, and send detailed job estimates to your customers with ease. It streamlines the quoting process by allowing you to quickly generate professional estimates based on repair tickets or point-of-sale transactions, ensuring clear communication of costs and services. With powerful features like customer approvals, linked estimates, and customizable templates, the module supports your workflow from initial quote to job approval and beyond.
Table of Contents
1. What Is an Estimate/Quote?
An estimate/quote is a detailed document provided to a prospective client outlining the scope, cost, and details of a proposed job or service. It serves as a formal quote that helps your customers understand what to expect regarding pricing and work involved.
My Gadget Repairs (MGR) offers a flexible and powerful Estimate Module designed to streamline this process, allowing estimates to be created either for repair tickets or point-of-sale transactions. This helps you manage customer expectations clearly and professionally before any work begins.
Key Benefits:
-
Provides transparency and professionalism to customers.
-
Helps streamline the sales and approval process.
-
Enables easy tracking and management of potential jobs.
-
Allows you to link multiple estimates to one job for flexible quoting.
-
Supports customer approvals directly through email notifications.
Outcome:
Using estimates effectively improves customer trust, accelerates job approvals, and ensures your repair shop operates with clear financial and operational visibility right from the start.
2. Accessing the Estimate Manager
To begin working with estimates, navigate to the Dashboard of your MGR system. From the left-hand menu, select Estimate Manager. This screen displays a list of all current estimates, both pending and completed, giving you quick access to manage and review your estimates.
The Estimate Manager provides a centralised interface where you can perform a variety of important tasks, such as:
-
Viewing all current estimates: Quickly browse through all your active, pending, approved, or rejected estimates in one place.
-
Adding new estimates: Easily create new estimates for customers or tickets with just a few clicks.
-
Filtering and searching estimates: Use filters and search functions to find specific estimates based on criteria like customer name, status, or date.
-
Tracking estimate status: Monitor the progress of each estimate, whether it’s pending approval, approved, rejected, or converted into a ticket.
-
Assigning estimates: Link estimates to customers or tickets to keep your workflow organised and streamlined.
-
Estimate KPIs & Performance Insights: Analyse estimate-related data to track conversion rates, average approval times, and overall sales performance.
Accessing and utilising the Estimate Module effectively empowers your sales and marketing teams to stay organised, streamline their workflows, and deliver accurate, timely proposals. By leveraging this tool, teams can effortlessly manage client quotations, track progress, and collaborate seamlessly, ultimately driving higher conversion rates and improving customer satisfaction. The Estimate Module not only centralises vital information but also provides valuable insights, enabling your teams to prioritise leads, tailor offers, and close deals more efficiently.

Estimate Manager Key Performance Indicators (KPIs):
The Estimate Manager KPIs provide a comprehensive overview of the current status and historical performance of your sales estimates. By tracking the number and value of pending estimates alongside the monthly breakdown of approved, declined, awaiting, and expired estimates, these metrics offer valuable insights into your sales pipeline health, customer engagement, and revenue forecasting accuracy. This information enables you to make informed decisions to optimise your estimate process and improve conversion rates over time.

1. Pending Estimates / Projected Value:
-
Count: 1
-
Projected Revenue: £179.95
This indicates there is currently 1 estimate awaiting customer response, representing a potential revenue of £179.95 if approved.
2. Estimates Status (Current Month):
-
Approved: 5
-
Declined: 4
-
Awaiting Response: 0
-
Expired: 1
In the current month, 5 estimates have been approved, contributing to confirmed upcoming work. Four estimates were declined by customers, none are currently awaiting a response, and one estimate has expired without action.
3. Estimates Status (Previous Month):
-
Approved: 45
-
Declined: 21
-
Awaiting Response: 0
-
Expired: 28
During the previous month, a total of 45 estimates were approved, 21 declined, none remained pending, and 28 expired.
Explanation:
These KPIs provide a snapshot of your sales pipeline and customer engagement related to estimates:
-
Pending Estimates / Projected Value helps forecast upcoming revenue by showing how many estimates are still in play and their combined value.
-
The Approved, Declined, Awaiting, and Expired counts for both the current and previous months track how estimates are progressing through your sales funnel, helping identify trends such as conversion rates, responsiveness, and potential revenue lost due to expired or declined estimates.
-
Monitoring changes month-over-month helps highlight improvements or issues in estimate approvals and customer decision-making.
Observations & Insights:
-
The number of pending estimates is currently low, which could indicate a fast decision-making process or a need to generate more new estimates to keep the sales pipeline active.
-
The projected value from the pending estimate (£179.95) is relatively small compared to the overall approved estimates, suggesting either smaller jobs are being quoted or larger projects are already in the approved stage.
-
Comparing the current month to the previous month, the approved estimates have decreased significantly (from 45 to 5), which may indicate a seasonal slowdown, reduced demand, or a potential bottleneck in the sales process that should be investigated.
-
The declined and expired estimates combined remain considerable, especially last month, which could mean quotes might need reviewing for competitiveness or clarity to improve acceptance rates.
-
The fact that there are no awaiting response estimates in both months could imply effective follow-ups or customers responding promptly, but it might also mean estimates are either quickly accepted/declined or overlooked and expire.
-
Tracking these KPIs over time will help identify trends and guide actions to improve estimate conversion and revenue forecasting.
This KPI snapshot is useful for sales teams and management to understand the estimate/quotation flow, assess the effectiveness of marketing and sales efforts, and adjust strategies accordingly.
Bulk Estimate Update/Delete:
To streamline your workflow and save time, the system offers a Bulk Update/Delete feature for managing multiple estimates simultaneously. This is especially useful when handling high volumes of estimates or making batch changes after a process or policy update.
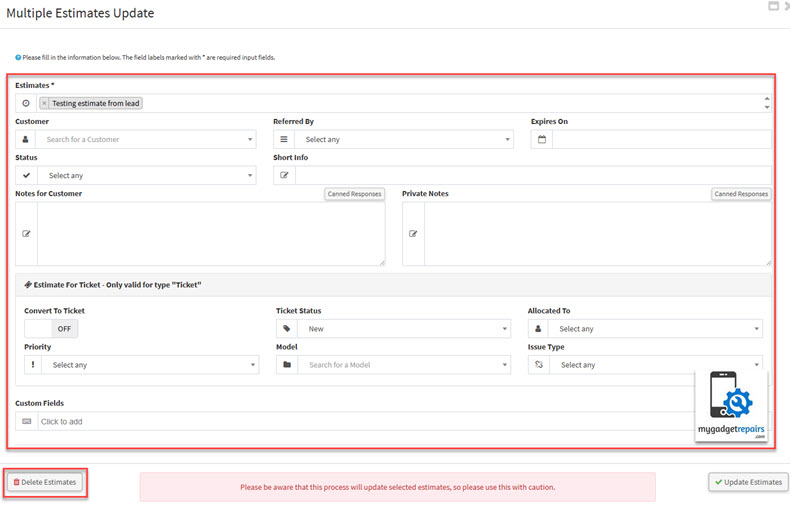
You can modify the following fields in bulk:
-
Customer
-
Referred By
-
Expires On
-
Status
-
Short Info
-
Notes for Customer
-
Private Notes
Additionally, you can perform actions such as:
-
Convert to Ticket: Automatically convert selected estimates into support or repair tickets.
-
Set Ticket Status: Define the status of the newly converted or existing tickets.
-
Allocated To: Assign the ticket to a specific technician or team member.
-
Priority: Set the urgency level (e.g., Low, Medium, High, Critical).
-
Model: Update the device or product model related to the estimate.
-
Issue Type: Specify or update the nature of the issue being estimated.
Support for Custom Fields is also included, allowing you to update organisation-specific data points in bulk.
Use Cases:
-
Seasonal Cleanup: A repair shop wants to archive or delete all estimates that have expired more than 60 days ago and haven’t been converted into tickets.
-
Sales Campaign Management: During a special promotion, a manager updates the “Referred By” field to track responses tied to a specific marketing campaign.
-
Technician Reassignment: If a technician goes on leave, all estimates previously allocated to them can be reassigned to another technician in one go.
-
Status Updates After Follow-Ups: After a round of customer follow-ups, multiple estimates can have their statuses updated to “Awaiting Customer Response” or “Closed”.
-
Custom Field Adjustments: When introducing a new custom tracking field (e.g., Estimate Source or Warranty Type), bulk updates allow backfilling historical estimates with the appropriate values.
-
Fast Ticket Conversion: When several pending estimates are approved by customers in bulk (via email or phone), the system can instantly convert all selected estimates into active tickets and assign them appropriately.
Search Form – Saved Searches – Rolling Dates:
The Estimate Search Form is a powerful tool that allows you to filter your data based on a wide variety of criteria such as customer details, status, technician, assigned dates, and more. Whether you’re tracking open estimates, reviewing high-value jobs, or managing team performance, the search form helps you drill down into the data that matters most.
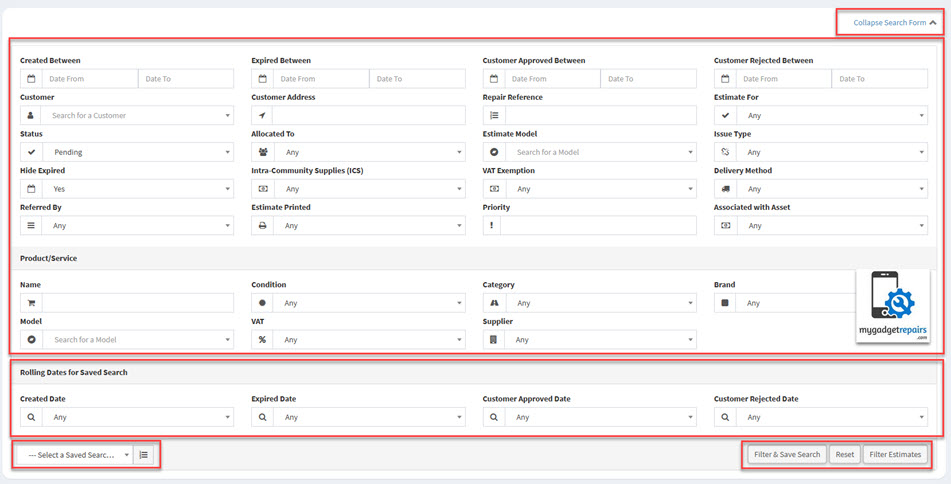
To save time and maintain consistency, we offer a Saved Search feature. This lets you save your filter combinations for quick access, so you don’t have to reapply them every time. Saved Searches can be customised and reused, helping you streamline daily tasks, generate reports, or build custom activity boxes for the estimate manager.
A key advantage of Saved Searches is the ability to use Rolling Dates. These are dynamic date filters that automatically adjust relative to the current day. Instead of setting a fixed date range, Rolling Dates keep your saved searches always relevant, so they update in real time without manual changes.
Available Rolling Date options include:
-
Today – Only includes records from today.
-
Yesterday – Includes only yesterday’s records.
-
Last 7 Days – Covers the last 7 days, including today.
-
Last 14 Days – Last two weeks of data, including today.
-
Last 21 Days – Last three weeks, including today.
-
Last 30 Days – Last full month of data, including today.
-
Last Week – Monday to Sunday of the previous week.
-
This Week – Monday to today of the current week.
-
Last Month – Entire previous calendar month.
-
This Month – From the start of the current month to today.
-
Last Month to Date – From the first to the current day of last month.
-
This Year – From January 1st to today of the current year.
-
Last Year – The Entire previous calendar year.
These Rolling Date ranges are perfect for tracking performance, measuring trends, and automating reporting. When combined with Saved Searches, they enable you to create real-time Activity Boxes, performance widgets, or dashboards that always show the latest and most relevant data.
Use Case Example:
You could create a Saved Search named “My New Estimates This Week“, filtering leads assigned to you with a created date of “This Week”. Every time you access it, it will automatically show estimates added from Monday to today, keeping your view fresh and relevant.
3. Creating a New Estimate
There are various ways to create an estimate, including:
-
Stand-alone Estimate: Creating an estimate independently, without linking it to any existing record. This is useful for quick quotes or when starting from scratch.
-
When to use:
-
When you need a quick quote without prior customer or job details.
-
For one-off inquiries or walk-in customers.
-
-
How it works:
-
Simply click the New Estimate button in the upper left of the Estimate Manager.
-
A new window will open, resembling the ticket interface but with fields specific to estimates.
-
Select the Estimate For field to specify whether this estimate relates to a ticket or a point of sale. Selecting Point of Sale will hide ticket-related fields for a simplified process.
-
Enter the Customer Name; if the customer doesn’t exist, create a new customer by clicking the plus (+) icon.
-
Add a brief description or short info about the issue or job (e.g., “Broken XYZ”).
-
The Estimate Expiration Date will be pre-filled automatically, but can be adjusted as needed.
-
Fill out any additional custom fields relevant to the estimate.
-
When ready, click Add New Estimate to save.

-
-
-
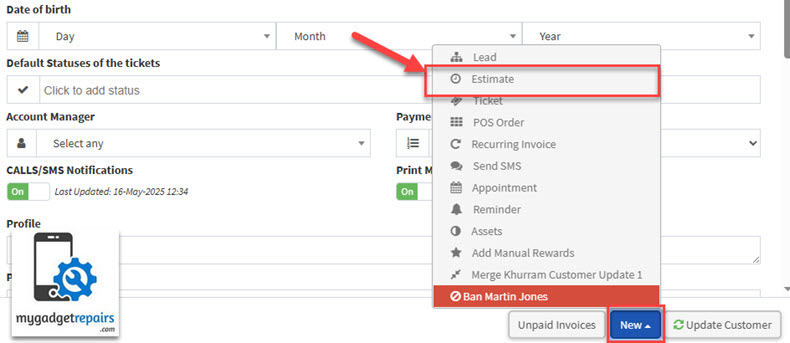
From Lead: Generating an estimate directly from a sales lead. This allows you to quickly provide potential customers with pricing based on the details gathered during the lead qualification process.
-
When to use:
-
After qualifying a lead, and need to provide a formal quote.
-
When the lead already has some information about the requested services or products.
-
-
How it works:
-
Pulls customer info and requirements from the lead record to pre-fill parts of the estimate, speeding up the process and reducing errors.
-
-
-
From Ticket: Creating an estimate based on an existing service or repair ticket. This helps when additional costs or services need to be quoted before proceeding with the job.
-
When to use:
-
When additional repairs or parts are identified during a job, and require approval before proceeding.
-
To formalise the costs associated with the work done or to be done.
-
-
How it works:
-
The system references the ticket details, parts, and labour items to generate a draft estimate that can be reviewed and sent to the customer.
-
-
-
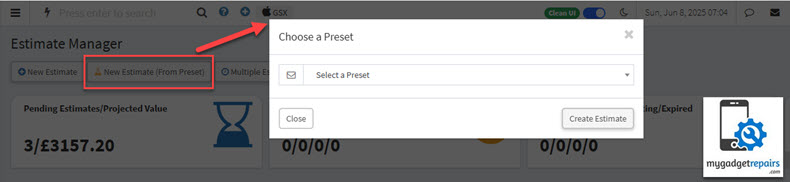
From Ticket Preset: Using predefined configurations to generate an estimate. This speeds up the process for common services or products by automatically applying standard prices and descriptions.
-
When to use:
-
For common or repetitive jobs with standardised pricing.
-
To maintain consistency and speed up quoting.
-
-
How it works:
-
Select a preset from a list of predefined estimates that automatically fills in items, prices, and descriptions, which can then be customised if needed.
-
-
-
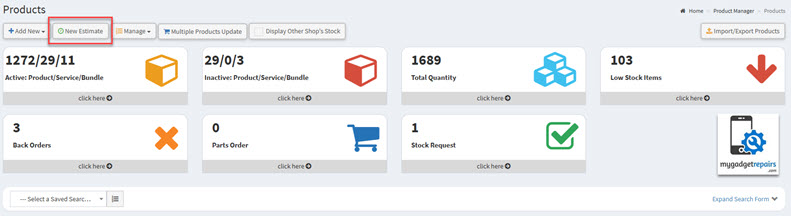
From Product or Service Catalogue: Selecting items or services from “Product Manager” to build an estimate tailored to the customer’s requirements.
-
When to use:
-
When you want to create detailed, itemised estimates with current pricing.
-
For customers requesting multiple products or a mix of services.
-
-
How it works:
-
Browse or search the “Product Manager“, add the desired items with quantities, and the system calculates totals based on catalogue pricing.
-
-
-
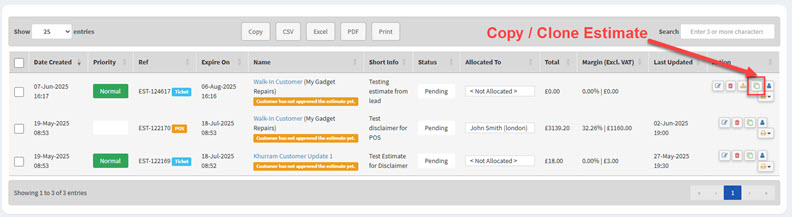
From Previous Estimate: Duplicating or modifying an existing estimate to save time when creating similar quotes for repeat customers or recurring jobs.
-
When to use:
-
For repeat customers or similar jobs, where the scope and pricing are mostly the same.
-
To save time by reusing prior work.
-
-
How it works:
-
Select an existing estimate, copy its details into a new estimate form, and update any changed items or pricing before sending.
-
-
-
From Customer Profile: Leveraging customer-specific pricing, discounts, or historical data to generate an accurate estimate personalised for the client.
-
When to use:
-
When certain customers have special rates or preferred service packages.
-
To provide personalised and accurate quotes based on past interactions.
-
-
How it works:
-
The system applies any customer-specific pricing rules or discounts automatically when creating the estimate.
-
-
4. Adding Products and Services
Once the estimate is created, you will notice the Product/Services dropdown, which closely resembles the interface used when managing tickets. This dropdown enables you to add billable line items directly to the estimate. Each product or service you select or enter will automatically contribute to the overall estimate total, providing a transparent breakdown of costs for your customer.
This functionality allows you to itemise all components of the job, whether that’s parts, labour, or any additional charges, ensuring your customer understands exactly what they are being billed for.
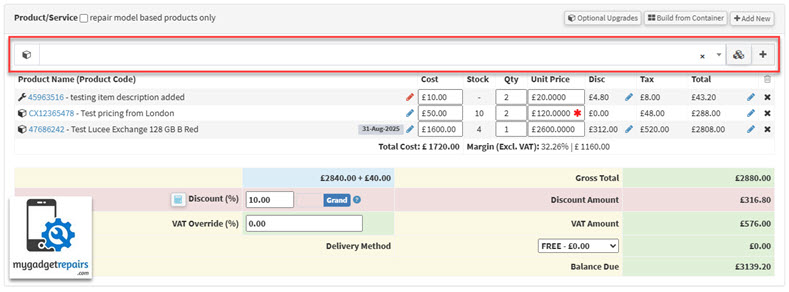
Additionally, you can make use of the following powerful options to further customise and streamline your estimate:
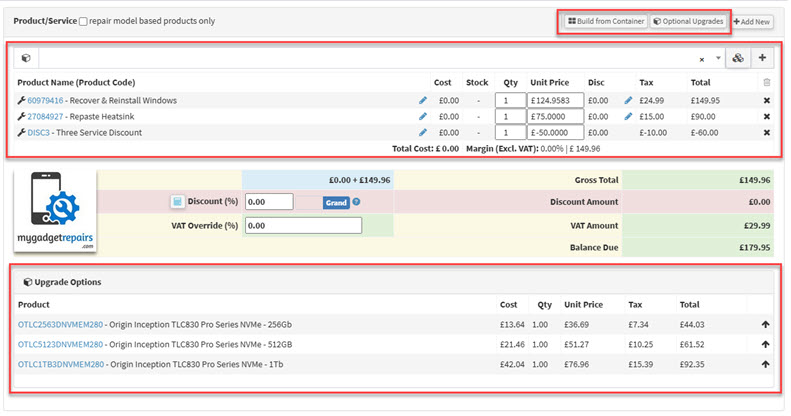
Optional Upgrades
This feature allows you to offer your customer additional products or services that they may want to add to their repair or service. These are presented as optional line items that the customer can choose to accept or decline. Including optional upgrades not only increases your chances of upselling but also helps customers tailor their service according to their preferences and budget. Read this KB article for more information.
Build from Container
This option lets you quickly add multiple related items to the estimate by selecting a pre-defined container. Containers group together all the necessary components and services for a specific job, saving you time and maintaining consistency in your estimates.
For example, consider a PC Build container. Instead of adding each part separately, you can select this container to automatically add all the core components, like:
-
CPU
-
Motherboard
-
RAM
-
Storage (SSD/HDD)
-
Power Supply
-
Case
-
Labour for assembly and testing
By selecting the “PC Build” container, all these line items appear together with their respective prices, giving your customer a clear and comprehensive estimate for a complete custom-built PC. This method reduces manual entry errors and speeds up your quoting process. Read this KB article for more information.
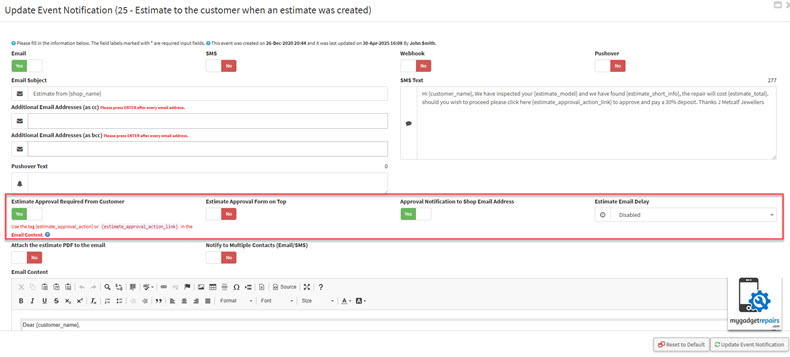
5. Enable Estimate Approval by Customers
Please note that customers can also approve the estimate directly. To enable this feature, you’ll need to add a specific tag in the notification email.
Here’s how you can set it up:
-
Navigate to Settings, then select the Notification tab.
-
Locate Notification No. 25: “Estimate to the customer when an estimate was created”. This notification is triggered when you send the estimate email to the customer.
-
Click the Edit icon next to this notification.
-
Enable the option “Estimate Approval Required From Customer.”
-
Copy the Estimate Approval Action Tag provided and paste it into the email body. This tag will automatically convert into a clickable link within the email, allowing customers to easily approve or decline the estimate.
-
If you would like to receive a notification when a customer approves or declines, make sure to also enable “Approval Notification to Shop Email Address.”
By setting this up, you streamline the approval process, making it simple and convenient for customers to respond directly from their email, while keeping you informed in real time.
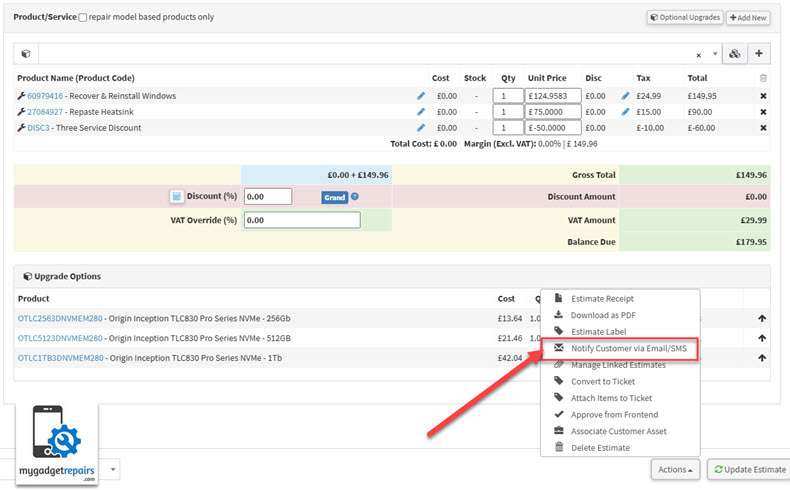
6. Sending the Estimate
Once you have added all the necessary billable line items and are ready to send the estimate, please navigate to the Actions menu and select the “Notify Customer via Email/SMS” option.
Please note that the system does not send the estimate automatically because it cannot determine when you have finished adding all line items. However, once you have added at least one line item, the system will grant you a 3-hour window to finalise the estimate. If no further changes are made within this timeframe, the estimate will be automatically emailed to the customer to ensure timely communication.
When the email notification pop-up appears, simply review the message and click the Send button to notify your customer immediately.
If you prefer, you can customise this behaviour by going to Settings > Estimate and adjusting the “Estimate Email Delay”. Here, you can change the delay timeframe or disable the automatic email feature entirely by turning off the “Auto Send” option.
This gives you full control over when and how estimates are sent, allowing you to tailor the process to your business needs.
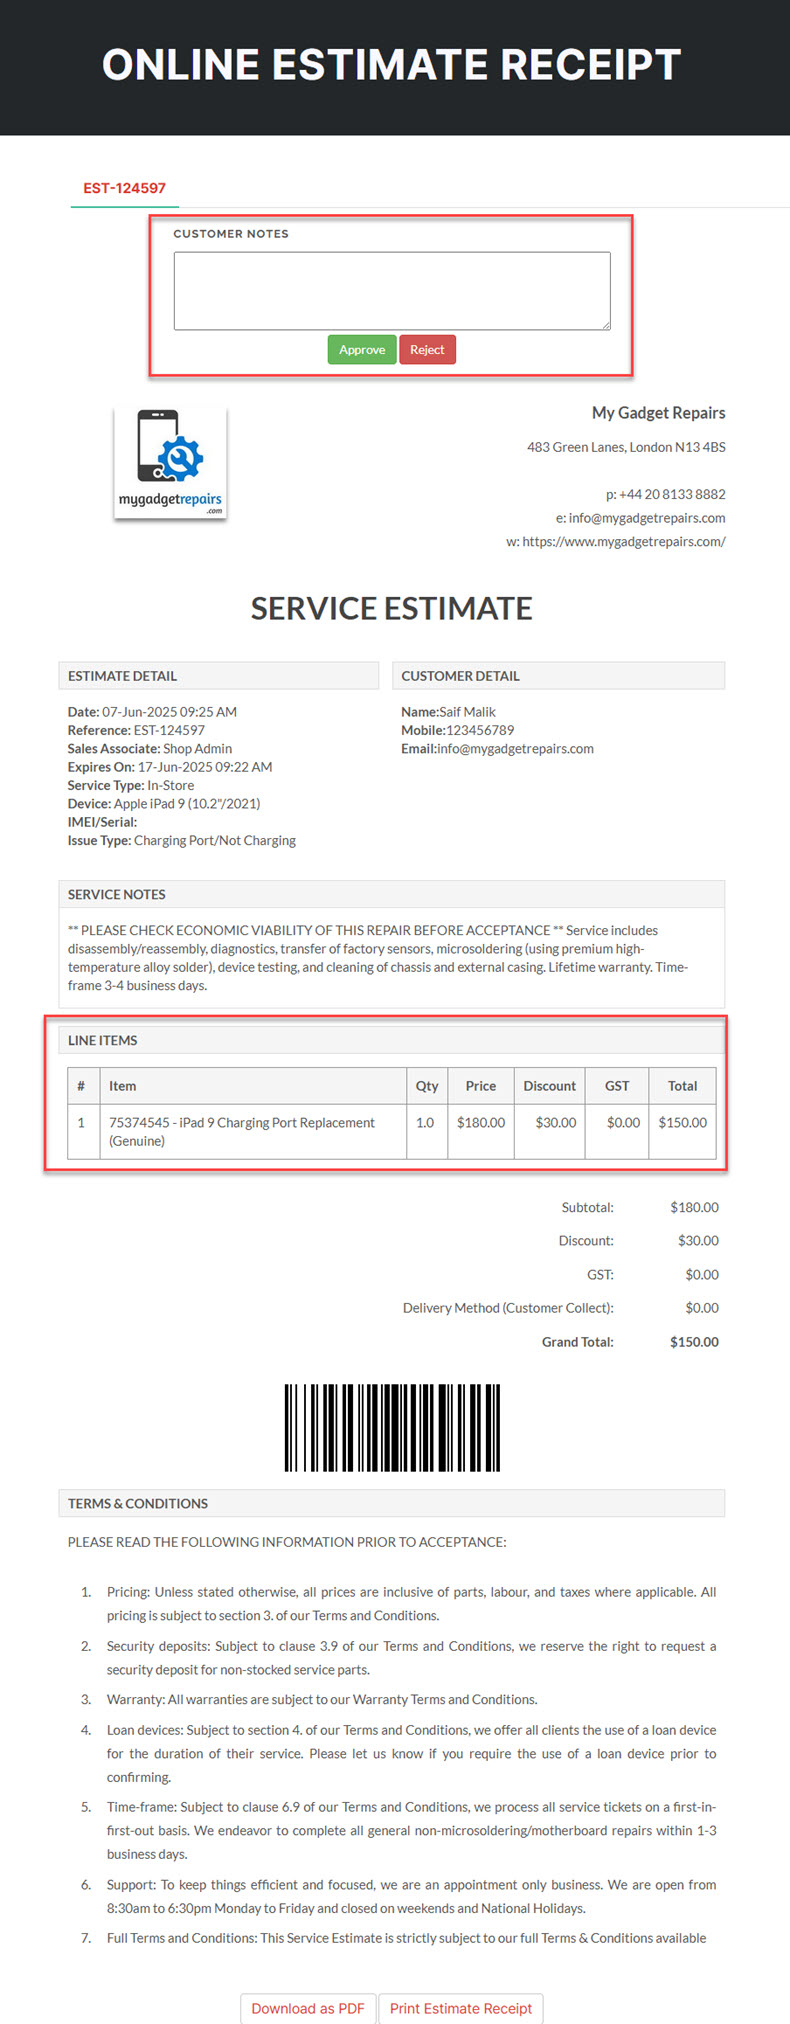
7. Estimate Approval from Customer Portal
After sending the estimate to the customer via email or SMS, the customer receives a secure, personalised link to view the detailed estimate. Crucially, this link empowers the customer to take action by either “Approve” or “Reject” the estimate. Additionally, if the estimate includes any “Optional Upgrades,” customers can select those upgrades as part of their decision, allowing for a flexible and transparent quoting process.
This phase of the estimate process is critical because securing customer consent ensures clarity and agreement before any repair work proceeds, minimising misunderstandings and improving customer satisfaction.
Customer Actions and System Responses
1. Approve:
-
For Stand-Alone Estimates:
When a customer approves a stand-alone estimate, the system immediately updates the estimate status to Approved. It then automatically triggers notifications to the admin team and the assigned repairer, informing them of the customer’s consent. This notification initiates the next step, allowing the repairer to begin preparations for converting the estimate into a formal repair ticket without delay. -
For Estimates Linked to Existing Tickets:
If the approved estimate is associated with an existing repair ticket, the system not only marks the estimate as approved but also seamlessly integrates all approved line items, including any selected optional upgrades, directly into the ticket. This automation eliminates manual entry, accelerating workflow and reducing the potential for errors. Simultaneously, the system notifies the admin and the repairer responsible for the ticket, ensuring they are promptly aware of the update and can proceed accordingly.
2. Reject:
-
When a customer declines an estimate, the system updates the estimate status to Rejected and immediately notifies both the admin and the repairer assigned to the estimate. This alert allows the team to review the rejected estimate and consider the appropriate next steps, such as reaching out with a counteroffer, alternative solutions, or further consultation to try and retain the customer’s business.
Notifications Overview
To keep all stakeholders informed at key moments, the system uses the following notifications:
-
Notification 80: Sent to the customer upon estimate approval, confirming their decision and providing any relevant next steps or information.
-
Notification 81: Sent as an alert to the assigned repairer once the customer approves the estimate, ensuring they are immediately aware and can begin necessary preparations for the repair.
Additional Enhancements and Considerations
-
Audit Trail: Each customer action, approval, rejected, or upgrade selection is logged with a timestamp and IP address for accountability and compliance purposes.
-
Optional Upgrade Management: The system clearly displays optional upgrades during estimate review and dynamically adjusts totals based on customer selections before final approval.
-
Reminders and Follow-Ups: If a customer does not respond within a configurable timeframe, the system can automatically send polite reminder notifications to encourage timely decisions.
-
Mobile-Friendly Interface: The estimate review and approval page is fully optimised for mobile devices, ensuring customers have a smooth and intuitive experience whether on desktop or smartphone.
-
Admin Override: In cases where manual intervention is necessary, admins can override estimate statuses or send customised follow-up communications directly from the system dashboard.
This streamlined and automated approach guarantees a transparent, efficient, and customer-centric approval process, reducing turnaround times and enhancing communication between customers, repairers, and administrative staff.
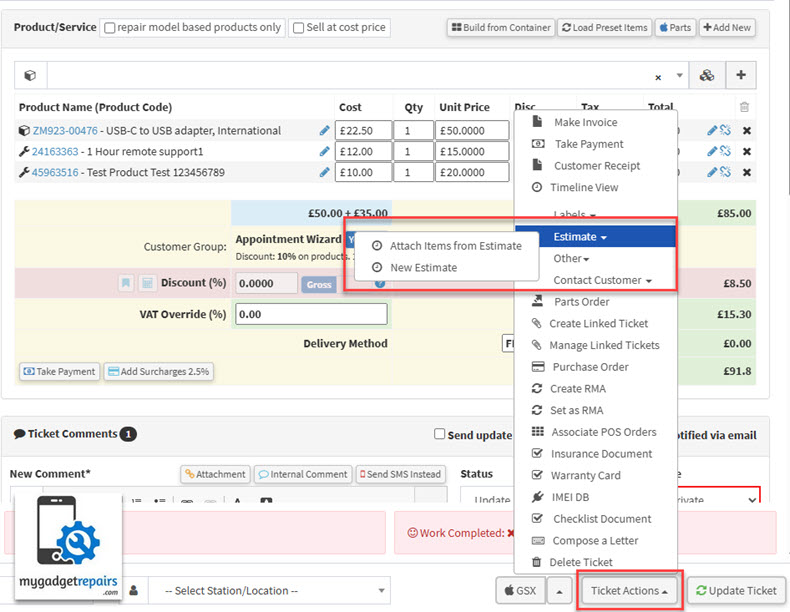
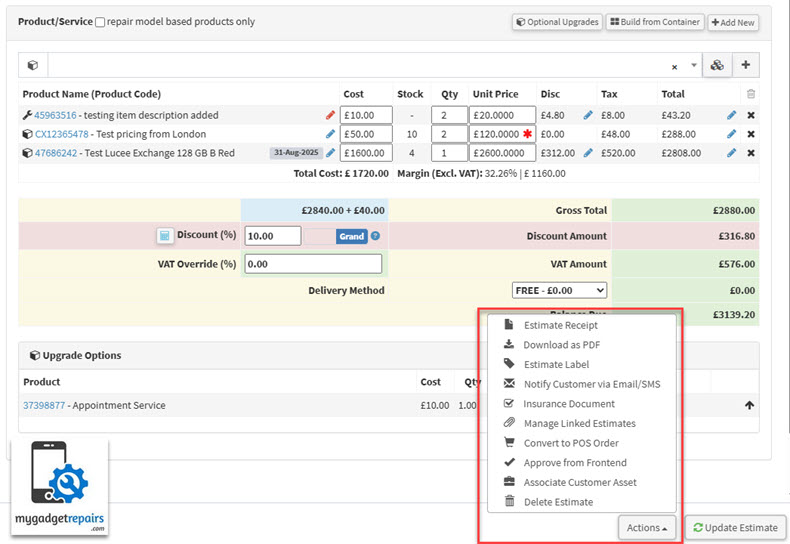
8. Estimate Action Menu Options
In the “Actions” dropdown, you have a range of tools to manage and streamline your estimate process efficiently. These options include:
-
Estimate Receipt: Generate a summary receipt of the estimate, detailing the items, services, and pricing for easy review or record-keeping.
-
Download as PDF: Export the estimate as a PDF file for printing, archiving, or sending outside the system.
-
Estimate Label: Print a label associated with the estimate, ideal for tagging devices or jobs for tracking in physical environments like repair benches or intake counters.
-
Notify Customer via Email/SMS: Instantly send the estimate to the customer through email or SMS. You can include a custom message and even request approval or feedback.
-
Insurance Document: Generate a formal insurance-compatible document outlining the damage, estimated cost, and other required details, useful for claims and approvals.
-
Manage Linked Estimates: View or manage any related or previously linked estimates for the same customer or device. Helpful for tracking multiple revisions or grouped jobs.
-
Convert to Ticket: Convert the estimate directly into a work order or service ticket when approved, seamlessly transitioning the job into the next stage.
-
Attach Items to Ticket: Associate individual line items from the estimate with an existing service ticket. Ideal when the estimate is split across multiple tickets.
-
Approve from Frontend: Allow customer-facing staff (or customers, if frontend approval is enabled) to approve the estimate via the frontend portal or public link.
-
Associate Customer Asset: Link the estimate to a registered customer asset (like a specific device or vehicle), enabling asset-specific history tracking and reporting.
-
Copy Estimate: Create a duplicate of an existing estimate to save time and reduce manual entry. Once copied, you can make necessary adjustments before finalising the new version.
- Delete Estimate: Permanently remove the estimate from the system. This action may require admin permissions and should be used cautiously.
9. Linked Estimates
The Linked Estimates feature is a powerful and convenient tool designed to streamline decision-making for both you and your customers. In many cases, especially for complex or customizable jobs, such as building a new computer, your customer may want to compare multiple options before committing.
For example, you might provide one estimate featuring an Intel-based configuration and another with an AMD-based setup.
By linking these estimates, you allow your customer to view and compare all variations side by side. Once the customer approves one of the linked estimates, the system will automatically mark all other associated estimates as declined. At the same time, the approved estimate will be instantly converted into a job ticket, saving time and reducing manual input.
This feature ensures a smoother workflow, eliminates confusion, and provides a more professional experience for your clients by clearly presenting alternatives and managing their selection efficiently.
10. Insurance Estimate Template
For repair shops handling insurance-related repairs, MGR offers a dedicated Insurance Document Template designed to meet the standard documentation requirements commonly requested by insurance providers. This built-in template helps streamline the entire claims process, saving your team time and ensuring consistency across submissions.
You can fully customise the template through Settings → Template Editor, allowing you to align it with your shop’s branding, preferred format, and any insurer-specific requirements.
Whether you’re dealing with accident repairs, warranty claims, or third-party coverages, MGR helps you present professional, compliant documentation, enhancing trust with both customers and insurance companies.
Key benefits:
-
Preformatted for faster insurance approvals
-
Editable to suit different insurance companies
-
Branded output to reflect your shop’s professionalism
-
Reduces back-and-forth with insurers
Make insurance paperwork a breeze, right from within MGR.
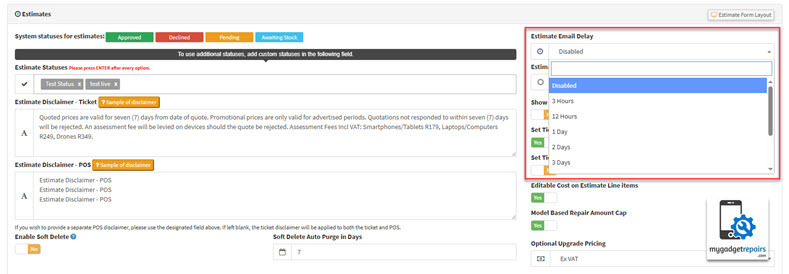
11. Estimate Settings
To help you better manage and convert potential jobs, we’ve introduced a comprehensive set of configurations under System Settings > Estimates. These options allow you to customise how estimates are created, tracked, followed up on, and presented to your customers.
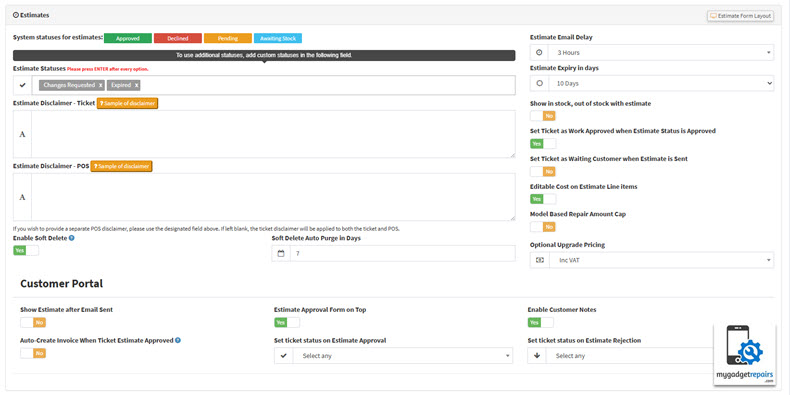
Below is a breakdown of each available setting:
- Estimate Statuses
-
-
System-defined statuses are used to track the life cycle of an estimate.
-
Approved – Customer has approved the estimate.
-
Declined – Customer has rejected the estimate.
-
Pending – Estimate has been created but not sent.
-
Awaiting Stock – Approval pending due to unavailable parts.
-
Changes Requested – Customer has requested modifications.
-
Expired – Estimate validity has lapsed.
-
[Custom Statuses] – Add additional statuses to suit your workflow (e.g., “Under Review”, “Needs Manager Approval”).
-
-
- Estimate Disclaimer – Ticket: Add a custom disclaimer that appears on ticket-based estimates. Useful for including repair terms or liability notices.
- Estimate Disclaimer – POS: Disclaimer shown on POS-generated estimates. May include return policy, warranty info, etc.
- Enable Soft Delete: Allows deletion of estimates without immediate permanent removal. Acts as a recycle bin.
- Soft Delete Auto Purge (Days): Automatically deletes soft-deleted estimates after a set number of days. (e.g., 30 days).
- Estimate Email Delay: Delay (in minutes) before an estimate is emailed after creation. Useful for batching or review.
- Estimate Expiry (Days): Automatically sets an expiry date for estimates (e.g., 7 days after sending). Controls urgency and inventory accuracy.
- Show Stock Status with Estimate: Display In Stock / Out of Stock labels next to line items on the estimate, helping customers understand part availability.
- Auto-Set Ticket as “Work Approved” When Estimate is Approved: When a customer approves an estimate, the ticket status is automatically updated to “Work Approved”.
- Auto-Set Ticket as “Waiting Customer” When Estimate is Sent: Once an estimate is sent, the ticket status is updated to indicate you’re awaiting customer action.
- Editable Cost on Estimate Line Items: Allows manual adjustment of cost per item in the estimate, overriding defaults.
- Model-Based Repair Amount Cap: Set a cap on the estimate value based on the model (e.g., do not allow repairs above $500 for certain devices).
- Optional Upgrade Pricing: Include upsell options in the estimate (e.g., premium parts, extended warranties) as optional checkboxes.
Conclusion
The Estimate Module in My Gadget Repairs is designed to provide a streamlined, flexible, and professional way to manage customer quotes. Whether you’re preparing a quick price for a walk-in repair or creating detailed estimates for complex jobs, this module gives you all the tools you need, from customizable templates and customer approvals to linking and converting estimates into tickets. By leveraging the power of estimates, you not only improve operational efficiency but also build trust and transparency with your customers. Make sure to explore all available features to get the most out of your estimating workflow.
Continuous Improvements
We’re constantly working to enhance the Estimate Module with new features and better functionality to help you convert more prospects. Your feedback is incredibly valuable in shaping these updates.

