The Leads module in My Gadget Repairs (MGR) CRM helps you capture, organise, and convert potential customers who aren’t yet tied to a ticket, estimate, or invoice. By centralising all inbound communication, emails, web inquiries, social-media leads, and more, you can prioritise and track every opportunity, ensuring nothing falls through the cracks.
Table of Contents
1. What Is a Lead?
A lead is an individual or organisation that has shown interest in your product or service and has the potential to become a customer. Leads are the starting point of the sales process and represent potential revenue opportunities for your business. They can come from various sources such as website visitors, referrals, marketing campaigns, social media interactions, trade shows, or inbound inquiries.
Leads typically provide some contact information, such as an email address, phone number, or social media handle, which allows your sales or marketing team to follow up and nurture the relationship. However, not all leads are created equal, some may be highly interested and ready to buy, while others might just be casually browsing or gathering information.
In the context of a CRM or sales funnel, a lead is the raw input that can be qualified, nurtured, and eventually converted into a paying customer. Effective lead management involves identifying, tracking, and engaging these prospects promptly to maximise conversion rates.
-
Key Benefit: Centralises all unassociated messages – website inquiries, widget submissions, emails, etc.
-
Outcome: Converts to an Estimate or Ticket when the customer is ready to purchase.
2. Accessing the Leads Module
The Leads Module is a dedicated section within MGR designed to help you manage and organise all your leads efficiently. Accessing this module is the first step in tracking potential customers, following up on inquiries, and managing your sales pipeline.
Click Leads Manager in the left-hand navigation menu. Inside the Leads Manager, you can perform a variety of important tasks such as:
-
Viewing all current leads: See a comprehensive list of all leads entered into the system, with quick access to their key details.
-
Adding new leads: Manually input new leads or import them in bulk from external sources like CSV files, marketing platforms, or website forms.
-
Filtering and searching leads: Use filters, search bars, and sorting options to quickly find specific leads based on criteria such as status, source, date added, or assigned sales representative.
-
Tracking lead status: Monitor where each lead stands in the sales process, for example, new, contacted, qualified, or disqualified.
-
Assigning leads: Allocate leads to specific team members or sales reps for follow-up and management.
- Lead KPIs & Performance Insights: Access key performance indicators. These metrics provide actionable insights to help optimise your lead generation strategies and boost overall sales efficiency.
Accessing and using the Leads Module effectively allows your sales and marketing teams to stay organised, prioritise prospects, and ensure no opportunities slip through the cracks.
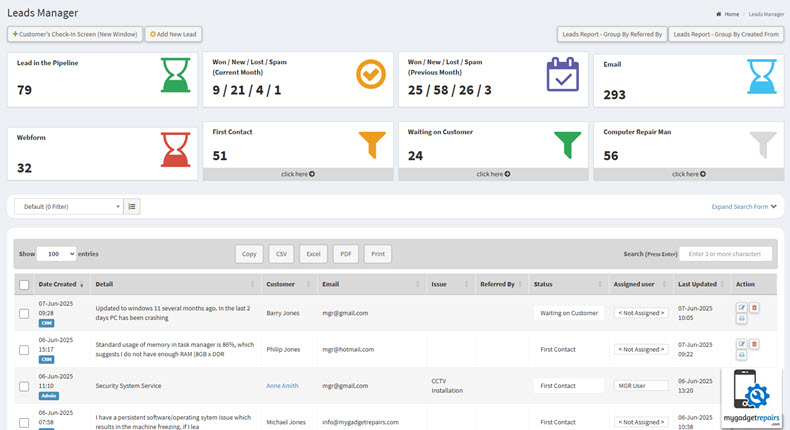
Lead Manager – Key Performance Indicators (KPIs)
The Lead Manager dashboard provides a quick overview of the current sales funnel performance and lead activity trends. Below is a breakdown of the lead status metrics, segmented by current and previous months for comparative analysis:
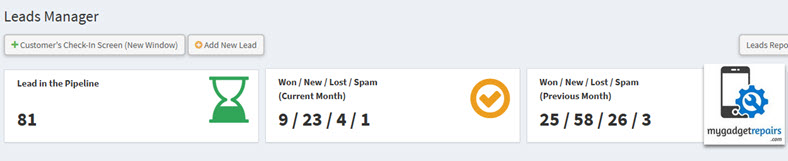
Overall Leads in Pipeline:
-
81 Leads: This represents the total number of active leads currently being tracked in the sales pipeline. These are leads that have not yet been converted, lost, or marked as spam.
Monthly Lead Breakdown
- Current Month (To Date):
-
Won: 9: These leads have successfully converted into paying customers or closed deals.
-
New: 23: Newly added leads in the current month that are yet to be worked on or categorised.
-
Lost: 4: Leads that were actively worked on but did not convert, either due to disinterest, competition, or other factors.
-
Spam: 1: Leads that were identified as irrelevant, fake, or non-business related and flagged accordingly.
-
- Previous Month:
-
Won: 25: Indicates a stronger conversion rate last month, possibly due to a higher volume of mature leads or better engagement.
-
New: 58: A significantly higher number of new leads were acquired last month, suggesting higher campaign reach or inbound activity.
-
Lost: 26: A considerable number of leads failed to convert last month, which may need further analysis to determine reasons (e.g., qualification issues, follow-up gaps).
-
Spam: 3: A slightly higher spam count, possibly from marketing campaigns or bot-generated submissions.
-
Observations & Insights:
-
There is a notable drop in both New and Won leads this month compared to the previous month, which might suggest slower outreach, seasonal impact, or campaign performance fluctuations.
-
The conversion rate (Won/New) for the current month is approximately 39%, which is relatively healthy but needs monitoring due to the smaller lead pool.
-
The drop in Lost leads this month (from 26 to 4) could indicate improved qualification or that leads are still in earlier stages of the funnel.
-
Spam rates remain low, showing good lead quality filtering overall.
This KPI snapshot is useful for sales teams and management to understand lead flow, assess the effectiveness of marketing and sales efforts, and adjust strategies accordingly.
Search Form – Saved Searches – Rolling Dates:
Our Lead Search Form offers powerful filtering capabilities to help you find exactly the data you need. With a wide range of filterable fields—including status, source, assigned user, creation date, and more—you can tailor your search to match your specific workflow and reporting needs.
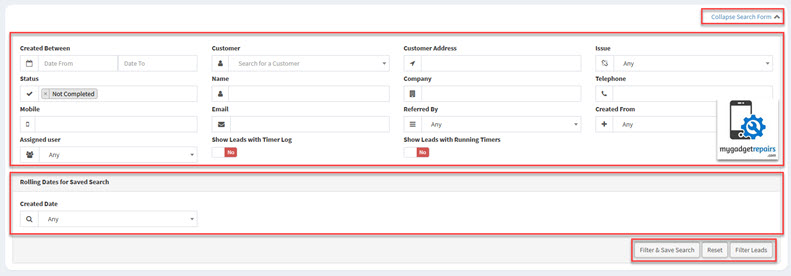
To save time and increase efficiency, you can save your most commonly used search criteria as a Saved Search. This feature allows you to quickly re-run specific filters without having to set them each time manually.
What is a Saved Search?
A Saved Search lets you preserve a set of filter conditions for repeated use. Whether you’re tracking leads from a particular campaign, monitoring follow-ups assigned to specific agents, or reviewing weekly performance metrics, saved searches ensure you have quick access to that information at any time.
Key benefits:
-
Save time on repetitive filtering tasks.
-
Create multiple saved views for different users or departments.
-
Combine with Rolling Dates to create live, always-up-to-date dashboards and activity boxes.
Rolling Dates: Always Relevant Time Filters
Rolling Dates are dynamic, relative time filters that automatically update based on the current date. Instead of selecting fixed calendar dates, you can use rolling date ranges to ensure your saved searches and reports stay relevant without manual updates.
Available Rolling Date options:
-
Today – Only includes records from today.
-
Yesterday – Includes only yesterday’s records.
-
Last 7 Days – Covers the last 7 days, including today.
-
Last 14 Days – Last two weeks of data, including today.
-
Last 21 Days – Last three weeks, including today.
-
Last 30 Days – Last full month of data, including today.
-
Last Week – Monday to Sunday of the previous week.
-
This Week – Monday to today of the current week.
-
Last Month – Entire previous calendar month.
-
This Month – From the start of the current month to today.
-
Last Month to Date – From the first to the current day of last month.
-
This Year – From January 1st to today of the current year.
-
Last Year – The Entire previous calendar year.
These Rolling Date ranges are perfect for tracking performance, measuring trends, and automating reporting. When combined with Saved Searches, they enable you to create real-time Activity Boxes, performance widgets, or dashboards that always show the latest and most relevant data.
Use Case Example:
You could create a Saved Search named “My New Leads This Week“, filtering leads assigned to you with a created date of “This Week”. Every time you access it, it will automatically show leads added from Monday to today, keeping your view fresh and relevant.
3. Creating a Lead
Creating a lead is the starting point of your sales journey. A lead represents a potential customer who has shown interest in your services or who your team has identified as a potential fit.
MGR offers a comprehensive range of omni-channel solutions designed to seamlessly capture and integrate leads from multiple sources into the system. Whether through web forms, social media platforms, email campaigns, live chat, phone calls, or in-person interactions, MGR ensures that every potential customer touchpoint is covered, maximising lead acquisition and enabling efficient, centralised management of all incoming leads.

-
Leads Manager
-
Click Add New Lead → Fill in details (or create a new customer on the fly).
-

-
-
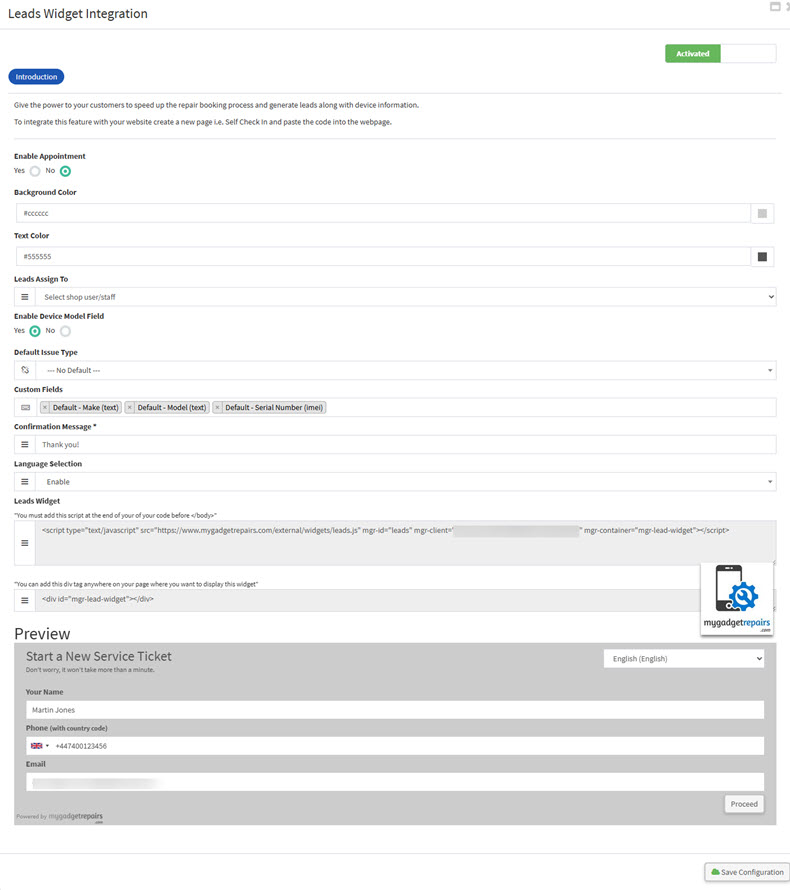
Website Widget
-
Embed the widget on your site or portals. 3rd Party Integration → Leads Widget
-
Fill in the details. Map custom ticket fields (e.g., IMEI/Serial) for lead capture.
-
-
-
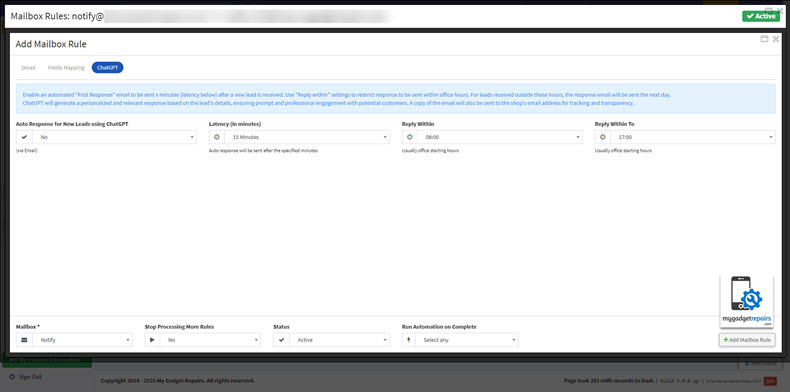
Mailbox Integration
-
Email rules match inbound messages from Facebook, LinkedIn, etc., and auto-create leads.
-
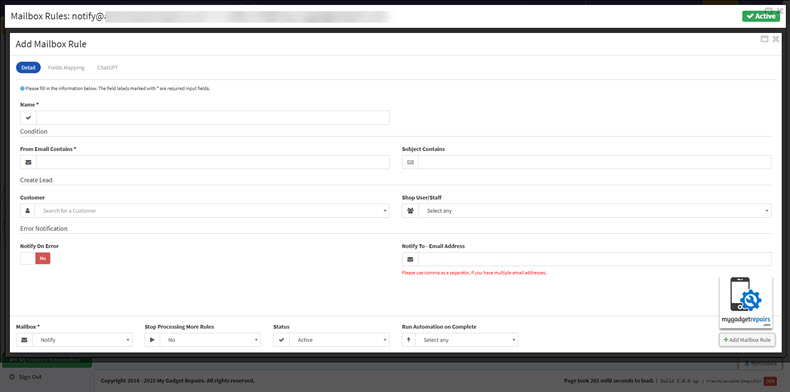
Field Mapping:
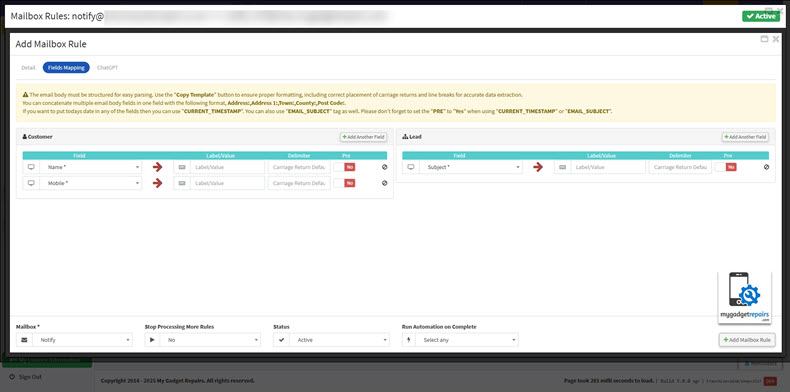
ChatGPT Autoresponders:
- For more information, please read this KB article.
-
-
Public API
-
Developers can create/update leads via REST endpoints. MGR can also create leads automatically from third-party apps or systems via:
-
API endpoints (e.g., leads coming from a partner system or online marketplace)
-
Integrations with marketing platforms (like Mailchimp, Meta Ads, or Google Ads) that generate leads.
-
-

- For more information, please read this KB article.
-
-
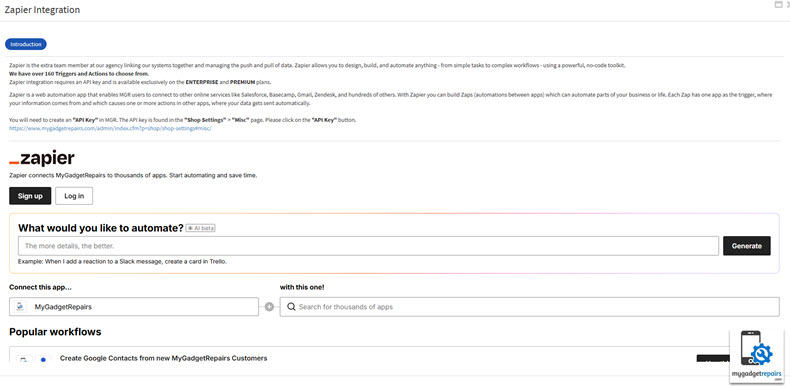
Zapier Integration
-
Predefined Zaps map external lead sources into MGR without coding.
-
-
-
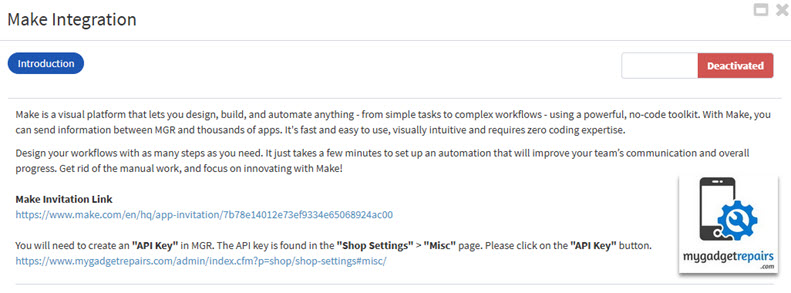
Make (formerly Integromat) Integration
-
Automate external lead sources into MGR without coding.
-
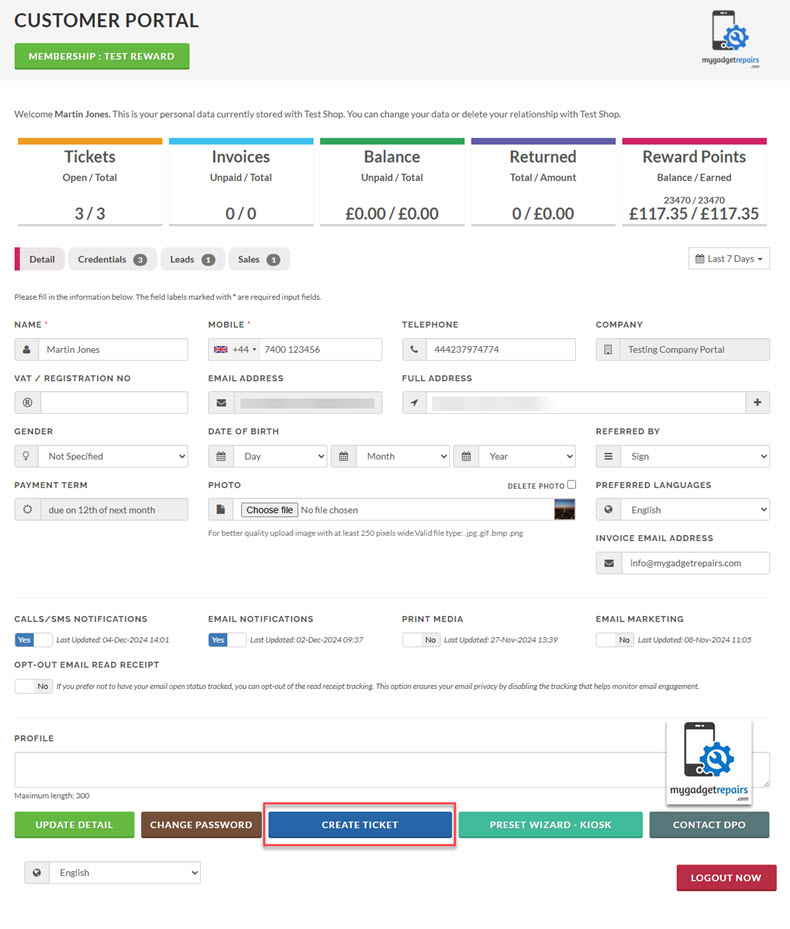
- Customer Portal
- Leads can also be created through your Customer Portal, a self-service platform where potential customers can register or submit inquiries directly.
-
When your customers submit a service request via the portal, their information automatically creates a lead in the MGR. This ensures seamless lead capture from your website or customer-facing platform, minimising manual data entry and accelerating follow-up.
- Please note that although the button is labelled “Create Ticket,” the system generates a lead instead.
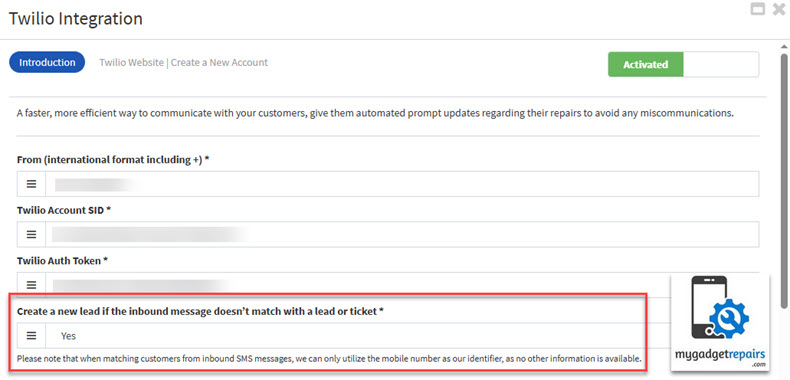
- Inbound SMS – Integrations
-
Many businesses receive customer inquiries or leads via SMS. With Inbound SMS integrations, any messages sent to your business number can be automatically captured and processed to create new leads within MGR. All SMS integrations include the following feature:
“Create a new lead if the inbound message doesn’t match an existing lead or open ticket.”
This ensures that every unique customer message is accounted for without duplication, allowing your team to efficiently track and follow up on new potential customers. If the incoming SMS content does not correspond to any existing lead or active support ticket, MGR will automatically generate a new lead record, helping you capture all opportunities seamlessly and preventing any inquiries from being missed.
-
4. Associating Customers
Once a lead is created in MGR, you have two possible scenarios regarding customer association:
-
The customer already exists in the system
-
The customer is not yet in the system
As illustrated in the screenshot below, in this example, Michael does not currently exist in MGR as a customer. Therefore, the system presents you with two options:
-
Create a New Customer
-
Attach to an Existing Customer
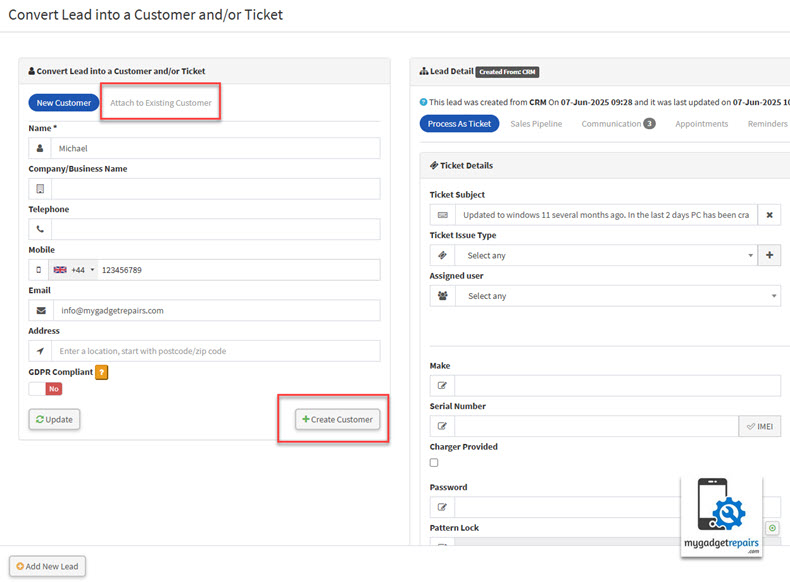
When you select the “Attach to an Existing Customer” tab, you are given access to the entire customer database. From there, you can search for and select the correct customer. Once found, simply click on the “Attach Customer” button to link the lead to that customer.
💡 Best Practice:
Always check if the customer already exists in MGR before creating a new one. This ensures data consistency, avoids duplicates, and helps maintain accurate customer records.
Automatic Lead Association
MGR also offers intelligent lead matching to streamline this process. For example:
-
If the lead is created through the widget, and the customer is logged into the customer portal, the system will automatically link the lead to that logged-in customer.
-
For leads generated via the mailbox integration, MGR will try to automatically match the lead using a combination of name, email address, and mobile number. If it finds a perfect match, it will assign the lead accordingly.
Integration Scenarios (API / Zapier / Make)
If you’re using API or Zapier/Make integrations, a similar process can be implemented. Before creating a lead, you can add a “Find Customer” step to perform a lookup based on email, name, or phone number. This ensures that the lead is linked to the correct customer record if it already exists.
When the customer is already present in MGR. Notice that there’s no option to create or attach a new customer, this is because the system has already identified the customer and linked them correctly.
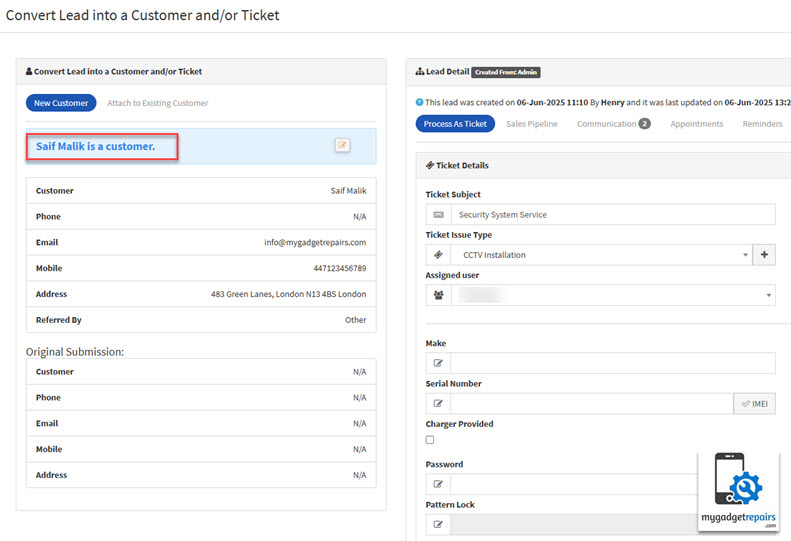
Key Takeaway
Effectively managing customer associations is one of the most important early steps when handling new inquiries in MGR. Whenever a new lead is created, it is essential to review the information thoroughly to determine whether the lead already exists as a customer in the system. This helps prevent duplicate records, ensures accurate communication history, and maintains data integrity across your CRM.
Before creating a new customer profile, always verify that the lead is not already associated with an existing customer. If a match is found, link the lead to the correct customer record instead of creating a new one.
Only convert a lead into a customer once they have demonstrated genuine interest in your services or engaged in meaningful dialogue. Leads that are clearly irrelevant, unresponsive, or promotional in nature should be promptly marked as “Spam” to keep your pipeline clean and focused.
5. Assigning, Status & Pipeline
Assigning leads to the appropriate staff members is essential for maximising conversion potential and ensuring each lead receives the attention it deserves. Certain staff may be designated to handle specific types of leads based on expertise, region, service category, or other business-defined criteria. This targeted allocation enhances efficiency and increases the chances of successfully converting a lead into a customer.
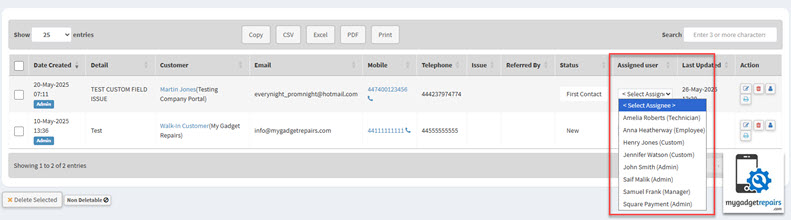
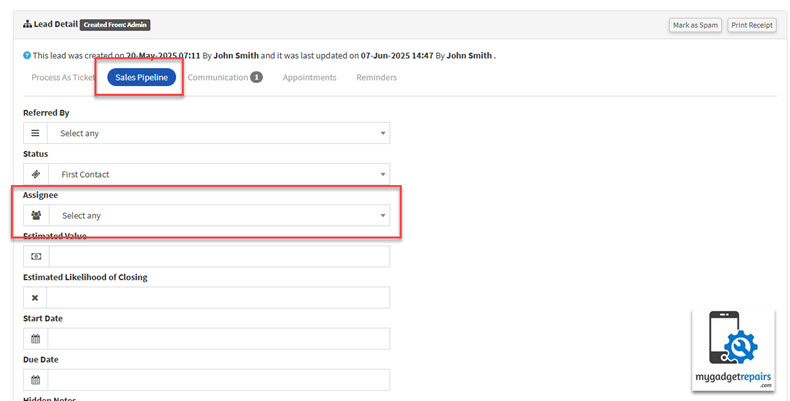
The assignment process mirrors the method used for ticket or estimate allocation. Simply select the relevant staff member from the dropdown menu, either directly from the Leads Manager screen or within the individual lead popup window.
From Leads Manager: Assign Staff
From Individual Lead: Assign Staff
Upon assignment, automated notifications are triggered to ensure prompt awareness. Specifically:
-
Notification #23 is sent to the admin to keep them informed of the assignment.
-
Notification #24 is sent to the assigned staff member, either via email or SMS, depending on their preferred communication method.
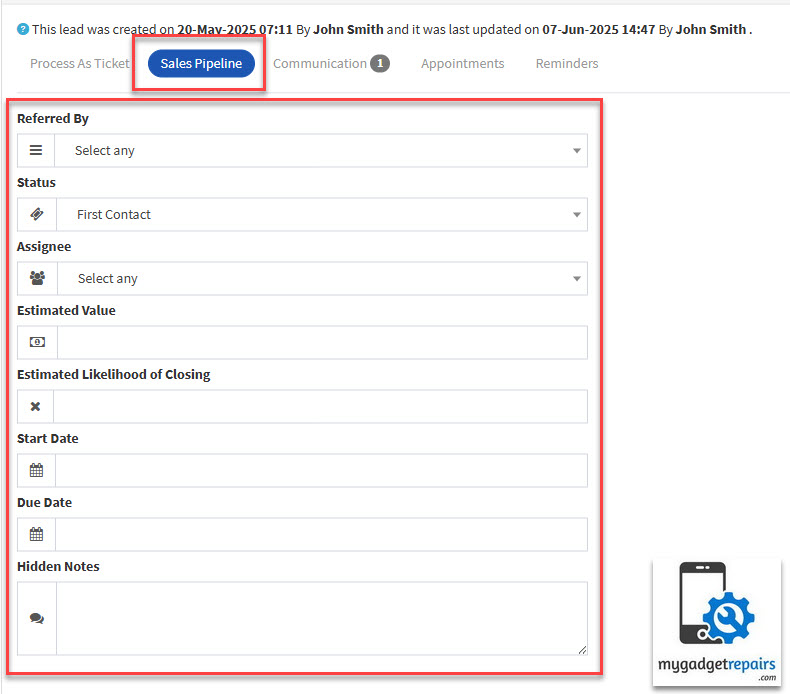
Once a lead is assigned, the staff member gains full ownership of the lead’s journey through the lead pipeline. This pipeline begins with the status “New” and progresses through key stages such as:
-
First Contact
-
Opportunity
-
In Negotiation
-
Won or Lost
This structured progression allows your team to manage and monitor every interaction, follow-up, and decision point systematically. The lead pipeline is not only a powerful sales tool but also a critical business intelligence asset. It enables business owners and sales managers to:
-
Evaluate the effectiveness of sales strategies,
-
Forecast potential revenue,
-
Identify bottlenecks, and
-
Optimise the overall sales process.
Preparing for Conversion
While managing the lead, relevant information is continuously gathered and recorded. This streamlines the process when converting the lead into a ticket or estimate, based on the customer’s needs. If the customer prefers to see pricing first, an estimate can be created. Otherwise, the system allows direct conversion to a support or job ticket.
Strategies to Successfully Convert Leads
Winning a lead requires more than just process, it demands skill, insight, and a customer-centric approach. Here are some proven strategies to improve your chances of success:
1. Understand the Lead’s Needs
Take time to deeply understand the lead’s pain points, expectations, and goals. Ask thoughtful, open-ended questions, and actively listen to their responses. This insight allows you to tailor your offerings in a way that directly addresses their unique challenges.
2. Deliver Value Early
Whether it’s through a consultation, a demonstration, or insightful content, provide immediate value. Show them how your product or service can solve their problem or improve their situation. This positions you as a helpful resource, not just a salesperson.
3. Build Trust Through Professionalism
Maintain a professional tone in every interaction. Respond promptly, communicate clearly, and follow through on commitments. Trust is a cornerstone of any successful sales relationship.
4. Follow Up Consistently
Many leads are lost simply due to a lack of follow-up. Implement a structured follow-up cadence with reminders and status checks to show ongoing interest and support. Persistence, when done respectfully, demonstrates reliability.
5. Personalise Your Approach
Avoid generic pitches. Use the information you’ve gathered to personalise your communication, recommendations, and proposals. A tailored approach makes the lead feel understood and valued.
6. Leverage Social Proof and Testimonials
Reinforce your credibility by sharing success stories, case studies, or client testimonials. Leads are more likely to convert when they see others have benefited from your solution.
7. Be Transparent
Don’t overpromise or gloss over potential limitations. Be honest about pricing, timelines, and deliverables. Transparency builds confidence and long-term customer loyalty.
By combining effective staff assignment with a robust pipeline management system and a strategic, personalised sales approach, businesses can dramatically increase their lead-to-customer conversion rates and build stronger, lasting relationships with their clients.
6. Communications
In the competitive world of customer engagement, effective communication isn’t just a benefit, it’s a necessity. Strong communication builds trust, fosters relationships, and significantly increases your chances of converting a lead into a loyal customer.
At MGR, we understand the importance of timely and targeted communication. That’s why we offer a range of communication tools, Email, SMS, and Calls, seamlessly integrated within your CRM to ensure you never miss an opportunity to connect.
And to make things even better, all communication interfaces in MGR are enhanced with ChatGPT (if the integration is enabled). This powerful feature assists you in crafting clear, professional, and effective messages quickly, saving time while elevating the quality of your customer interactions.
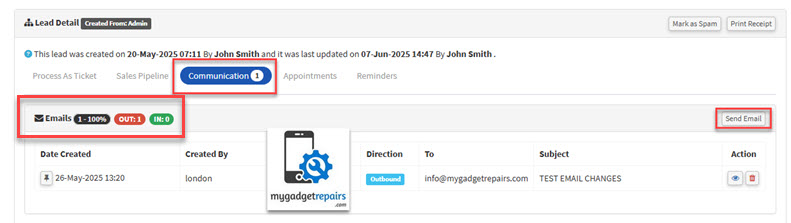
Email Communication
To send an email to a lead, simply click the “Send Email” button. A user-friendly pop-up will appear, allowing you to compose a personalised message. If you have the ChatGPT integration enabled, you’ll see a built-in assistant that can help you draft your email. Once your message is ready, click “Send Email” to deliver it directly to the customer.
Please note: In order to send emails related to a lead, the associated customer must have “Email Notifications” enabled. If this setting is not enabled, the option to send an email will be disabled (greyed out).
To enable this, navigate to the customer profile and ensure the “Email Notifications” checkbox is ticked. This ensures compliance with communication preferences and prevents unauthorised or unwanted emails.
If the customer replies, the system will automatically associate their response with the lead, ensuring all communication remains centralised. You’ll also receive a real-time notification alerting you of the reply.
🔔 Note: To use this feature, you must have the Mailbox integration enabled. For step-by-step setup instructions, please refer to the knowledge base article.
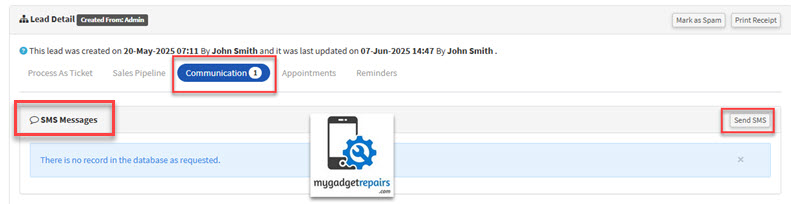
SMS Messaging
Need to send a quick update or reminder? MGR allows you to send SMS messages directly from the lead profile. Just ensure your SMS integration is enabled.
You can also schedule SMS messages for later delivery, perfect for appointment reminders or time-sensitive promotions.
Please note: In order to send SMS messages to a lead, the associated customer must opt in to receive Calls/SMS notifications. If the customer has not provided this consent, the SMS option will be disabled (greyed out) for compliance and privacy reasons. To enable messaging, ensure that the customer’s communication preferences are updated accordingly under their profile settings.
If your SMS service supports inbound messaging, any customer replies will automatically be linked to the corresponding lead, and you’ll receive an instant notification of the incoming message.
And with ChatGPT assistance built into the SMS interface, you can compose clear, friendly, and concise text messages in seconds, even if you’re not sure what to say.
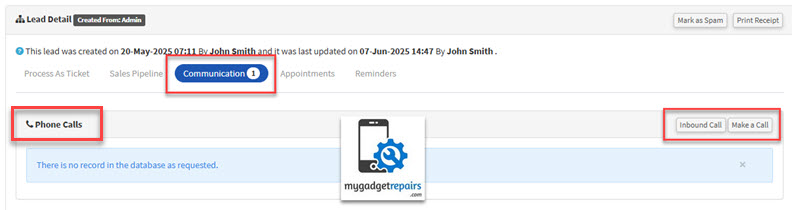
Voice Calls (VOIP Integration)
With VOIP integration enabled, you can initiate calls directly from within MGR. Click the “Make Call” button to open a call window, where you can also add notes before, during, or after the conversation. This ensures every phone interaction is well-documented and easily accessible for future reference.
Whether it’s a quick follow-up or a detailed consultation, capturing call notes helps your team stay informed and aligned.
ChatGPT can even suggest conversation prompts or note summaries, helping you prepare for calls or document them more effectively.
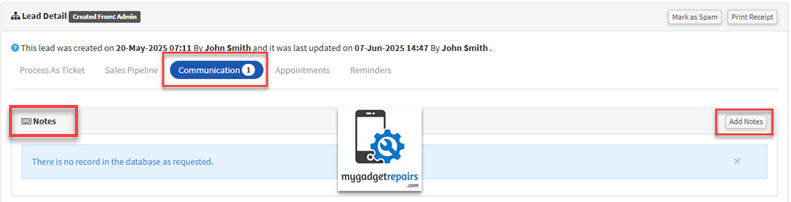
Internal Notes
Sometimes, you may just want to jot down a quick note, maybe a customer preference, a follow-up reminder, or a lead-specific detail that’s not tied to a message or call. MGR’s Notes feature lets you do exactly that.
These plain-text notes are a simple yet powerful way to track ongoing lead interactions, collaborate with your team, and ensure nothing slips through the cracks.
ChatGPT can help here too, suggesting note formats or summarising your input for consistency and clarity.
Key Takeaway
-
Use the right channel for the right moment, email for detailed info, SMS for quick touchpoints, and calls for high-value conversations.
-
Ensure your Mailbox, SMS, and VOIP integrations are enabled to take full advantage of MGR’s communication features.
-
Stay organised, responsive, and professional, key traits that help you win and retain customers.
-
Enable ChatGPT integration to assist in writing professional, engaging, and thoughtful responses across all channels.
-
Automate intelligently: Let MGR organise and assign replies to leads automatically, saving you from manual tracking.
By combining MGR’s powerful communication tools with the intelligence of ChatGPT, you can provide faster, smarter, and more personalised experiences, exactly what today’s customers expect.
7. Appointments & Reminders
From time to time, it’s essential to schedule appointments and set timely reminders when managing your leads. These tools are not just organisational aids, they play a critical role in driving lead engagement, building trust, and ultimately increasing your conversion rates. Leveraging appointments and reminders effectively demonstrates professionalism and commitment, significantly improving customer satisfaction and your overall sales performance.
Appointments help establish a clear and structured communication channel with your leads or customers, allowing you to guide them through their journey confidently. Meanwhile, reminders serve as timely nudges to follow up on conversations, check in with prospects, or prompt next steps, all of which are key to maintaining momentum in the sales cycle.
Neglecting to follow up or forgetting scheduled appointments can lead to missed opportunities, lost revenue, and damage to your business’s reputation. A simple missed call or delayed message could create frustration for the lead and give the impression of disorganisation or lack of interest. On the other hand, consistent and proactive communication helps you stay top-of-mind and positions your business as reliable and attentive.
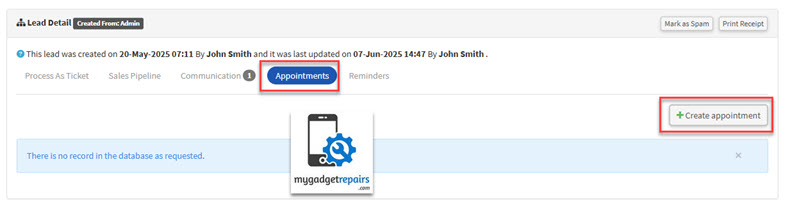
Creating an Appointment
To schedule a new appointment, click on the “Create Appointment” button. A pop-up will appear, displaying your calendar on the left side to help prevent double bookings. On the right-hand side, you can enter the appointment details, including the date, time, and purpose of the meeting. Once complete, click “Create Appointment” to finalise it. An email notification will automatically be sent to the customer, ensuring they’re informed, and the appointment will be recorded in both your calendar and the lead’s profile for easy reference.
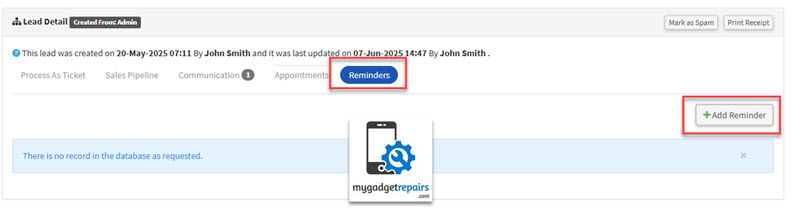
Creating a Reminder
To set a new reminder, click on the “Add Reminder” button. In the pop-up window, choose the reminder date and add relevant notes to describe the purpose, such as a follow-up call, email check-in, or a service update. For example, if you want to call the customer two days after your initial conversation, setting a reminder ensures that this critical step isn’t overlooked.
Appointments and reminders are your strategic allies in lead management, helping you stay organised, responsive, and in control. In a fast-paced environment where timing and personalisation matter, these tools can be the difference between closing a deal and losing it.
Make it a habit to use appointments and reminders consistently, and you’ll not only streamline your workflow but also build stronger, more loyal relationships with your leads and customers.
8. Lead Timers
Capturing the time you spend on each lead is not just a helpful habit, it’s a strategic advantage. MGR makes it easy to track this time, empowering you to improve your sales process, prioritise high-value opportunities, and make smarter decisions based on data.
Why Track Time on Leads?
-
Gain Insight Into Your Sales Pipeline
Understanding how long it takes to convert a lead into a customer is essential. By tracking time, you can identify bottlenecks in your sales process and refine your workflows to improve efficiency and conversion rates. -
Prioritise Your Efforts
Some leads move faster than others. By tracking time, you can spot which leads are progressing efficiently and which are consuming more time than they’re worth, helping you focus your attention where it matters most. -
Evaluate Lead Quality
Spending excessive time on a stagnant lead? Time tracking gives you the visibility to reassess whether that lead deserves more attention or if it’s time to move on and allocate your resources more effectively.
How It Works in MGR
MGR makes lead time tracking simple and visual:
-
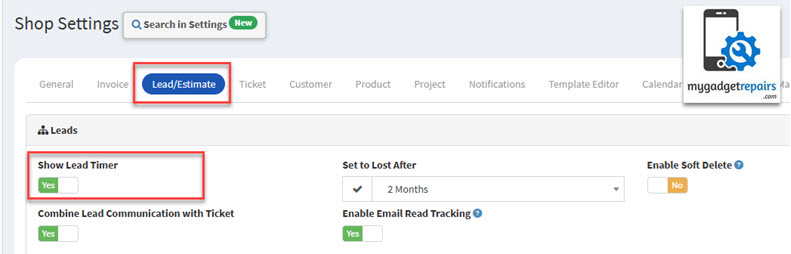
Enable the Timer Feature
First, head to Settings > Leads and toggle the option “Show Lead Timer” to Yes. This activates the lead timer feature across your account.
-
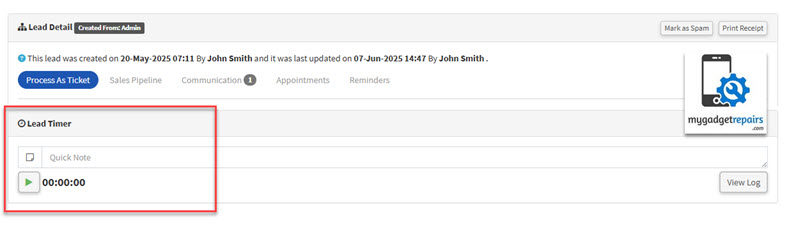
Start Tracking Time
To start tracking time on a lead, open the lead detail, add a note (optional), and click the play icon. This starts the timer and switches the icon to stop, allowing you to pause or stop the timer anytime.
-
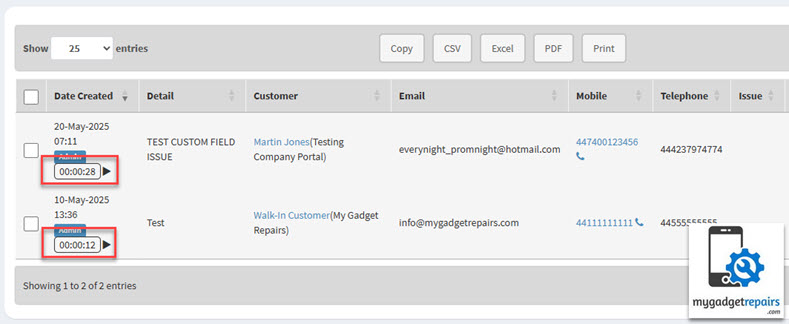
Visual Indicators in Lead Manager
Back in the Lead Manager, you’ll see a play icon on any lead with an active timer. This gives everyone on your team visibility into who is currently working on which leads and how much time has been invested so far.
-
Transparency for Team Leads and Shop Owners
Having visibility into active lead timers allows team leads or shop owners to monitor workload distribution and staff activity. It also helps ensure that leads aren’t being neglected or overworked without measurable progress.
Create Smart Filters and Counters
MGR allows you to segment and monitor time-tracked leads using Saved Searches and Activity Boxes:
-
Leads With Logged Time
-
Expand the search form and set “Show leads with timer log” to Yes.
-
Click Filter and Save Search.
-
Name it something like “Leads with Time”.
-
Enable “Show in Activity Boxes” and click Save as New Search.
-
A new counter will appear showing how much time leads have tracked.
-
-
Leads With Active Timers
-
Similarly, set “Show leads with running timer” to Yes in the search form.
-
Save the search as “Leads with Running Timer” and enable it for activity boxes.
-
The system will now show a live count of leads with active timers.
For example, if there are 2 leads with currently running timers, you’ll see a counter showing “2”. Clicking the “Click here” link opens a filtered view showing just those leads.
-
-
Dynamic Updates
Stop the timer on one of the leads by clicking Edit > Stop Timer. When you return to the Lead Manager, the “Leads with Running Timer” counter will automatically update, reflecting the change (e.g., from 2 to 1).
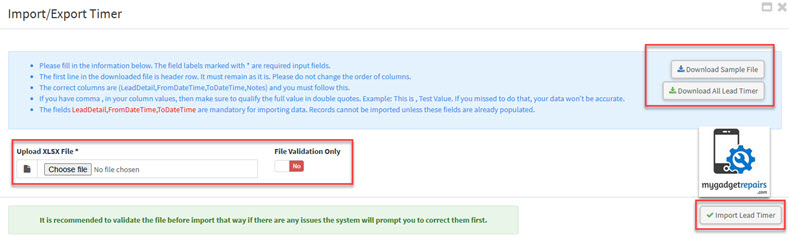
You can easily import or export lead timers as needed, whether you’re updating existing records or performing a bulk operation. This feature is especially useful for large-scale data management or migrating information between systems. A sample file is provided to guide you through the correct format and ensure a smooth import process. Exported data is available in a structured format for easy analysis or backup.

Import/Export Interface
Tracking time on leads isn’t just about logging hours, it’s about making smarter decisions. With MGR’s lead timer, you gain:
-
Greater transparency into your sales activities
-
Data-driven prioritisation of leads
-
Enhanced team accountability and performance tracking
-
Efficient time management and process optimisation
By enabling and actively using the lead timer, you’re setting your team up for greater productivity and higher conversion success. Take control of your sales process today, activate the lead timer and unlock deeper insights into how your team works.
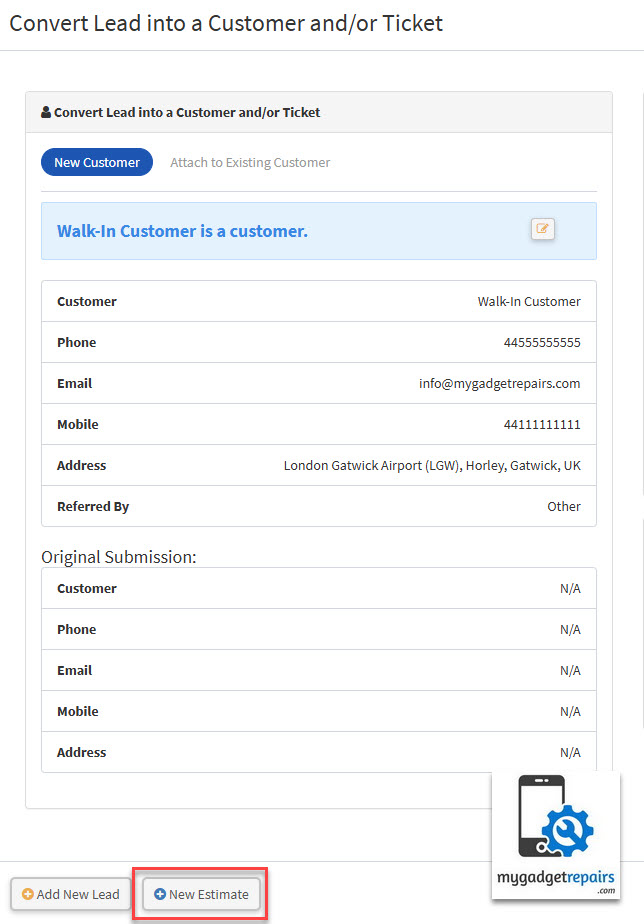
9. Converting a Lead
Once a lead reaches the decision-making stage, the next step is to either create a ticket or generate an estimate, depending on the customer’s preference. Let’s begin with creating a ticket.
In some cases, a ticket might already exist before the lead is captured, for example, if the customer walked in or contacted you directly for a repair. In such scenarios, you can associate the lead with an existing open ticket. Simply click on the “Associate with Ticket” option from “Ticket Actions“, which opens a pop-up form where you can search and select from open tickets. This ensures seamless integration between lead management and ticketing, avoiding duplicate data and keeping all interactions unified.
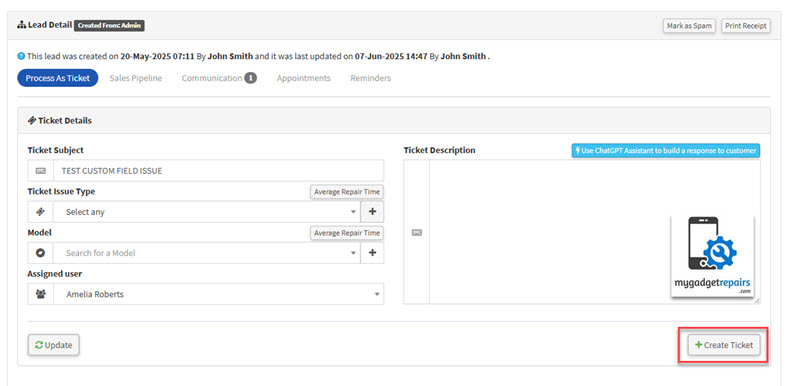
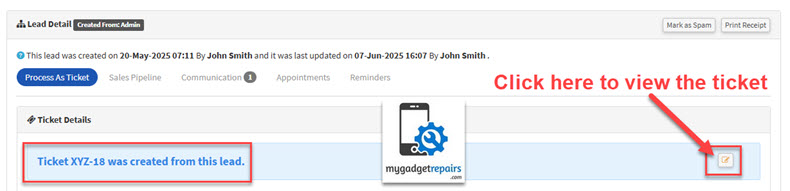
For this walkthrough, however, we’ll demonstrate how to create a new ticket from the lead. Click on the “Create Ticket” button, and the system will ask for confirmation. Click OK to proceed. Once confirmed, MGR will generate a new ticket, display a success message, and provide a clickable ticket icon. Click on this icon to navigate directly to the newly created ticket.
On the ticket screen, you’ll notice a clear indicator that this ticket originated from a lead. A dedicated button allows you to jump straight to the lead details, displaying its full history, communications, and timeline. Importantly, the system will automatically set the lead status to “Won” upon successful ticket creation.
However, please note: if there is an active timer running on the lead or any linked item, the system will prevent ticket conversion until the timer is stopped. This safeguard ensures accurate time tracking and avoids accidental billing discrepancies.
Alternatively, instead of a ticket, you may wish to provide the customer with an estimate. MGR supports creating multiple estimates per lead, which is especially useful when customers are comparing repair options or awaiting approval. Creating an estimate will not immediately mark the lead as “Won.” The lead will only be updated to “Won” status when an estimate is successfully converted into a ticket.
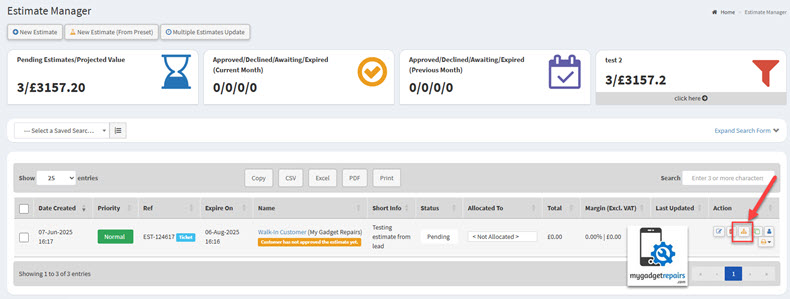
Once an estimate is created, a new tab labelled “Estimates” will appear on the lead view, listing all estimates associated with the lead. Each estimate entry features an Edit icon under the “Actions” column. Clicking this allows you to review and modify the estimate, which is helpful when responding to customer feedback or updating parts/labour costs.
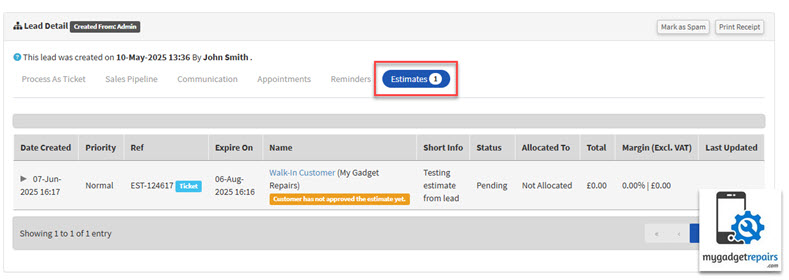
Every estimate displays its association with the originating lead, maintaining a transparent link between lead activity and potential work.
Ultimately, the Lead Module in MGR serves as a powerful conversion tool, driving business by guiding potential customers into either repair jobs (tickets) or sales (POS orders) based on their individual needs. Its ability to track, manage, and convert leads directly impacts business performance, helping improve operational efficiency, close more sales, and increase customer satisfaction.
By leveraging this module effectively, teams can ensure no opportunity is missed and every customer interaction is captured, tracked, and actioned with precision.
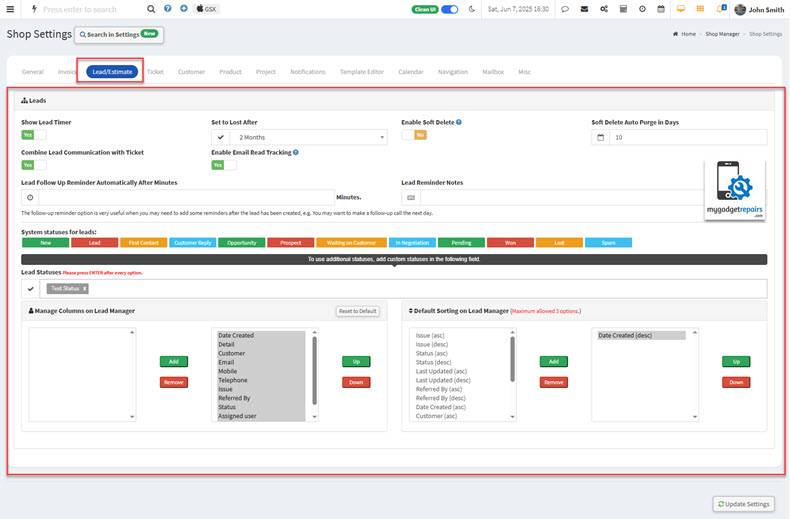
10. Leads Settings
To help you better manage and convert potential customers, we’ve included a dedicated set of configurations under System Settings > Leads. These options allow you to tailor how leads are tracked, followed up, and displayed.
Below is a breakdown of each available setting:
Lead Settings Explained
-
Show Lead Timer: Enables a timer on each lead, tracking how long the lead has been open. This is useful for performance monitoring and improving response times.
-
Set to Lost After: Automatically marks leads as “Lost” if no action is taken within a set number of days. This helps keep your lead pipeline clean and focused on active opportunities.
-
Enable Soft Delete: Allows leads to be “soft deleted“, meaning they are hidden from the interface but not permanently removed. You can restore them later if needed.
-
Soft Delete Auto Purge in Days: Automatically and permanently deletes soft-deleted leads after a specified number of days, ensuring data hygiene and freeing up system resources.
-
Combine Lead Communication with Ticket: Merges lead-related emails and notes into the corresponding ticket once the lead is converted. This keeps the communication history intact and in one place.
-
Enable Email Read Tracking: Tracks when emails sent to leads are opened. This helps you gauge engagement and follow up more effectively.
-
Lead Follow-Up Reminder Automatically After Minutes: Automatically creates a reminder a certain number of minutes after a lead is created. Great for ensuring that no new leads are overlooked.
-
Lead Reminder Notes: Add default notes or prompts for reminders to guide your team on what to follow up with, helping standardise your approach.
-
Lead Statuses: Create additional status options. These statuses help in categorising and progressing leads through your funnel.
-
The following statuses are already created for you. Only add custom statuses if needed and avoid duplicating these:
-
NewLead
-
First Contact
-
Customer Reply
-
Opportunity
-
Prospect
-
Waiting on Customer
-
In Negotiation
-
Pending
-
Won
-
Lost
-
Spam
-
-
-
Manage Columns on Lead Manager: Configure which columns are visible in the Lead Manager view. Tailor the data to what’s most important for your workflow.
-
Default Sorting on Lead Manager: Set how leads should be sorted by default, such as by creation date, last updated, status, or priority, for improved usability and clarity.
11. Reports
The Lead section includes a set of powerful reports designed to give you actionable insights into your leads. Each report is equipped with a flexible search and filter form, allowing you to narrow down results based on specific date ranges, sources, users, and other criteria relevant to your business needs.
Available Reports:
-
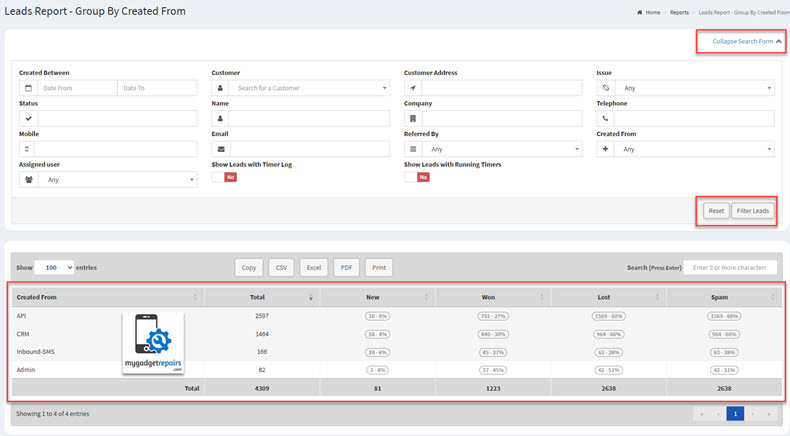
Group By Created From: This report categorises leads based on their creation source, whether they originated from your website, manual entry, third-party integrations, or walk-ins. This helps you identify which channels are performing best in attracting new leads.
-
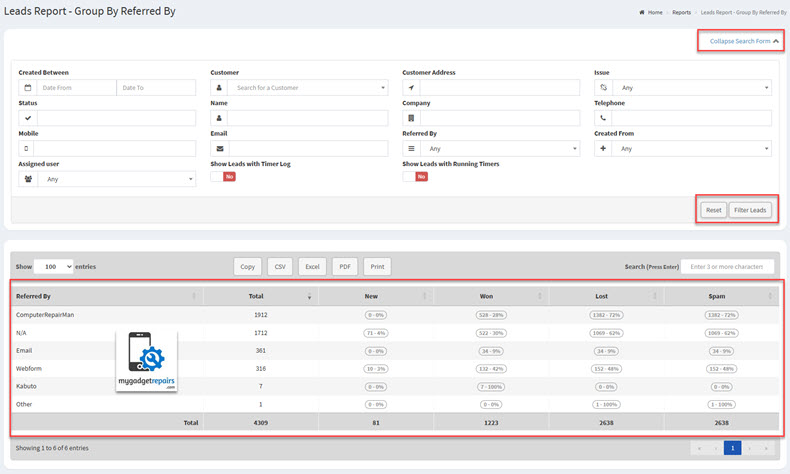
Group By Referred By: This report segments leads according to referral sources such as existing customers, affiliates, partners, or marketing campaigns. It provides valuable insight into who or what is driving referrals, enabling you to optimise your referral programs.
Continuous Improvements
We’re constantly working to enhance the Leads Module with new features and better functionality to help you convert more prospects. Your feedback is incredibly valuable in shaping these updates.

